VIPERBase
VIPERBase 是一个用于 iOS 平台的 VIPER 架构实现。
本项目的目标是让 VIPER 的使用和采用更加容易,简化与该架构一起工作时所需的所有设置,并尽可能减少由此特性产生的手动工作。
安装
CocoaPods
CocoaPods 是 Cocoa 项目的依赖管理器。要将 VIPERBase 集成到您的 xcode 项目中,请指定其在您的 Podfile 中
pod 'viper-base', '~> 2.1'Xcode 模板安装
使用 VIPER 时最糟糕的体验可能是自己创建所有必需的文件、类和协议。这极大地影响了生产力,使一个简单任务变得相当耗时。
Xcode 允许我们创建个性化的模板。有了这个资源,我们决定创建一个 专门为 VIPERBase 定制的模板。使用此模板,将不再需要进行手动操作。
有关安装和使用我们模板的说明,请参阅此 教程。
模块概述
模块代表应用中的一个屏幕。
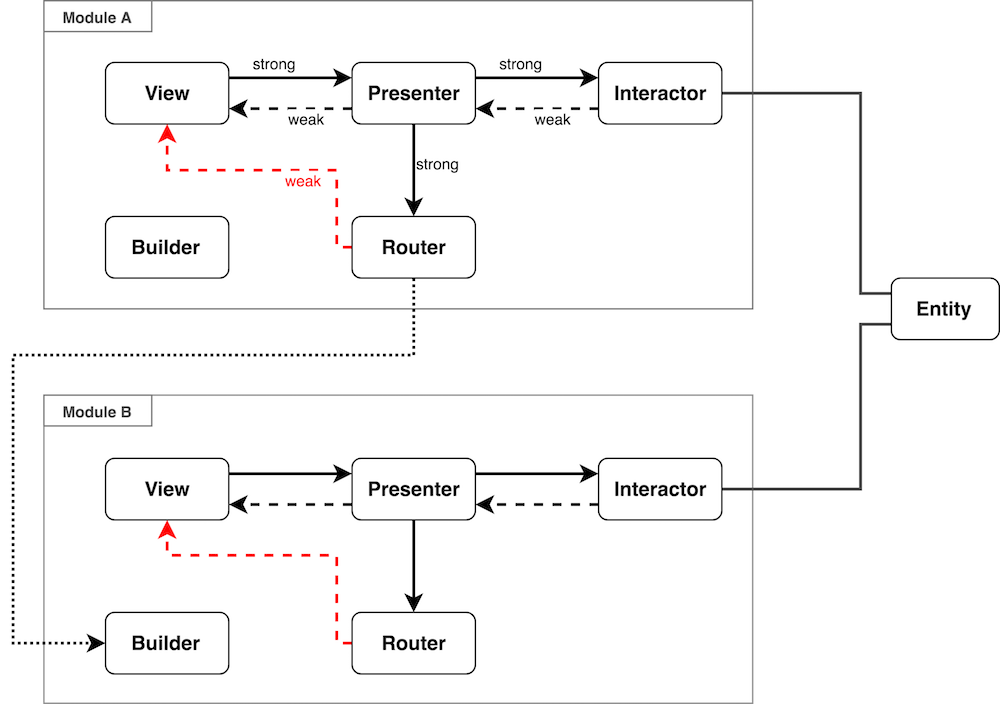
这种VIPER实现有一些特定的特点
- 构建组件
有些方法把模块创建任务视为路由器的责任。但这违反了单职责原则,因为路由器已经负责模块间的导航。
为了解决这个问题,引入了构建器。它负责创建模块的所有组件并建立相应的连接。
- 模块与实体间的解耦
这样,实体可以被用于一个或多个模块中,因为它们是简单的结构,没有业务逻辑。
- 路由器拥有视图引用
iOS架构中,导航是从一个UIViewController到另一个UIViewController进行的。因此,路由器必须拥有当前模块视图的引用,仅用于导航目的,并从其构建器那里接收目标模块的视图。
模块组件
协议
协议定义了层间通信的方式。一个模块由5个协议组成
视图协议
视图类遵守此协议。它定义了从
// MARK: - View Contract

protocol MyModuleViewProtocol: class {

}
视图输出协议
展示者类遵守此协议。它定义了从
// MARK: - View Output Contract

protocol MyModuleViewOutputProtocol: class {

}
交互者协议
交互类符合此协议。它定义了从展示者到交互者的通信。
// MARK: - Interactor Contract

protocol MyModuleInteractorProtocol: class {

}
交互者输出协议
展示者类符合此协议。它定义了从交互者到展示者的通信。
// MARK: - Interactor Output Contract

protocol MyModuleInteractorOutputProtocol: class {

}
路由协议
路由类符合此协议。它定义了从展示者到路由器的通信。
// MARK: - Router Contract

protocol MyModuleRouterProtocol: class {

}
视图
视图基本结构
final class MyModuleView: UIViewController, VIPERView {
    var presenter: MyModuleViewOutputProtocol!
}

// MARK: - MyModuleViewProtocol

extension MyModuleView: MyModuleViewProtocol {

}您只需实现定义在视图协议中的方法。
展示者
演示者的基本结构
final class MyModulePresenter: VIPERPresenter {
    weak var view: MyModuleViewProtocol!
    var interactor: MyModuleInteractorProtocol!
    var router: MyModuleRouterProtocol!
}

// MARK: - MyModuleViewOutputProtocol

extension MyModulePresenter: MyModuleViewOutputProtocol {

}

// MARK: - MyModuleInteractorOutputProtocol

extension MyModulePresenter: MyModuleInteractorOutputProtocol {

}
您只需实现定义在 视图输出契约 和 交互器输出契约 中的方法。
交互器
交互器的结构
final class MyModuleInteractor: VIPERInteractor {
    weak var presenter: MyModuleInteractorOutputProtocol!
}

// MARK: - MyModuleInteractorProtocol

extension MyModuleInteractor: MyModuleInteractorProtocol {

}
只需实现定义在 交互器契约 中的方法。
路由器
路由器的结构
final class MyModuleRouter: VIPERRouter {
    weak var viewController: UIViewController!
}

// MARK: - MyModuleRouterProtocol

extension MyModuleRouter: MyModuleRouterProtocol {

}
只需实现定义在 路由器契约 中的方法。
模块间的导航
在路由器中,可以通过两种方式执行导航:以模态方式 显示模块 或将模块 推送到导航堆栈。要执行导航,请使用以下方法
- presentModule(withView:embedIn:animated:completion:)
此方法以模态方式显示下一个模块。以下为参数详情
withView:要导航到的模块视图。embedIn:.navigationController或.none。默认值为.noneanimated:是否执行过渡动画。默认值是truecompletion:当过渡完成时调用的处理函数。默认值是nil
- pushModule(withView:embedIn:animated:)
此方法将下一个模块推送到 导航堆栈。它只在没有当前模块 嵌入到导航控制器中 或是导航堆栈的一部分时才有效。
withView:要导航到的模块视图。embedIn:.navigationController或.none。默认值为.noneanimated:是否执行过渡动画。默认值是true
构建器
在构建器类中,您需要为模块的视图(View)、表示(Presenter)、交互(Interactor)和路由(router)层分别指定类。
final class MyModuleBuilder: VIPERBuilder<MyModuleView, MyModulePresenter, MyModuleInteractor, MyModuleRouter> {

    override class var defaultViewUIType: VIPERViewUIType {
        return .storyboard(name: "MyModuleView", bundle: nil)
    }
}

// MARK: - Builder custom methods

extension MyModuleBuilder {

}
您还可以通过 defaultViewUIType 属性定义视图 UI 的加载方式。有 3 种可能的值
- Storyboard 文件:只需告知 storyboard 文件的名称(不带扩展名),如果需要,还需告知包。
.storyboard(name: "MyModuleView", bundle: nil)- XIB 文件:只需告知 XIB 文件的名称(不带扩展名),如果需要,还需告知包。
.nib(name: "MyModuleView", bundle: nil)- 无:如果您打算以编程方式实现 UI,请使用此选项。
.none构建模块
以下 4 个方法可用于构建模块。另外,您可以根据模块需求 创建自定义构建方法。
- build():
创建模块,并返回包含 view 和 presenter 引用的 VIPERModule 结构体。您可以使用表示引用来在模块间 传递数据。
// MARK: - MyModuleRouterProtocol

extension MyModuleRouter: MyModuleRouterProtocol {

    func goToNextModule() {
        let module = NextModuleBuilder.build()
        pushModule(withView: module.view)
    }
}
- build(viewUIType:):
此方法与上述方法类似,但允许您在方法调用期间指定 UI 类型。当您使用 typealias 定义模块构建器的配置时,此方法非常方便。
typealias MyModuleBuilder = VIPERBuilder<MyModuleView, MyModulePresenter, MyModuleInteractor, MyModuleRouter>

MyModuleBuilder.build(viewUIType: .storyboard(name: "MyModuleView", bundle: nil))
您还可以使用此方法,如果您打算在模块通信周围进行 单元测试,根据测试需求 模拟一个或多个层类。
import XCTest

class ProjectTests: XCTestCase {

    //...

    func testModuleCommunication() {
        typealias MockModuleBuilder = VIPERBuilder<ModuleMockView, ModuleOriginalPresenter, ModuleOriginalInteractor, ModuleOriginalRouter>

        let module = MockModuleBuilder.build()

        //...
    }
}
- [已弃用] buildAndAttachToWindow()
这是一个特殊的构建方法,通常用于启动应用的初始模块,在 AppDelegate 类中调用。
@UIApplicationMain
class AppDelegate: UIResponder, UIApplicationDelegate {

    var window: UIWindow?

    func application(_ application: UIApplication, didFinishLaunchingWithOptions launchOptions: [UIApplication.LaunchOptionsKey: Any]?) -> Bool {
        window = InitialModuleBuilder.buildAndAttachToWindow()
        return true
    }
}
更新:现在您必须首先使用 build() 或 build(viewUIType:) 方法 构建模块,然后调用新的 attachToWindow() 或 attachToWindow(withNavigationController:) 方法。
window = InitialModuleBuilder.build().attachToWindow()window = InitialModuleBuilder.build().attachToWindow(withNavigationController: true)[重要]:计划在下一个主版本(v3.0)中移除已弃用的方法。
- [已弃用] buildAndAttachToNavigationController(tabBarItem:)
此方法创建模块,将其附加到导航控制器,并 返回导航控制器引用。如果您打算在导航栏控制器 内部使用模块,可以使用 tabBarItem 参数为此模块配置标签栏项。
let tabBarController = UITabBarController()

let bookmarksItem = UITabBarItem(tabBarSystemItem: .bookmarks, tag: 0)
let contactsItem = UITabBarItem(tabBarSystemItem: .contacts, tag: 1)
let downloadsItem = UITabBarItem(tabBarSystemItem: .downloads, tag: 2)

tabBarController.viewControllers = [
    BookmarksBuilder.buildAndAttachToNavigationController(tabBarItem: bookmarksItem),
    ContactsBuilder.buildAndAttachToNavigationController(tabBarItem: contactsItem),
    DownloadsBuilder.buildAndAttachToNavigationController(tabBarItem: downloadsItem)
]
更新:现在您必须首先使用 build() 或 build(viewUIType:) 方法 构建模块,然后调用新的 attachToNavigationController() 方法。
window = MyModuleBuilder.build().attachToNavigationController()[重要]:计划在下一个主版本(v3.0)中移除已弃用的方法。
自定义构建方法
如果您有一个特定模块期望接收一些数据,那么为该模块创建一个自定义构建方法会很方便。这样,构建器将负责将此数据传递给presenter。
要创建自定义构建方法:
- 在构建器类中定义一个
静态方法,定义期望的参数并返回模块视图的类型; - 开始实现,调用
build()方法; - 根据实现方式将数据传递给
presenter; - 返回
view。
// MARK: - Builder custom methods

extension NextModuleBuilder {

    static func build(someData: Any, anotherData: Any) -> MyModuleView {
        let module = build()
        module.presenter.someData = someData
        module.presenter.anotherData = anotherData
        return module.view
    }
}
路由器可以像这样调用此构建器:
let view = NextModuleBuilder.build(someData: "Example of data", anotherData: "Another example of data")pushModule(withView: view)presentModule(withView: view)许可协议
VIPERBase采用MIT许可协议发布。