phoneid_iOS 1.0.1
| 测试已测试 | ✓ |
| 语言语言 | SwiftSwift |
| 许可证 | Apache 2 |
| 发布最后发布 | 2017年10月 |
| SwiftSwift 版本 | 4 |
| SPM支持 SPM | ✗ |
由 Olena Bachurina 维护。
phoneid_iOS 1.0.1
- 作者
- Federico Pomi
概览
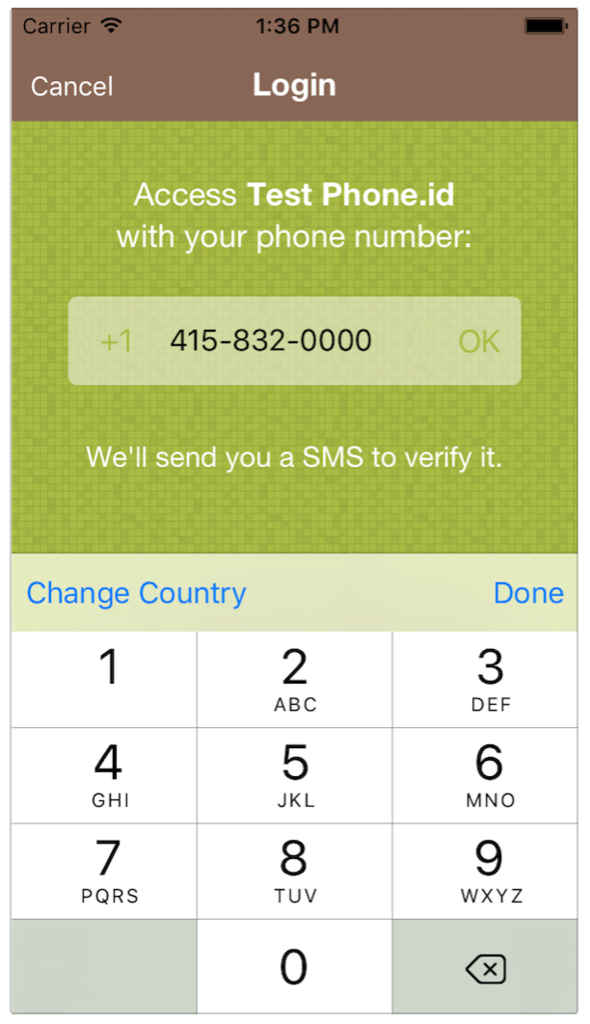
phoneid_iOS 是一个轻量级、易于使用的 iOS 8 库(使用 Swift 编写)。它提供通过手机号和验证码登录用户的服务。请参阅 全屏模式,紧凑模式
使用方法
要运行示例项目,请克隆仓库,并首先从 Example 目录运行 pod install
要求
iOS 8, iOS 9
安装
phoneid_iOS 通过 CocoaPods 提供。要安装
它,只需将以下行添加到您的 Podfile 中
use_frameworks!
pod "phoneid_iOS"
目录
快速入门
1. 配置 phoneid 客户端
如果您的应用程序尚未在 PhoneId 注册并且拥有客户端 ID,您应该在 developer.phone.id 上创建它
为了开始使用 phoneid SDK,您需要使用您的客户端 ID 配置它(将 "TestPhoneId" 替换为您的客户端 ID)
#####Swift
import phoneid_iOS

@UIApplicationMain
class AppDelegate: UIResponder, UIApplicationDelegate {

//......
func application(application: UIApplication, didFinishLaunchingWithOptions launchOptions: [NSObject: AnyObject]?) -> Bool {

        //configure client
        PhoneIdService.sharedInstance.configureClient("TestPhoneId");
        return true
    }

}
//.....
#####Objective-C
#import "phoneid_iOS-Swift.h"

@implementation AppDelegate

- (BOOL)application:(UIApplication *)application didFinishLaunchingWithOptions:(NSDictionary *)launchOptions {

    // configure phone.id
    [[PhoneIdService sharedInstance] configureClient:@"TestPhoneId" autorefresh:YES];

    return YES;
}
@end
PhoneIdService.sharedInstance - 返回 PhoneIdService 的单例实例。
2. 集成 phoneid 按钮
PhoneIdLoginButton 是 iOS SDK 中的 UIView 子类,允许用户登录和注销。它跟踪用户的登录状态,并自动显示适当的消息,即 登录 或 注销
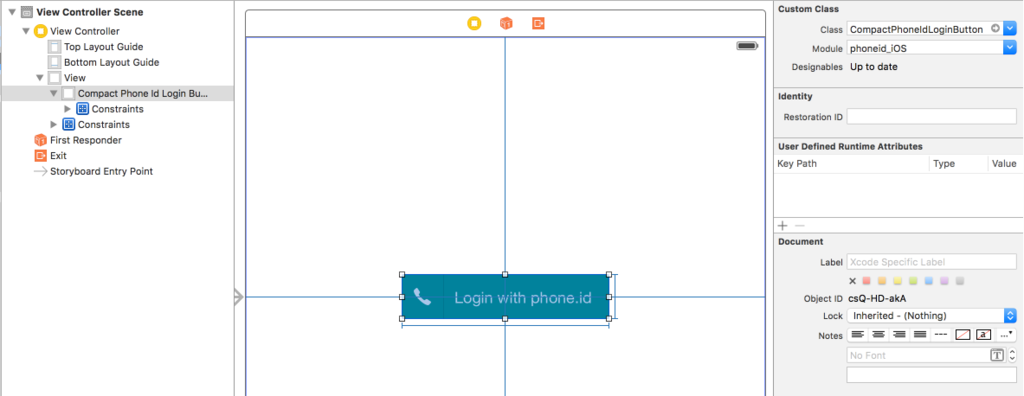
在 storyboard 中将 UIView 添加到您的视图控制器,并更改其类为 “PhoneIdLoginButton”。请注意,此按钮的模块将自动更改到“phoneid_iOS”。这是正确的,不要更改此值
注意,您可以使用 CompactPhoneIdLoginButton 代替 PhoneIdLoginButton
本步骤完成后,集成基本完成。
3. 回调
为了在登录成功、注销或发生某些错误等有趣的事件上获得通知,您可以在 PhoneIdService.sharedInstance 上设置适当的处理程序。以下是可用的处理程序列表
phoneIdAuthenticationSucceed - 在用户成功登录后,您可以在其中获取身份验证令牌信息
######Swift
PhoneIdService.sharedInstance.phoneIdAuthenticationSucceed = { (token) ->Void in

}
######Objective-C
[PhoneIdService sharedInstance].phoneIdAuthenticationSucceed = ^(TokenInfo* token){

};
phoneIdAuthenticationCancelled - PhoneId SDK 在用户在身份验证工作流程中点击关闭按钮时调用此块
######Swift
 PhoneIdService.sharedInstance.phoneIdAuthenticationCancelled = {

}
######Objective-C
[PhoneIdService sharedInstance].phoneIdAuthenticationCancelled = ^{

};
phoneIdAuthenticationRefreshed - 每次令牌刷新时,Phoneid SDK 调用此块
######Swift
PhoneIdService.sharedInstance.phoneIdAuthenticationRefreshed = { (token) ->Void in

}
######Objective-C
[PhoneIdService sharedInstance].phoneIdAuthenticationRefreshed = ^(TokenInfo* token){

};
phoneIdWorkflowErrorHappened - 当发生错误时,Phoneid SDK 调用此块
######Swift
PhoneIdService.sharedInstance.phoneIdWorkflowErrorHappened = { (error) ->Void in
    print(error.localizedDescription)
}
######Objective-C
[PhoneIdService sharedInstance].phoneIdWorkflowErrorHappened = ^(NSError* error){
    NSLog(@"%@", error.localizedDescription);
};
phoneIdDidLogout - 在注销时,Phoneid SDK 调用此块
######Swift
PhoneIdService.sharedInstance.phoneIdDidLogout = {

}
######Objective-C
[PhoneIdService sharedInstance].phoneIdDidLogout = ^{

};
UI 自定义
phone.id UI 的颜色方案可以轻松定制。
这可以通过 ColorScheme 对象来实现。ColorScheme 对象定义了 phone.id 内部使用的命名颜色集。
ColorScheme对象的全部字段都是UIColor。
这些字段分为两组:常用颜色和特定颜色。
常用颜色用于定义phone.id UI的主色调,并为特定颜色提供默认值。
常用颜色不会直接在phone.id中使用,它们只为特定颜色字段提供默认值。
这种分离是为了提供更灵活的主题样式方式。
您可以更改主颜色 - 您无需更改每个UI控件的颜色,但是
如果您需要为某些UI控件设置特定颜色,则可以覆盖默认值。
您可以在这里查看ColorScheme字段与UI控件颜色的详细映射。
Phone.id SDK通过PhoneIdService实例的componentFactory属性提供定制点。
颜色和背景的定制可以分两步完成
- 创建自己的组件工厂实例,并设置您喜欢的颜色方案
######Swift
    func customComponentFactory() -> ComponentFactory{

        let factory:ComponentFactory = DefaultComponentFactory()
        factory.colorScheme = ColorScheme()

        // You can change main colors
        factory.colorScheme.mainAccent = UIColor(hex: 0xAABB44)
        factory.colorScheme.extraAccent = UIColor(hex: 0x886655)
        factory.colorScheme.success = UIColor(hex: 0x91C1CC)
        factory.colorScheme.fail = UIColor(hex: 0xD4556A)
        factory.colorScheme.inputBackground = UIColor(hex: 0xEEEEDD).colorWithAlphaComponent(0.6)

        factory.colorScheme .applyCommonColors()

        // But also, if some of main colors don't fit to your color solution,
        // you can specify your own colors for certain UI element:

        factory.colorScheme.buttonHighlightedImage = UIColor(hex: 0x778230)
        factory.colorScheme.buttonHighlightedText = UIColor(hex: 0x778230)
        factory.colorScheme.buttonHighlightedBackground = UIColor(hex: 0xBBC86A)

        factory.defaultBackgroundImage = UIImage(named:"background")!

        return factory

    }
######Objective-C
- (id<ComponentFactory>)customComponentFactory{

    id<ComponentFactory> factory = [[DefaultComponentFactory alloc] init];

    ColorScheme* colorScheme = [[ColorScheme alloc] init];
    colorScheme.mainAccent = [[UIColor alloc] initWithHex:0xAABB44];
    colorScheme.extraAccent = [[UIColor alloc] initWithHex:0x886655];
    colorScheme.success = [[UIColor alloc] initWithHex:0x91C1CC];
    colorScheme.fail = [[UIColor alloc] initWithHex:0xD4556A];

    colorScheme.inputBackground = [[[UIColor alloc] initWithHex:0xEEEEDD] colorWithAlphaComponent:0.6];
    [colorScheme applyCommonColors];

    colorScheme.buttonHighlightedImage = [[UIColor alloc] initWithHex: 0x778230];
    colorScheme.buttonHighlightedText = [[UIColor alloc] initWithHex: 0x778230];
    colorScheme.buttonHighlightedBackground = [[UIColor alloc] initWithHex: 0xBBC86A];
    factory.defaultBackgroundImage = [UIImage imageNamed:@"background"];
    factory.colorScheme = colorScheme;

    return factory;
}- 尽早地将自己的组件工厂设置到phoneid服务中,最好是在didFinishLaunchingWithOptions中
######Swift
    func application(application: UIApplication,
        didFinishLaunchingWithOptions launchOptions: [NSObject: AnyObject]?) -> Bool {

            // configure phone.id
            PhoneIdService.sharedInstance.configureClient("TestPhoneId");

            // UI theming
            PhoneIdService.sharedInstance.componentFactory = customComponentFactory()
            return true
    }
######Objective-C
- (BOOL)application:(UIApplication *)application didFinishLaunchingWithOptions:(NSDictionary *)launchOptions {

    // configure phone.id
    [[PhoneIdService sharedInstance] configureClient:@"TestPhoneId" autorefresh:YES];

    // UI theming
    [PhoneIdService sharedInstance].componentFactory = [self customComponentFactory];

    return YES;
}
用户配置文件
Phone.id SDK提供了用户资料管理。
要获取用户的资料,请调用PhoneIdService的loadMyProfile方法。
用户还可以编辑自己的资料:设置屏幕名、资料图片和出生日期。
组件工厂为您提供了资料编辑UI,请参见以下示例
######Swift
   // load user profile
   PhoneIdService.sharedInstance.loadMyProfile{ (userInfo, e) -> Void in

       if let user = userInfo{

           // present user editing profile UI
           let profileController = PhoneIdService.sharedInstance.componentFactory.editProfileViewController(user)
           self.presentViewController(profileController, animated: true, completion: nil)
       }
   }
######Objective-C
    // load user profile
    [[PhoneIdService sharedInstance] loadUserProfile: ^(UserInfo* userInfo, NSError* e){

        if (userInfo){
            // present user editing profile UI
            UIViewController* profileController = [[PhoneIdService sharedInstance].componentFactory editProfileViewController: userInfo];
            [self presentViewController:profileController animated:YES completion:nil];
        }

}];用户资料图片上传到s3.amazon.com,该服务器目前不完全支持Apple App传输安全的要求(更多信息请参见此处)。因此,为了使其能够正常工作,需要在应用的Info.plist中添加以下代码片段
######Info.plist
    <key>NSAppTransportSecurity</key>
    <dict>
        <key>NSExceptionDomains</key>
        <dict>
            <key>s3.amazonaws.com</key>
            <dict>
                <key>NSExceptionRequiresForwardSecrecy</key>
                <false/>
            </dict>
        </dict>
    </dict>
上传联系人
用户从通讯录中的电话号码存储在Phone.id服务器上,用于构建社交图谱。您可以使用以下调用上传用户的通讯录
######Swift
    PhoneIdService.sharedInstance.uploadContacts() { (numberOfUpdatedContacts, error) -> Void in

    }
######Objective-C
   [[PhoneIdService sharedInstance] uploadContacts:^(NSInteger numberOfContacts, NSError * error) {

   }];
如果自上次上传以来用户的通讯录没有更改,则方法将不会再次上传该通讯录。
作者
Federico Pomi, [email protected]
许可证
phoneid_iOS在Apache License Version 2.0下可用。更多信息请参见LICENSE文件。