YOLayout 0.2.13
| 测试已测试 | ✗ |
| Lang语言 | Obj-CObjective C |
| 许可证 | MIT |
| Released最后发布 | 2016 年 8 月 |
由 John Boiles,Gabriel Handford 维护。
YOLayout 0.2.13
- 作者:
- Gabriel Handford 和 John Boiles
一个基于框架的布局框架,与 UIView、NSView、CALayer 以及任何实现了 setFrame: 的任何其他内容一起工作。避免使用 Interface Builder 和 Auto Layout,并完全掌控您的布局。
用法
以下是一个具有图片、标题标签和多行描述标签的视图的示例,具有动态高度。
// TableViewCellView.h
#import <YOLayout/YOLayout.h>

@interface TableViewCellView : YOView // Subclass YOView
@end

// TableViewCellView.m
@interface TableViewCellView ()
@property UILabel *titleLabel;
@property UILabel *descriptionLabel;
@end

@implementation TableViewCellView

- (void)viewInit {
  [super viewInit];
  UIImageView *imageView = [[UIImageView alloc] initWithImage:[UIImage imageNamed:@"information.png"]];
  [self addSubview:imageView];

  self.titleLabel = [[UILabel alloc] init];
  self.titleLabel.numberOfLines = 1;
  self.titleLabel.lineBreakMode = NSLineBreakByTruncatingTail;
  self.titleLabel.font = [UIFont boldSystemFontOfSize:16];
  [self addSubview:self.titleLabel];

  self.descriptionLabel = [[UILabel alloc] init];
  self.descriptionLabel.font = [UIFont systemFontOfSize:16];
  self.descriptionLabel.numberOfLines = 0; // Multi-line label (word wrapping
  self.descriptionLabel.lineBreakMode = NSLineBreakByWordWrapping;
  [self addSubview:self.descriptionLabel];

  YOSelf yself = self;
  self.viewLayout = [YOLayout layoutWithLayoutBlock:^CGSize(id<YOLayout> layout, CGSize size) {
    CGFloat x = 10;
    CGFloat y = 10;

    // imageView's size is set by the UIImage when using initWithImage:
    CGRect imageViewFrame = [layout setOrigin:CGPointMake(x, y) view:imageView options:0];
    x += imageViewFrame.size.width + 10;

    y += [layout sizeToFitVerticalInFrame:CGRectMake(x, y, size.width - x - 10, 0) view:yself.titleLabel].size.height;
    y += [layout sizeToFitVerticalInFrame:CGRectMake(x, y, size.width - x - 10, 1000) view:yself.descriptionLabel].size.height;

    // Ensure the y position is at least as high as the image view
    y = MAX(y, (imageViewFrame.origin.y + imageViewFrame.size.height));
    y += 10;

    return CGSizeMake(size.width, y);
  }];
}-
viewLayout执行布局并返回它所需的大小。这统一了layoutSubviews和sizeThatFits:为单个方法。此示例返回与传入相同宽度的变量高度。要使视图填充所有可用大小,可以返回size(传入的大小)。 -
viewInit是一个统一的初始化器。initWithFrame:和initWithCoder:都调用此方法。 - 布局基于块,让您可以捕获局部引用。
- YOSelf 弱引用有助于防止自我保留循环。
- 由于布局是基于块的,因此您可以在单个方法中创建多个视图、子视图和布局。
示例项目
通过查看操作来跟踪和学习 YOLayout 的最佳方式是看到它在实际应用中的效果。打开示例项目: YOLayoutExample。它包含 iOS 和 OSX 目标。
NSView
支持 NSView 和 Cocoa。YOLayout 使 UIKit 和 Cocoa 的布局保持一致。
常见问题解答
为什么在我们有 Interface Builder 的情况下仍然在代码中进行布局?
您是否曾经尝试使用 IB 完成较大的项目?这是令人沮丧的。小的调整可能会以意想不到的方式破坏 Auto Layout 约束。此外,Interface Builder 并不适合有多个提交者的大型项目;git 合并 storyboards 和 xibs 可能非常困难。最终,我们是程序员;我们喜欢用代码来完成事情。
好吧,那么为什么不只使用代码中的 Auto Layout 呢?
代码中的 Auto Layout 是向正确方向迈出的一步,但它与基于框架的布局相比存在几个缺点
- 自动布局通常比基于框架的布局慢。有关自动布局性能劣势的详细分析,请参阅[这里](http://pilky.me/36/)。
- 自动布局的动画也可能比较复杂,因为您需要动画所有相关约束。
- 自动布局的调试可能相当困难,因为对内部发生的事情了解甚少。使用YOLayout,您可以对布局过程进行全面检查。如果布局出现问题,只需逐步检查布局代码,即可找出错误!非常简单。
那么为什么不在layoutSubviews中编写自己的布局代码呢?
在layoutSubviews中编写布局代码的核心问题是需要在layoutSubviews和sizeThatFits:中重复编写大量的布局代码。当您有多个子视图可能会动态调整大小,这段代码就会变得重复且难于维护。在sizeThatFits:中调用layoutIfNeeded可能会因为父视图在其layoutSubviews中使用了您的sizeThatFits:方法而造成无限递归的风险。
它会布局不在视图层次中的视图吗?
您可能没有问这个问题,但您应该问!YOLayout的一个有趣之处在于,布局也适用于在drawRect:中绘制的视图。因为YOLayout独立于视图层次结构,您可以轻松地在将子视图添加到层次结构或仅在drawRect:中绘制它之间切换,而不需要更改布局代码。试试看Auto Layout能做这个!
YOLayout非常适合自定义绘制控件。在drawRect:中绘制的视图可以使用IB_DESIGNABLE属性在界面构建器中以实时方式绘制。打开示例项目(pod try YOLayout),查看DrawableView.m和DrawableView.xib。
viewInit是什么?
- (void)viewInit;是视图的统一初始化器。在YOLayout中,没有必要指定默认框架或处理从界面构建器或从代码加载的视图的初始化。
我必须对所有视图使用YOLayout吗?
不需要。如果您的布局非常简单,或者它没有动态大小,只需像平常一样使用layoutSubviews(UIKit)或layout(AppKit)。YOLayout不会特别地覆盖行为,并且与现有的布局方法兼容。
使用YOLayout的缺点
就像大多数事情一样,YOLayout也有权衡。我们喜欢使用它在处理具有许多不同对齐和动态大小项目的复杂布局时。
但是,也存在一些不足
- 您可能会发现自己在一些诸如填充和内边距这样的项目中强行编码像素值。
- 对于简单的布局,AutoLayout可能更容易使用。
- YOLayout是一个自定义框架,而界面构建器和AutoLayout是Apple和它们的SDK的一部分,因此它们有更好的支持。
还有更多,您可以随时通过提交问题告诉我们您为什么要讨厌它。
依赖关系
没有依赖!
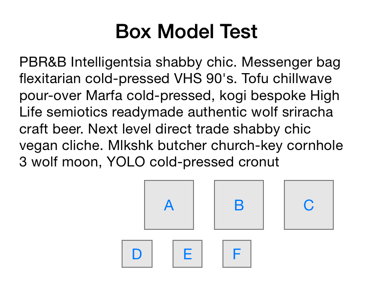
盒模型
使用 YOLayout 我们实现了一个盒模型(YOVBox 和 YOHBox),支持一些基本的布局属性,如间距、内边距、水平对齐、最小大小和最大大小。
YOVBox 用于垂直布局,而 YOHBox 用于水平布局。例如
#import <YOLayout/YOBox.h>

@interface BoxExample : YOVBox
@end

@implementation BoxExample

- (void)viewInit {
  [super viewInit];
  self.backgroundColor = UIColor.whiteColor;

  // Labels stacked vertically (VBox)
  YOVBox *labelsView = [YOVBox box:@{@"spacing": @"10", @"insets": @"20,20,0,20"}];
  {
    UILabel *label1 = [[UILabel alloc] init];
    label1.text = @"Box Model Test";
    label1.font = [UIFont boldSystemFontOfSize:20];
    label1.textAlignment = NSTextAlignmentCenter;
    [labelsView addSubview:label1];

    UILabel *label2 = [[UILabel alloc] init];
    label2.font = [UIFont systemFontOfSize:14];
    label2.numberOfLines = 0;
    label2.text = @"PBR&B Intelligentsia shabby chic. Messenger bag flexitarian cold-pressed VHS 90's. Tofu chillwave pour-over Marfa cold-pressed, kogi bespoke High Life semiotics readymade authentic wolf sriracha craft beer. Next level direct trade shabby chic vegan cliche. Mlkshk butcher church-key cornhole 3 wolf moon, YOLO cold-pressed cronut";
    [labelsView addSubview:label2];
  }
  [self addSubview:labelsView];

  // Buttons with min size right aligned (HBox)
  YOHBox *buttons = [YOHBox box:@{@"spacing": @"20", @"insets": @"10,20,10,20", @"minSize": @"50,50", @"horizontalAlignment": @"right"}];
  {
    UIButton *button1 = [self buttonWithText:@"A"];
    [buttons addSubview:button1];
    UIButton *button2 = [self buttonWithText:@"B"];
    [buttons addSubview:button2];
    UIButton *button3 = [self buttonWithText:@"C"];
    [buttons addSubview:button3];
  }
  [self addSubview:buttons];

  // Buttons centered horizontally (HBox)
  YOHBox *buttonsCenter = [YOHBox box:@{@"spacing": @"20", @"horizontalAlignment": @"center"}];
  {
    [buttonsCenter addSubview:[self buttonWithText:@"D"]];
    [buttonsCenter addSubview:[self buttonWithText:@"E"]];
    [buttonsCenter addSubview:[self buttonWithText:@"F"]];
  }
  [self addSubview:buttonsCenter];
}

- (UIButton *)buttonWithText:(NSString *)text {
  UIButton *button = [UIButton buttonWithType:UIButtonTypeSystem];
  button.backgroundColor = [UIColor colorWithWhite:0.9 alpha:1.0];
  [button setTitle:text forState:UIControlStateNormal];
  button.layer.borderWidth = 1.0;
  button.layer.borderColor = UIColor.grayColor.CGColor;
  button.contentEdgeInsets = UIEdgeInsetsMake(5, 10, 5, 10);
  return button;
}

@end
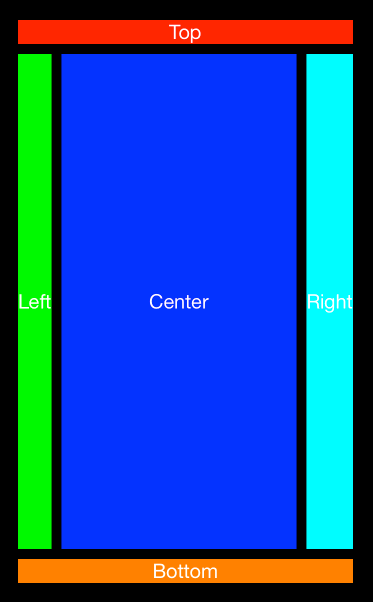
边框布局
对于边框布局,您可以使用 YOVBorderLayout 或 YOHBorderLayout。例如
@implementation BorderView

- (void)viewInit {
  [super viewInit];
  self.backgroundColor = UIColor.blackColor;

  UILabel *topView = [self label:@"Top" backgroundColor:UIColor.redColor];
  [self addSubview:topView];

  YOView *centerView = [YOView view];
  {
    UILabel *leftLabel = [self label:@"Left" backgroundColor:UIColor.greenColor];
    [centerView addSubview:leftLabel];
    UILabel *centerLabel = [self label:@"Center" backgroundColor:UIColor.blueColor];
    [centerView addSubview:centerLabel];
    UILabel *rightLabel = [self label:@"Right" backgroundColor:UIColor.cyanColor];
    [centerView addSubview:rightLabel];

    centerView.viewLayout = [YOHBorderLayout layoutWithCenter:centerLabel left:@[leftLabel] right:@[rightLabel] insets:UIEdgeInsetsZero spacing:10];
  }
  [self addSubview:centerView];

  UILabel *bottomView = [self label:@"Bottom" backgroundColor:UIColor.orangeColor];
  [self addSubview:bottomView];

  self.viewLayout = [YOVBorderLayout layoutWithCenter:centerView top:@[topView] bottom:@[bottomView] insets:UIEdgeInsetsMake(20, 20, 20, 20) spacing:10];
}

- (UILabel *)label:(NSString *)text backgroundColor:(UIColor *)backgroundColor {
  UILabel *label = [[UILabel alloc] init];
  label.font = [UIFont systemFontOfSize:20];
  label.text = text;
  label.numberOfLines = 0;
  label.textAlignment = NSTextAlignmentCenter;
  label.backgroundColor = backgroundColor;
  label.textColor = [UIColor whiteColor];
  return label;
}

@end
许可证
YOLayout 在 MIT 许可证下可用。有关更多信息,请参阅 LICENSE 文件。


