YOLOVisionML 0.0.1
- 作者:
- Jade Choghari
- jadechoghari
YOLOVisionML
作者:Jade Choghari

![]()

YOLOVisionML 简化了 YOLO 模型输出处理,实现了精确的边界框和掩码计算,提高了目标检测和机器学习的能力。
该库对任何已转换为 CoreML 的 YOLO 模型进行转换,以及对输出为张量且符合 Ultralytics 格式的输出
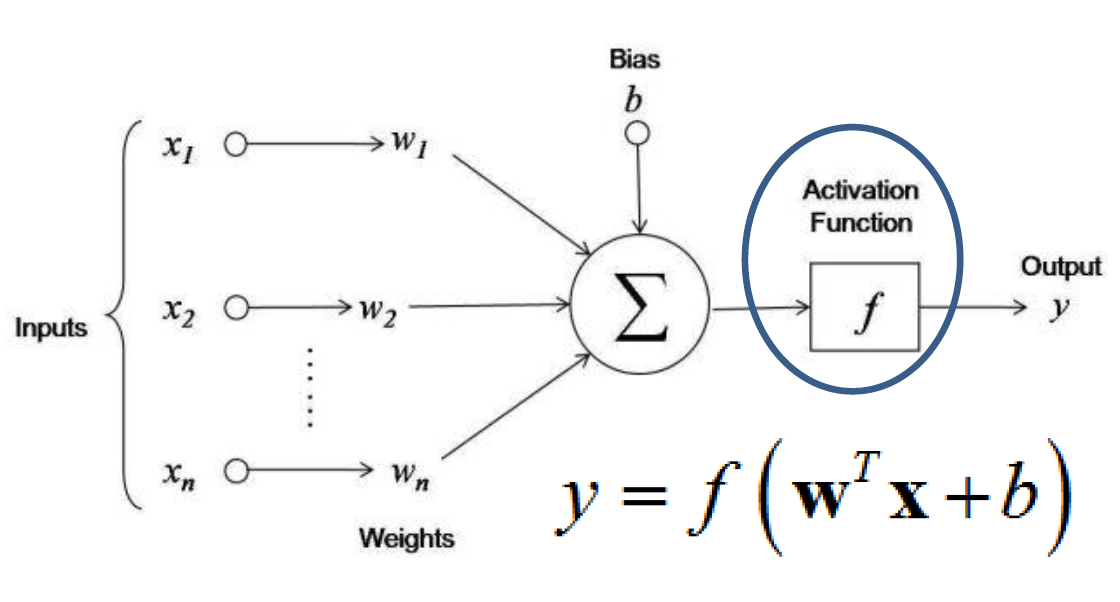
模型的概述使用神经网络架构从输入数据中提取复杂模式。然而,为了实现精确和可操作的结果,我们对初始输出 'y' 进行了额外的后处理。
| Swift 函数 | 描述 | 数学公式(如适用) |
|---|---|---|
| sigmoidMatrix | 将 sigmoid 函数应用于矩阵,将神经网络输出转换为范围为 [0, 1] 的概率。 | sigmoid(x) = 1 / (1 + e^(-x)) |
| createMask | 从输入数据生成二值掩码。 | 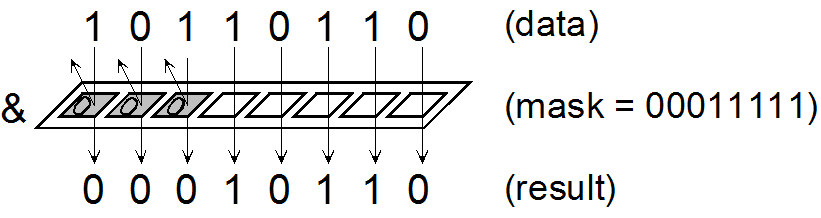 |
| parseRow | 解析和过滤一行数据,返回 [x1, y1, x2, y2, 十进制 (classId), 最大概率] | 处理目标检测任务中的神经网络输出。它提取网络输出中的信息,并将其转换为有意义的对象属性和相关概率,从而使得对图像中检测到的对象进行分析和解释。 |
| get_mask | 基于某些条件获取掩码。 | 0 到 1 之间的值输出 |
| parseRowMask | 解析掩码数据的一行。 | 类似于 parse row,但有一个额外的输出,掩码。 |
| overlayMask | 将掩码叠加到图像上。 | |
| nonMax: intersection | 计算框之间的交集区域。 | 区域 = 宽度 * 高度 |
| nonMax: union | 计算框之间的并集区域。 | 区域 = A + B - 交集 |
| nonMax: iou | 计算交集与并集(IoU)。 | 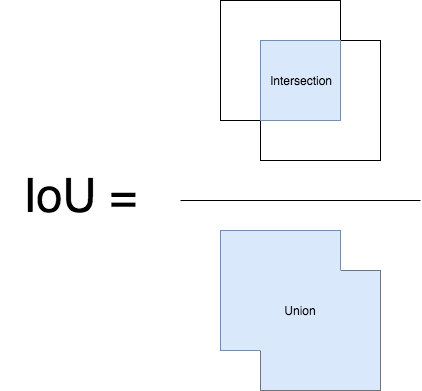 |
| nonMaxSuppression | 对框执行非最大值抑制。 |  |
| nonMaxSuppressionMask | 分段掩码的非最大值抑制。 | |
| imageToArray | 将像素化掩码图像转换为位掩码数组表示,如 [UInt8]。 | 例如:[[0, 0, 0, 0, 1, 1, 1, 1, 0 ...]] |
| convertToUIImage | 将表示为 [UInt8] 的位掩码转换为像素化掩码图像。 | |
| resizeMask | 将掩码调整到指定大小。 | |
| MLMultiArrayToCGImage | 将 MLMultiArray 转换为 CGImage 以供显示。 | |
| drawRectanglesOnImage | 在图像上绘制矩形。 |
安装
您可以使用 CocoaPods 安装 YOLOVisionML。要将它集成到您的 Xcode 项目中,请按照以下步骤操作
- 打开您的项目
Podfile
$ open Podfile- 将以下行添加到您的
Podfile
pod 'YOLOVisionML'
pod 'MatrixFlow'
此行指定您要在项目中包含 YOLOVisionML CocoaPod,版本为 1.0 或最新兼容版本。
- 保存
Podfile并在项目根目录中运行以下命令
$ pod install此命令将指定的 pod 安装到您的项目中。
通过点击运行
pod install后创建的.xcworkspace文件来打开您的项目。在任何您打算使用 YOLOVisionML 模块的地方导入它
import YOLOVisionML
import MatrixFlow
注意:您还需要安装我构建的另一个名为 'MatrixFlow' 的 pod,它专为矩阵操作而设计。
并在 pod 代码内部,您非常重要地需要更改 . 的宽度和高度。
用法
使用 YOLOVisionML pod 时,请在调用其功能之前,使用所需的图像宽度和高初始化 'YOLOVisionML' 类。这允许您在不同功能中无缝应用这些尺寸。
let yoloInstance = YOLOVisionML(imageWidth: 1170, imageHeight: 1516)要利用任何这些功能,您只需提及模块实例的名称,然后跟随后面的函数名
例如
对于解析一行(请注意,在未来的使用中,您需要循环遍历每一行;以下只是一个单行的演示)
```swift
let parsedRow = yoloInstance.parseRowMask(row: TestParsedMask)
Happy coding and data manipulation! 🧠💡

## Context

When I tried converting from YOLO to CoreML for a model that gives bounding box and segmentation mask outputs, I thought it'd be easy with CoreML. But after exploring CoreML-tools and Ultralytics tools, I found limitations in Swift, YOLO, and CoreML. They lack functions like matrix processing (available in my Cocoa project 'MatrixFlow'), image segmentation processing, input/output handling, and more.

This library propose a solution. This is result of an 80+ hours of trial and errors to try and make the output work.
Please note: Some of you might have different index result as mine, but this is normal since every input is different, every predictions is different so you’ll need to when told to do so.


First and foremost, my YOLO model requires input images of size 640x640. Therefore, we must resize the images from their original dimensions to this new width and height. However, it's crucial to always verify the CoreML-specific format during the check within CoreML. Here's how I've handled it:
swift
let config = MLModelConfiguration()
let model = try best_2(configuration: config)
let input = best_2Input(image: buffer)
// 进行预测
let output = try model.prediction(input: input)
The output prediction of this model is:
Output 0 : var [1, 37, 8400] and Output1: p [1, 32, 160, 160]

The YOLOv8 model is equipped with a predetermined capability to identify up to 8400 bounding boxes. This constraint is a foundational aspect established during the design phase of the neural network architecture. Consequently, the model consistently generates 8400 lines of output for each image, regardless of the actual count of objects detected within that image. This consistent output structure remains unaltered due to the model's inherent construction. Subsequently, a significant portion of these output rows typically lacks meaningful content, rendering them essentially inconsequential or what is colloquially referred to as "garbage." Moving forward, let's delve into the next steps: We will be dealing with two outputs that are categorized as MLMultiArray. To enable further manipulation, it becomes necessary to convert them into standard arrays. For this purpose, we will employ the 'MatrixFlow' pod.

For output0, we’re also removing the first dimension since it’s unnecessary
swift
// 将 MLMultiArray 转换为普通的 Swift 数组
let array = MatrixFlow.convertMultiArrayToArray(output0)
// 执行降维
let reducedArray = array[0]
对于 output1 三个维度
let fourArray = MatrixFlow.convertMultiArrayToArray4d(output1)
let reducedArray1 = fourArray[0]
Upon inspecting the dimensions of `reducedArray` (output0) and `reducedArray1`, a noteworthy observation emerges: the count of columns in the first matrix corresponds to the count of rows in the second matrix. This alignment implies the possibility of matrix multiplication to unite these two matrices. Upon this union, an outcome akin to (8400,160,160) can be attained. This configuration signifies segmentation masks for all the detected boxes. Each segmentation mask, encompassing dimensions of 160x160, is a distinctive entity. However, for matrix multiplication to transpire, the `output1` matrix must be reshaped to ensure a matching number of dimensions. The subsequent phase involves the fusion of these matrices. To be specific, the incorporation entails the addition of 25600 columns originating from the second matrix and appending them to the first matrix. This fusion operation will harmoniously blend the two matrices into an integrated structure.swift
// 需要重塑数组
let reshapedArray = reducedArray1.map { subArray in
return subArray.flatMap { $0 }
} (to 160x160)
// 执行矩阵乘法
let result = MatrixFlow.multiplyMatrices(masks1, reshapedArray)
print("after multip", result!.count, result![0].count)
// 乘法后我们需要 obi connect
// 执行加法操作
var combinedMask: [[Decimal]] = []
// for (box, mask) in zip(reshapedArray, masks1)
//or (box, mask) in zip(boxes1, result!)
for (box, mask) in zip(boxes1, result!) {
let combinedRow = box + mask
combinedMask.append(combinedRow)
}
## Step 2:  Parsing the combined output:
We have two options:
### Option 1: With box + masks:
swift
let boxesMask: [ParsedRow] = combinedMask.enumerated().map { parseRowMask(index: $0.offset, row: $0.element) }
At this point, we can pinpoint the index where the model has generated its most accurate prediction. In this particular context, this index is designated as 'i,' and its specific value is 8249.

Our next step involves the task of locating the corresponding mask linked to this particular index.
swift
let maskImage = YOLOVisionML.convertToUIImage(mask: boxesMask[8249].mask)
let newSize = CGSize(width: Int(round(NSDecimalNumber(decimal: boxesMask[8249].x2 - boxesMask[8249].x1).doubleValue)),
height: Int(round(NSDecimalNumber(decimal: boxesMask[8249].y2 - boxesMask[8249].y1).doubleValue)))
let resizedImage = resizeMask(image: maskImage!, targetSize: newSize)
let color = UIColor.green
let finalImage = overlayMask(baseImage: inputImage!, mask: maskImage!, color: color)
You’ll be able to see the masks as well as the binary form.

## Option 2: You just want the box:
swift
let resultNormal = YOLOVisionML.nonMaxSuppression(boxes: boxes, iouThreshold: 0.7)
Apply it only for the boxes.

###Explanation of the functions
swift
func parseRow(row: [Decimal]) -> [Decimal]
This function effectively filters and extracts each piece of data from every row.

Given that we've resized the image to a dimension of 640x640, the process involves reverting it back to its original size while considering both the width and height. Specifically, we calculate values such as `x1` using the formula `(xc - w/2) / 640 * img_width`.

Subsequently, the objective is to identify the object that corresponds to the maximum probability within this set of values. Additionally, we extract the associated class ID. In the current context, as we're focused on detecting sessions with a single class ID, this ID remains consistent throughout.

Notably, we've implemented a filtering mechanism that eliminates bounding boxes with a probability less than 4 (please note that the probability range here is not confined to [0,1]).

As a result of this process, the output takes the form of a list of Decimal values. This list may encompass multiple entries, contingent on the desired threshold for decision-making points.
swift
let result: [Decimal] = [x1, y1, x2, y2, Decimal(classId), maxProbability]
 ### NonMaxSupression
 In the realm of Machine Learning, a fundamental technique called non-maximum suppression is employed to effectively filter and prioritize the best bounding box predictions.
I'll provide an overview of its functioning.

Our next step involves the application of non-maximum suppression to the collection of probable bounding boxes we've obtained. It's important to emphasize that a specific IOU (Intersection over Union) threshold needs to be chosen for this process. This threshold is crucial in determining how overlapping bounding boxes are handled.

By deploying non-maximum suppression, we ensure that only the most relevant bounding boxes are retained, contributing to a more refined and accurate outcome.
These are the main functionalities of the non max in the pod

<img src="https://miro.medium.com/v2/resize:fit:1400/1*iVUDd4fYhL5evD1M5156DA.png" width = "60%" height="50%">
<br />
<img src="https://miro.medium.com/v2/resize:fit:1400/1*6d_D0ySg-kOvfrzIRwHIiA.png" width = "60%" height="40%">
swift
func intersection(box1: [Decimal], box2: [Decimal]) -> Decimal
func union(box1: [Decimal], box2: [Decimal]) -> Decimal
func iou(box1: [Decimal], box2: [Decimal]) -> Decimal
func nonMaxSuppression(boxes: [[Decimal]], iouThreshold: Decimal) -> [[Decimal]]
I won’t explain how the code specifically works, since it’s a lot of computation but follow the exact same concept of the non max suppression method.

As a result we get an even more accurate result of bbox like one or two.

For visualizing the box on the image, we can use this function
swift
func drawRectanglesOnImage(image: UIImage, boxes: [[Decimal]])
### Option 2: You want the bounding box and the masks to be processed at the same time.
It’s the same process with few modifications.

We create a struct to store the data of each row but with box and mask data this time.
Struct:
swift
struct ParsedRow {
let x1: Decimal
let y1: Decimal
let x2: Decimal
let y2: Decimal
let classId: Decimal
let maxProbability: Decimal
let mask: [[UInt8]]
let index: Int
}
func parseRowMask(index: Int, row: [Decimal]) -> ParsedRow
func nonMaxSuppressionMask(boxes: [ParsedRow], iouThreshold: Decimal) -> [ParsedRow]
Consider utilizing a specialized function that's designed to output masks and parse rows. In essence, this approach transcends the conventional practice of solely returning a set of box probabilities, as represented by [x1, y1, x2, y2, Decimal(classId), maxProbability]. Instead, we're enhancing each row with its corresponding masks. In terms of recommendation, I propose opting for row filtering (option 1), which facilitates the seamless application of masks to the precise row, streamlining the process and eliminating the need for individual mask application.

Now, let's delve into the nuances of mask creation and processing:

Let's explore the methods for creating and manipulating masks.

### Binary Mask
We must refresh our understanding of masks in Machine Learning. Masks consist of binary values, specifically 0 or 1, denoting a binary choice – a representation of 'yes' or 'no.' In Swift, a mask is represented as a [[UInt8]].
Behind the scenes, several operations are executed to generate these masks. The procedure entails the utilization of a specific function:

Prior to this, when dealing with the output dimensions of (3, 160, 160), it's noticeable that after isolating the box's x, y, h, and w, the remaining values are indicative of the probability that a given pixel belongs to the object. If the probability is low, the pixel is attributed to the background and is set to black. Conversely, if the probability is higher, the pixel is designated as white. However, these raw values are an output from the neural network and require conversion into probabilities. To accomplish this, we apply the sigmoid function.
In essence, the sigmoid function facilitates the conversion of the neural network's raw output into interpretable probabilities.

<img src="https://miro.medium.com/v2/resize:fit:970/1*Xu7B5y9gp0iL5ooBj7LtWw.png" width="40%" height="10%">

For a clearer overiview this is the algorithm that we commonly use for a binary (or bit) mask in machine learning:
scss
binary_mask(x, y) = 1, if image(x, y) >= threshold
0, otherwise
Here is the function used :swift
func createMask(from matrix: [[Decimal]]) -> [[UInt8]]
If you want to visualize the mask you can check it out with this function: swift
func createMask(from matrix: [[Decimal]]) -> [[UInt8]]
We must also scale this mask to the size of the bounding box of this object we’ll use this function:
swift
func resizeMask(image: UIImage, targetSize: CGSize) -> UIImage
Finally after calling the box drawer you can add the masks on top of the newly created image thanks to :swift
func overlayMask(baseImage: UIImage, mask: UIImage, color: UIColor) -> UIImage?
### Additional
I've also added some additional functionalities like:
swift
func MLMultiArrayToCGImage(output: MLMultiArray) throws -> CGImage?
```
这会将 MLMultiArray 转换为 CGI 图像。
参考资料
YOLOVisionML 标志
来源: UltralyticsApple Create ML 框架图标
来源: Apple 开发者示例图片:来源 Fotolia
示例 3:伊卡洛斯
图片 4、5、6、7:miro.medium
有关 YOLO 输出处理的更多信息,请参阅 https://dev.to/andreygermanov/how-to-create-yolov8-based-object-detection-web-service-using-python-julia-nodejs-javascript-go-and-rust-4o8e