ViSearchWidgets 0.4.0
| 测试已测试 | ✓ |
| 语言语言 | SwiftSwift |
| 许可证 | MIT |
| 发布最新版本 | 2017年4月 |
| SwiftSwift 版本 | 3.0 |
| SPM支持 SPM | ✗ |
| 依赖 | |
| ViSearchSDK | ~> 1.2.1 |
| Kingfisher | ~> 3.2.1 |
| LayoutKit | ~> 4.0.0 |
ViSearchWidgets 0.4.0
- 作者
- Ngo Hung
ViSearch Swift Widgets SDK
1. 概述
使用我们有效、易于使用和可定制的 SDK 小部件搜索和货币化您的产品图像。
我们已经推出了四个解决方案,可以适应您各种场景的需求。
- 查找类似:只需点击一下即可自动从您的库存中找到视觉上相似的商品
- 你可能也喜欢:使用视觉识别和自定义规则推荐客户可能喜欢的产品
- 通过图像搜索:使用内置的自动化物体识别从您的数据库中搜索匹配或相似的商品
- 通过颜色搜索:从广泛的颜色谱中选取并发现产品
API 文档: https://visenze.github.io/visearch-widget-swift/
为了快速了解 SDK 提供的内置功能,请按照第 3 节中的说明操作,然后跳转到第 4.3 节运行示例。
2. 要求
-
支持:iOS 9.0+。 最低需求:iOS 8.0+
- SDK已在iOS 9.0+(真实iPhone设备)上进行了全面测试。
- iOS 8.x版本仅在模拟器上进行测试。
-
Xcode 8.1+
-
Swift 3.0+
3. 设置
3.1 设置您的ViSenze账户
为了使用我们的小工具,请设置您的ViSenze账户。有关如何设置的说明,请参阅我们的开发者文档设置说明。
要使用移动小工具,您将需要获取小工具应用程序密钥。
3.2 上传您的数据源
为了进行测试,您需要在上传您的数据源到ViSenze 仪表板并配置架构字段。对于小工具集成,架构字段的规格如下
| 元数据 | 架构 | 类型 | 必需 | 可搜索 | 描述 | 示例 |
|---|---|---|---|---|---|---|
| 图像ID | im_name | 字符串 | 是 | 是 | 图像的唯一标识符。在ViSenze仪表板中自动生成。 | red-polka-dress.jpg, 2720f503-a0d9-4516-8803-19052fbf343c |
| 图像URL | im_url | 字符串 | 是 | 否 | 产品图像的URL。在ViSenze仪表板中自动生成。 | http://somesite.com/abc.jpg |
| 移动图像URL | custom | 字符串 | 否 | 否 | 移动友好的图像URL,以便在移动应用程序中更快加载。如果不提供此项,则将使用im_url来显示产品图像 | http://somesite.com/small-img.png |
| 标题 | custom | 字符串 | 是 | 可选 | 将出现在产品图像下方的产品标题 | Black dress |
| 描述 | custom | 文本文本 | 否 | 可选 | 产品描述,可能出现在产品详细页面中 | Black dress |
| 品牌 | custom | 字符串 | 否 | 是 | 可选字段,用于显示在产品卡片中。可用于过滤。 | Nike, Adidas |
| 类别 | custom | 字符串 | 否 | 是 | 产品类别。可用于过滤。 | 连衣裙、上衣、眼镜、手表等 |
| 价格 | custom | 浮点数/整数 | 是 | 是 | 产品的原始零售价。可用于范围过滤 | 49.99 |
| 折扣价 | custom | 浮点数/整数 | 否 | 是 | 折扣产品价格。可用于范围过滤 | 40.99 |
4. 安装SDK
4.3 运行示例应用程序
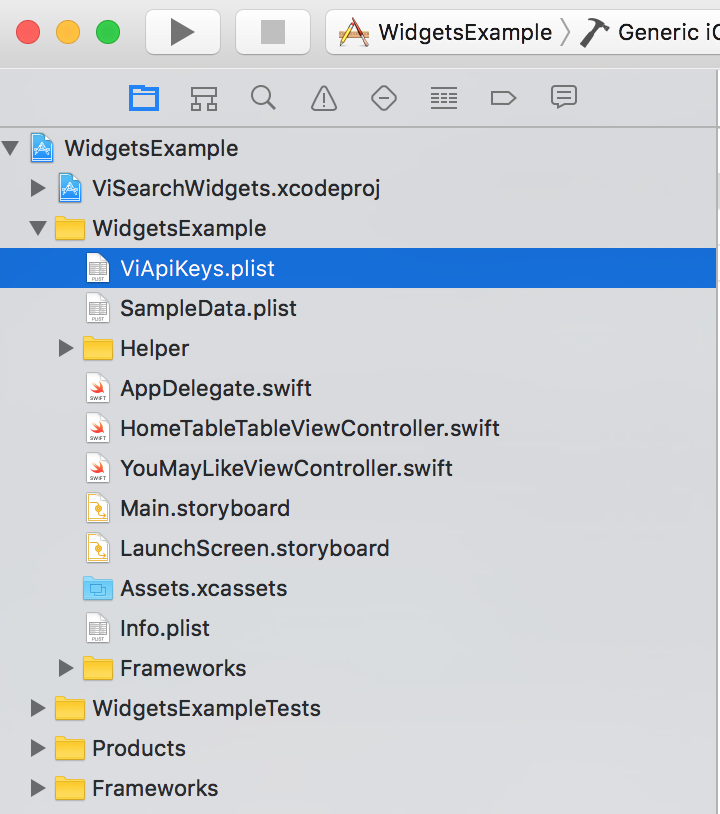
示例应用程序的源代码位于WidgetsExample文件夹中。请打开WidgetsExample.xcodeproj并配置应用程序密钥/架构映射来运行示例。
- 配置应用程序密钥
有关获取应用程序密钥的说明,请参阅3.1部分。您可以在ViApiKeys.plist文件的accessKey字段输入应用程序密钥。
- 示例应用程序使用Carthage构建。请下载并运行最新的发布版本的
Carthage.pkg文件。Carthage安装后,您需要在源目录中运行以下命令
carthage update --platform iOS --no-use-binaries
- 配置架构映射
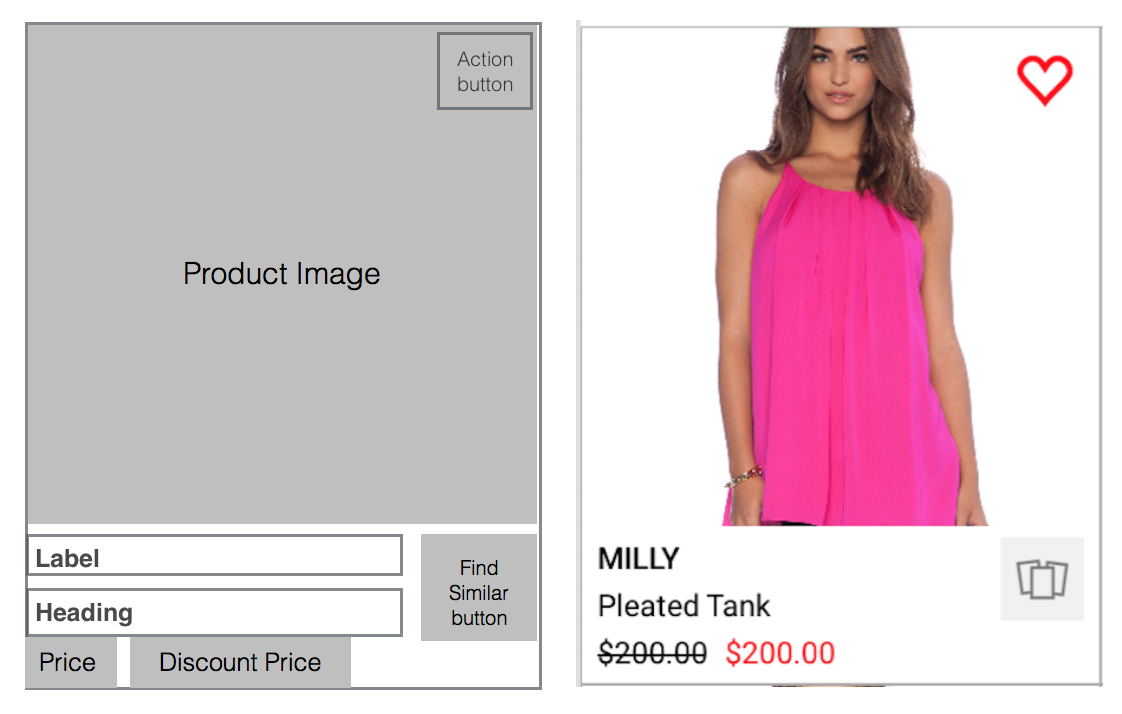
如3.2部分中所述,您需要上传您的数据源并配置架构字段。然后可以通过产品卡片 UI组件显示包含产品信息的字段。请参阅以下截图以获取示例。
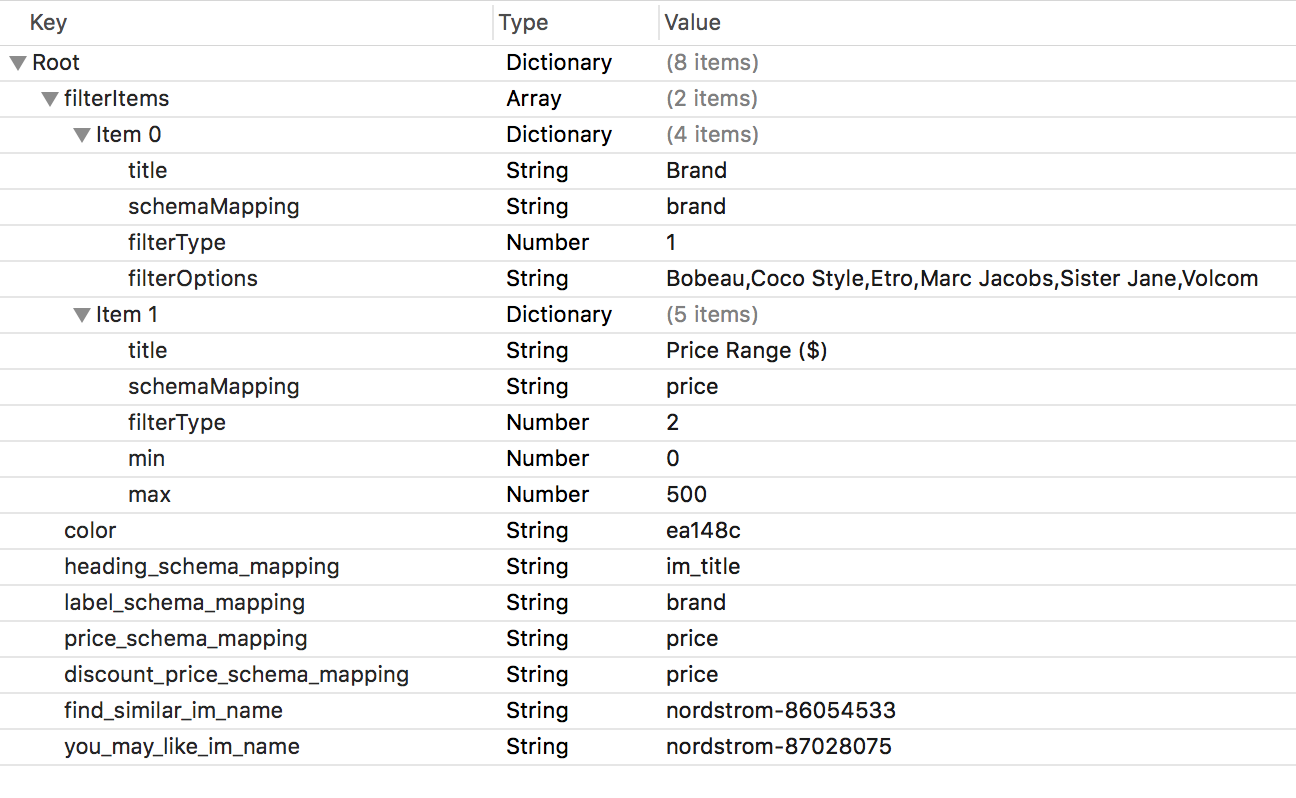
您需要编辑SampleData.plist(在Configure App keys部分截图中的ViApiKeys.plist文件下方)来配置您示例数据源的架构映射。
-
heading_schema_mapping:是指向产品卡片组件中标题字段的架构映射。在截图 中,它用于显示产品标题(架构字段是im_title,这是数据源中的自定义字段)。 -
label_schema_mapping: 指的是“产品卡片”组件中Label字段的方案映射。在屏幕截图中使用它来显示产品品牌。 -
price_schema_mapping: 指的是“产品卡片”组件中Price字段的方案映射。在屏幕截图中使用它来显示产品的原始零售价。 -
discount_price_schema_mapping: 指的是“产品卡片”组件中Discount Price字段的方案映射。在屏幕截图中使用它来显示产品的折扣价。这属于可选项,可能不适用于您的数据源。 -
color: 用于“按颜色搜索”小部件演示的示例颜色代码。 -
find_similar_im_name: 用于“查找相似”小部件演示的示例im_name。您可以在ViSenze仪表板中浏览产品图片,并使用现有任何im_name进行测试。如果您使用无效的im_name(即不存在的),将在小部件中显示默认的错误消息。 -
you_may_like_im_name: 用于“你可能也喜欢”小部件演示的示例im_name。您可以在ViSenze仪表板中浏览产品图片,并使用现有任何im_name进行测试。如果您使用无效的im_name(即不存在的),将在小部件中显示默认的错误消息。 -
filterItems: 配置演示应用中使用的过滤器类型。支持两种过滤器类型(类别和范围过滤器)。 -
配置方案:在最终步骤中,您需要将运行方案更改为“WidgetsExample”。现在您已经准备好运行演示应用。

5. 配置SDK
5.1 应用密钥
ViSearch 必须在使用前使用应用密钥进行初始化。请参阅第3.1部分以获取获取密钥的方法。您可以在AppDelegate类中初始化一次。
import ViSearchSDK
import ViSearchWidgets
...

// init ViSearch client with app key
ViSearch.sharedInstance.setup(appKey: "YOUR_APP_KEY")
5.2 应用权限
-
应用传输安全设置:为了加载产品图片,您需要在项目的
Info.plist中配置“应用传输安全设置”选项。请参阅此链接和建议以获取更多信息。如果您的产品图片URL来自各种未知域名,可以将“任意加载”选项设置为“是”。 -
添加隐私使用描述 :
iOS 10现在需要用户权限才能访问相机和照片库。为了使用“图像搜索”,请在您的Info.plist中添加描述NSCameraUsageDescription和NSPhotoLibraryUsageDescription以访问相机/照片库。更多详细信息请参阅这里。

6. 解决方案小部件
6.0 通用小部件配置
我们所有的部件(作为ViBaseSearchViewController的视图控制器子类构建)都需要以下通用配置步骤。
6.0.1 产品卡片方案映射
如3.2部分中所述,您需要上传您的数据源并配置架构字段。然后可以通过产品卡片 UI组件显示包含产品信息的字段。请参阅以下截图以获取示例。
然后您可以如下配置小部件(是视图控制器)
// create the widgets as view controller
...
...
// configure schema mapping for product card UI component in the widget
controller.schemaMapping.heading = ...  // mapping for heading element e.g. for displaying product title
controller.schemaMapping.label = ...   // mapping for label element e.g. for displaying product brand
controller.schemaMapping.price = ... // mapping for price element e.g. for displaying product original retail price
controller.schemaMapping.discountPrice = ... // mapping for discount price element e.g. for displaying product discount price. May not be available in product feed
controller.schemaMapping.productUrl = ... // mapping for product image URL. default to "im_url" schema field.
6.0.2 产品卡片显示设置
您还可以配置产品卡的各种设置。
// configure product image size and content mode
controller.imageConfig.size = CGSize(width: imageWidth, height: imageHeight )
controller.imageConfig.contentMode = .scaleAspectFill

// configure product card box size
controller.itemSize = ...

// add border to product card
controller.productCardBorderColor = UIColor.lightGray
controller.productCardBorderWidth = 0.7

// add only bottom and right borders for product card
controller.productBorderStyles = [.RIGHT , .BOTTOM]

// display a strike through text through the original retail price (if discount price is available)
controller.priceConfig.isStrikeThrough = true
6.0.3 常见搜索设置
// create search params (depending on the widget)
// for example, in Find Similar, You May Also Like, parameters are constructed by providing im_name:
// let params = ViSearchParams(imName: im_name)

// set various search settings

// limit search to return 16 most similar results
params.limit = 16

// retrieve additional meta-data (in addition to what was mentioned in schema mapping)
params.fl = ["category"]

// set search paramters
controller.params = params有关搜索参数的高级配置,请参阅此链接。
6.1 查找相似商品
用户可以在商品列表或商品详情页面主动查找视觉上相似的产品。我们的算法为不同的属性分配适当的权重,以确定最终的相似度评分,并将产品结果按评分顺序显示。该解决方案为购物者提供了基于视觉相似性发现其他相关结果的机会。
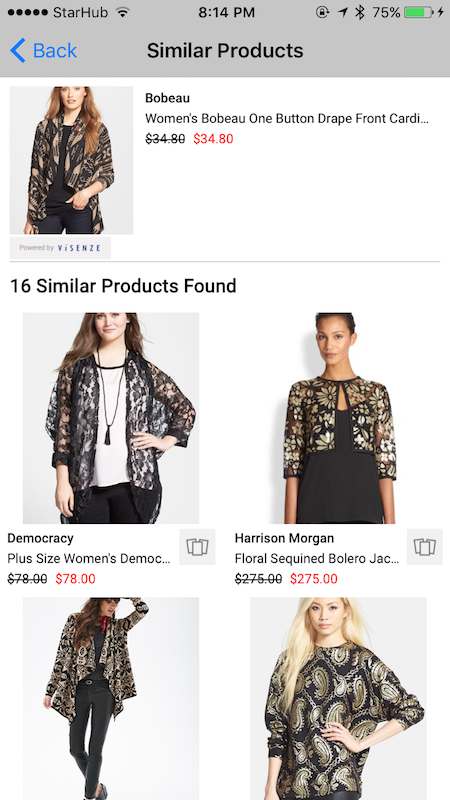
产品以网格形式显示。
以下为使用“查找相似”小部件的示例代码。请阅读第6.0节,以了解重要的配置步骤。
import ViSearchSDK
import ViSearchWidgets
...


// create search parameter which will search for similar products to sample_im_name.jpg
// you can trigger the search from a "Similar" button from product details screen
// Alternately, the "Find Similar" search can be triggered in the search results by clicking on "Find Similar" button on a product card (located at bottom right)
if let params = ViSearchParams(imName: "sample_im_name.jpg") {

    // 1. create Find Similar widget
    let similarController = ViFindSimilarViewController()

    // configure max of 16 most similar results to return
    params.limit = 16

    // 2. set search parameters
    similarController.searchParams = params

    // 3. configure schema mapping (refer to section 6.0.1)
    // Assumption: your schema data feed include "im_title", "brand", "price" fields which store data for product title, brand and current price
    similarController.schemaMapping.heading = "im_title"
    similarController.schemaMapping.label = "brand"
    similarController.schemaMapping.price = "price"

    // 4. configure product image size and content mode
    let containerWidth = self.view.bounds.width
    let imageWidth = containerWidth / 2.5
    let imageHeight = imageWidth * 1.2

    similarController.imageConfig.size = CGSize(width: imageWidth, height: imageHeight )
    // configure image content mode
    similarController.imageConfig.contentMode = .scaleAspectFill

    // 5. configure products to display in 2 columns
    similarController.itemSize = similarController.estimateItemSize(numOfColumns: 2, containerWidth: containerWidth)

    // 6. misc setting (Optional)
    // configure border color if necessary
    similarController.productCardBorderColor = UIColor.lightGray
    similarController.productCardBorderWidth = 0.7

     // configure spacing between product cards on the same row i.e. the column spacing
    similarController.itemSpacing = 0

    // configure spacing between the rows
    similarController.rowSpacing = 0

    // 7. configure delegate to listen for various events such as when user clicks on Action button
    similarController.delegate = self

    // 8. open widget with navigation controller
    self.navigationController?.pushViewController(similarController, animated: true)

    // 9. trigger web service to ViSenze server
    similarController.refreshData()

}
重要API文档
- ViFindSimilarViewController:查找相似小部件
- ViGridSearchViewController:以网格(集合视图)形式呈现搜索结果
- ViBaseSearchViewController:所有小部件的基类
- ViSearchViewControllerDelegate:小部件定制的代理
6.2 你可能还喜欢
该解决方案在商品详情页面展示了推荐产品。您可以基于客户人口统计或其他元数据(如品牌、价格、颜色等)为每个应用程序应用自定义推荐规则。然后,我们的算法将创建相似度评分并按评分顺序排列产品。该解决方案为您提供了基于视觉相似性和其他相关推荐规则推广更多产品的机会。

产品以水平滚动视图显示。
以下为使用“你可能还喜欢”小部件的示例代码。请阅读第6.0节,以了解重要的配置步骤。小部件(ViRecommendationViewController)应在详情屏幕中作为子视图控制器使用。有2种方式呈现子视图控制器。
- 以编程方式呈现 ViRecommendationViewController 作为子视图控制器
import ViSearchSDK
import ViSearchWidgets
...

// create search parameter which will search for similar products to sample_im_name.jpg
if let params = ViSearchParams(imName: "sample_im_name.jpg") {

    // 1. create You May Also Like widget
    let controller = ViRecommendationViewController()

    // configure max of 10 most similar results to return
    params.limit = 10

    // 2. set search parameters
    controller.searchParams = params

    // 3. configure schema mapping (refer to section 6.0.1)
    // Assumption: your schema data feed include "im_title", "brand", "price" fields which store data for product title, brand and current price
    controller.schemaMapping.heading = "im_title"
    controller.schemaMapping.label = "brand"
    controller.schemaMapping.price = "price"

    // 4. configure product image size and content mode
    let containerWidth = self.view.bounds.width

    // this will let 2.5 images appear on screen within containerWidth viewbox
    let imageWidth = controller.estimateItemWidth(2.5, containerWidth: containerWidth)
    let imageHeight = imageWidth * 1.2

    controller.imageConfig.size = CGSize(width: imageWidth, height: imageHeight )
    // configure image content mode
    controller.imageConfig.contentMode = .scaleAspectFill

    // 5. configure product card box size
    // IMPORTANT: this must be called last after schema mapping configuration as we calculate the item size based on whether a field is available
    // e.g. if label is nil in the mapping, then it will not be included in the height calculation of product card
    // the product card height is dynamic and will depend on schema mapping
    // the  product card width is set to image width
    controller.itemSize = controller.estimateItemSize()

    // 6. misc setting (Optional)

    // configure left spacing
    controller.paddingLeft = 8.0

    // configure border color if necessary
    controller.productCardBorderColor = UIColor.lightGray
    controller.productCardBorderWidth = 0.7

     // configure spacing between product cards on the same row i.e. the column spacing
    controller.itemSpacing = 0

    // 7. configure delegate to listen for various events such as when user clicks on Action button
    controller.delegate = self


    // 8a. if you are presenting this view programmatically i.e. not from storyboard , you will need to add the following code to present as view controller

    // set the frame and call necessary methods in current view controller
    controller.view.frame = CGRect(x: 0, y: 320, width: self.view.bounds.width, height: controller.itemSize.height )
    self.addChildViewController(controller)
    self.view.addSubview(controller.view)
    controller.didMove(toParentViewController: self)

    // 9. trigger web service to ViSenze server
    controller.refreshData()

}
- 从Storyboard呈现子视图控制器
您需要在视图控制器中拖入一个包含内联转场的嵌入式视图。有关说明,请参阅此处以及WidgetsExample演示。
在Interface Builder中,在ViSearchWidgets模块下将子控制器类设为ViRecommendationViewController。
然后,您可以在以下prepare方法内设置控制器
override func prepare(for segue: UIStoryboardSegue, sender: Any?) {
  if segue.identifier == "yourEmbedSegueIdentifier" {

	 let controller = segue.destination as! ViRecommendationViewController

	 if let params = ViSearchParams(imName: "sample_im_name.jpg") {

      //1. configure max of 10 most similar results to return
      params.limit = 10

      // 2. set search parameters
      controller.searchParams = params

      // 3. configure schema mapping (refer to section 6.0.1)
      // Assumption: your schema data feed include "im_title", "brand", "price" fields which store data for product title, brand and current price
      controller.schemaMapping.heading = "im_title"
      controller.schemaMapping.label = "brand"
      controller.schemaMapping.price = "price"

      // 4. configure product image size and content mode
      let containerWidth = self.view.bounds.width

      // this will let 2.5 images appear on screen within containerWidth viewbox
      let imageWidth = controller.estimateItemWidth(2.5, containerWidth: containerWidth)
      let imageHeight = imageWidth * 1.2

      controller.imageConfig.size = CGSize(width: imageWidth, height: imageHeight )
      // configure image content mode
      controller.imageConfig.contentMode = .scaleAspectFill

       // 5. configure product card box size
       // IMPORTANT: this must be called last after schema mapping configuration as we calculate the item size based on whether a field is available
       // e.g. if label is nil in the mapping, then it will not be included in the height calculation of product card
       // the product card height is dynamic and will depend on schema mapping
       // the  product card width is set to image width
       controller.itemSize = controller.estimateItemSize()

       // 6. misc setting (Optional)

       // configure left spacing
       controller.paddingLeft = 8.0

       // configure border color if necessary
       controller.productCardBorderColor = UIColor.lightGray
       controller.productCardBorderWidth = 0.7

        // configure spacing between product cards on the same row i.e. the column spacing
       controller.itemSpacing = 8

        // 7. configure delegate to listen for various events such as when user clicks on Action button
        controller.delegate = self


        // 8. trigger web service to ViSenze server
        controller.refreshData()

    }

  }
}
重要API文档
- ViRecommendationViewController:你可能还喜欢小部件
- ViHorizontalSearchViewController:以水平滚动视图(集合视图)形式呈现搜索结果
- ViBaseSearchViewController:所有小部件的基类
- ViSearchViewControllerDelegate:小部件定制的代理
6.3 通过图像搜索
购物者可以拍下或上传他们想要的产品照片,找到全方位、跨品牌等价格点上的相同或相似产品,并订购最适合他们需求的产品。该解决方案为购物者提供了一种创新且简单的方式,在无需关键词的情况下找到他们想要的项目。
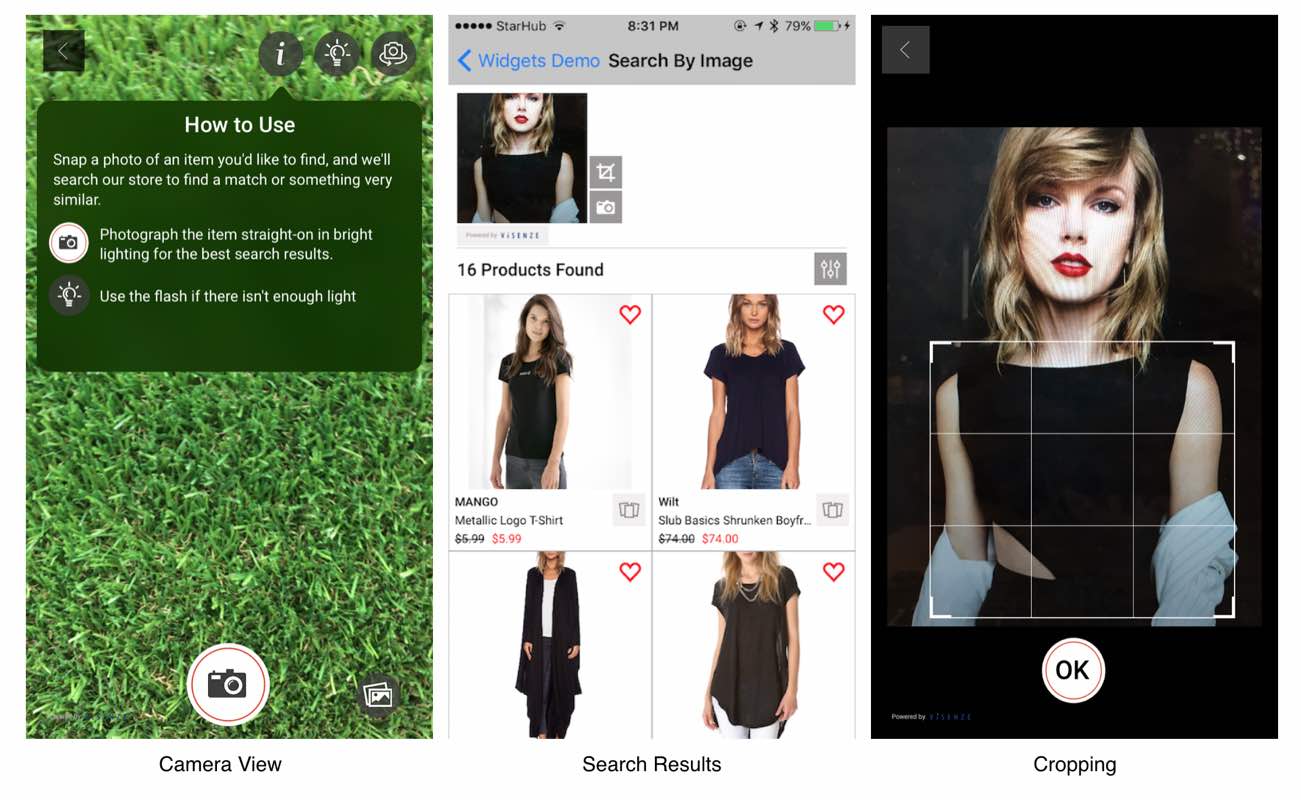
产品以网格形式显示。
以下为使用“通过图像搜索”小部件的示例代码。请阅读第6.0节,以了解重要的配置步骤和第5.2节,以了解重要的应用权限。
import ViSearchSDK
import ViSearchWidgets
...

// the entry point for Search by Image is to open a camera to take photo
// 1. we use CameraViewController for photo taking / select photo
let cameraViewController = CameraViewController(croppingEnabled: false, allowsLibraryAccess: true) { [weak self] image, asset in

    // user cancel photo taking
    if( image == nil) {
        self?.dismiss(animated: false, completion: nil)
        return
    }

    // 2. create the Search by Image widget and save recent photo
    let controller = ViSearchImageViewController()

    // save recent photo asset (which can be a recent taken photo from camera)
    // the asset can also be from the user's photo library
    controller.asset = asset

    // create search parameter
    let params = ViUploadSearchParams(image: image!)

    // configure max of 16 most similar results to return
    params.limit = 16

    // upload higher res image if necessary i.e. max 1024
    params.img_settings = ViImageSettings(setting: .highQualitySetting)

    controller.searchParams = params

    // enable cropping and select photo from library
    controller.croppingEnabled = true
    controller.allowsLibraryAccess = true

    // 3. configure schema mapping (refer to section 6.0.1)
    // Assumption: your schema data feed include "im_title", "brand", "price" fields which store data for product title, brand and current price
    controller.schemaMapping.heading = "im_title"
    controller.schemaMapping.label = "brand"
    controller.schemaMapping.price = "price"

    // 4. configure product image size and content mode
    let containerWidth = self.view.bounds.width
    let imageWidth = containerWidth / 2.5
    let imageHeight = imageWidth * 1.2

    controller.imageConfig.size = CGSize(width: imageWidth, height: imageHeight )
    // configure image content mode
    controller.imageConfig.contentMode = .scaleAspectFill

    // 5. configure products to display in 2 columns
    controller.itemSize = similarController.estimateItemSize(numOfColumns: 2, containerWidth: containerWidth)

    // 6. misc setting (Optional)
    // configure border color if necessary
    controller.productCardBorderColor = UIColor.lightGray
    controller.productCardBorderWidth = 0.7

     // configure spacing between product cards on the same row i.e. the column spacing
    controller.itemSpacing = 0

    // configure spacing between the rows
    controller.rowSpacing = 0

    // 7. configure delegate to listen for various events such as when user clicks on Action button
    controller.delegate = self

    // 8. open widget with navigation controller
    self.navigationController?.pushViewController(similarController, animated: true)

    // 9. trigger web service to ViSenze server
    controller.refreshData()

    self?.dismiss(animated: false, completion: nil)

}

// present the camera to take photo or select from library
present(cameraViewController, animated: true, completion: nil)
您可以通过设置以下属性启用/禁用裁剪、照片库访问
// if you want to enable cropping immediately after taking photo and before search
// just set croppingEnabled to true for CameraViewController
// in the widget demo, search results are displayed immediately after taking from camera. Cropping is only done later by clicking on the crop button next to the query image
let cameraViewController = CameraViewController(croppingEnabled: false, allowsLibraryAccess: true) ...

// enable cropping and select photo from library
controller.croppingEnabled = true
controller.allowsLibraryAccess = true
重要API文档
- ViSearchImageViewController:通过图像搜索小部件
- ViGridSearchViewController:以网格(集合视图)形式显示搜索结果
- ViBaseSearchViewController:所有小部件的基类
- ViSearchViewControllerDelegate:小部件定制的代理
- CameraViewController : 显示相机视图,用于拍照或从相册中选择照片
- ConfirmViewController : 确认控制器,用于保留/丢弃拍摄/选择的图片。裁剪操作在此进行。
6.4 通过颜色搜索
购物者可以在您的整个已索引的产品目录中搜索特定颜色的商品,并通过属性或字段(如类别、品牌、价格等)进一步缩小搜索结果。我们的算法可以通过颜色调色板或广泛的颜色光谱中的一组预选颜色搜索目录。
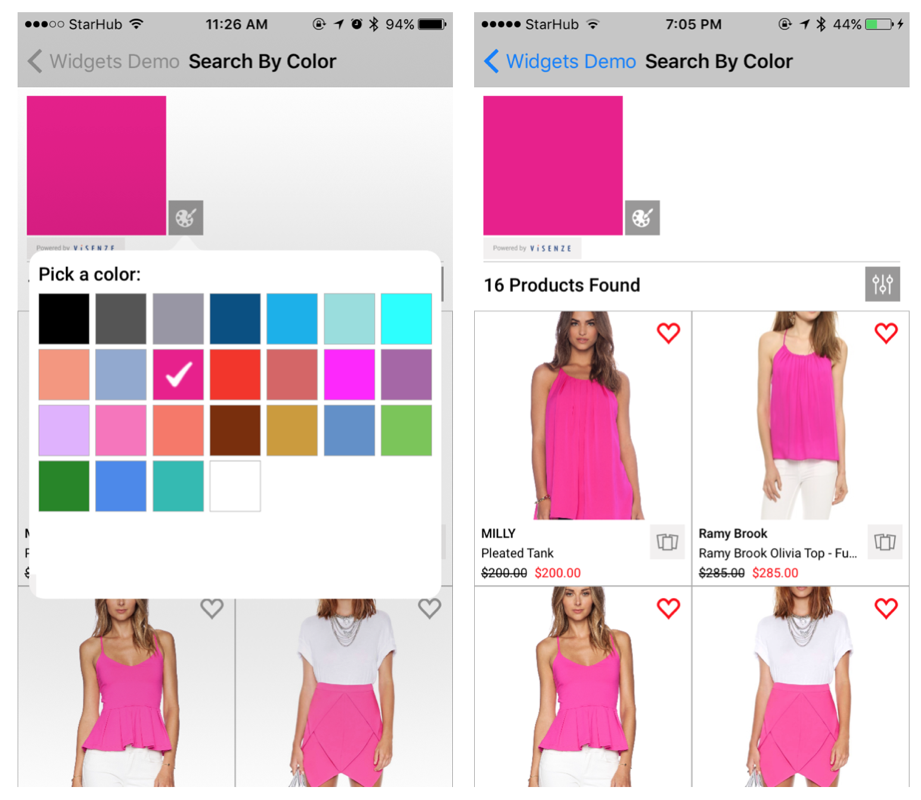
产品以网格形式显示。
以下是使用“通过颜色搜索”小部件的示例代码。请阅读第6.0节了解重要的配置步骤。
import ViSearchSDK
import ViSearchWidgets
...


// create search parameter with color code 00ff00
if let params = ViColorSearchParams(color: "00ff00") {

    // 1. create controller
    let controller = ViColorSearchViewController()

    // configure max of 16 most similar results to return
    params.limit = 16

    // 2. set search parameters
    controller.searchParams = params

    // 3. configure schema mapping (refer to section 6.0.1)
    // Assumption: your schema data feed include "im_title", "brand", "price" fields which store data for product title, brand and current price
    controller.schemaMapping.heading = "im_title"
    controller.schemaMapping.label = "brand"
    controller.schemaMapping.price = "price"

    // 4. configure product image size and content mode
    let containerWidth = self.view.bounds.width
    let imageWidth = containerWidth / 2.5
    let imageHeight = imageWidth * 1.2

    controller.imageConfig.size = CGSize(width: imageWidth, height: imageHeight )
    // configure image content mode
    controller.imageConfig.contentMode = .scaleAspectFill

    // 5. configure products to display in 2 columns
    controller.itemSize = similarController.estimateItemSize(numOfColumns: 2, containerWidth: containerWidth)

    // 6. misc setting (Optional)
    // configure border color if necessary
    controller.productCardBorderColor = UIColor.lightGray
    controller.productCardBorderWidth = 0.7

     // configure spacing between product cards on the same row i.e. the column spacing
    controller.itemSpacing = 0

    // configure spacing between the rows
    controller.rowSpacing = 0

    // 7. configure delegate to listen for various events such as when user clicks on Action button
    controller.delegate = self

    // 8. open widget with navigation controller
    self.navigationController?.pushViewController(similarController, animated: true)

    // 9. trigger web service to ViSenze server
    controller.refreshData()

}
重要API文档
- ViColorSearchViewController : 通过颜色搜索的小部件
- ViGridSearchViewController : 用于以网格(集合视图)显示搜索结果
- ViBaseSearchViewController : 所有小部件的基础类
- ViSearchViewControllerDelegate:小部件定制的代理
- ViColorPickerModalViewController : 颜色选择视图控制器。您可以在弹出视图中展示此视图(即从按钮点击触发)或作为子视图控制器。请参阅第7.5.2节了解示例实现。
7. 自定义
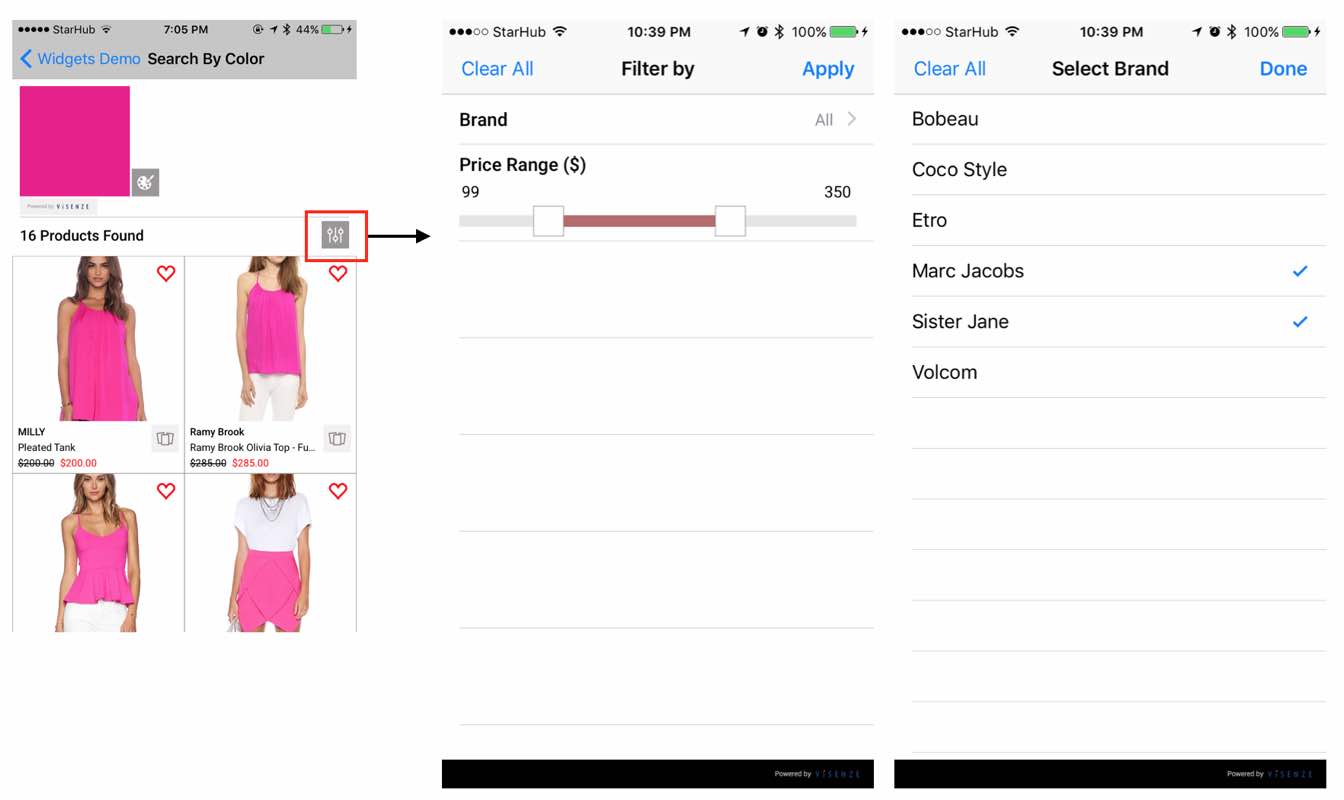
7.1 筛选
您可以配置用于 查找类似、通过图片搜索 和 通过颜色搜索 小部件筛选结果的过滤器组件。支持两种类型的过滤器
- 范围过滤器(例如价格)(ViFilterItemRange)
- 多选类别过滤器(例如产品类别、品牌)(ViFilterItemCategory)
过滤器可以创建如下
var items : [ViFilterItem] = []

// configure a 'price' range filter item
// Assumption: there is a int/float field named "price" in your schema data feed
let min : Int = 0
let max : Int = 500

let item = ViFilterItemRange(title: "Price Range ($)", schemaMapping: "price", min: min, max: max)
items.append(item)

// configure a category filter item for 'brand' schema field
// Assumption: there is a string field named 'brand' in your schema
let brandString = "Bobeau,Coco Style,Etro,Marc Jacobs,Sister Jane,Volcom"
let options = brandString.components(separatedBy: ",")
var optionArr : [ViFilterItemCategoryOption] = []
for o in options {
    optionArr.append( ViFilterItemCategoryOption(option: o) )
}

let brandFilterItem = ViFilterItemCategory(title: "Brand", schemaMapping: "brand", options: optionArr)
items.append(brandFilterItem)
要显示过滤器,您只需设置小部件的 filterItems 属性即可
controller.filterItems = items重要API文档
7.2 小部件主题
要自定义小部件和按钮的颜色、样式,您可以参考以下类
- ViTheme : 默认全局配置,包括文字字体、按钮颜色、大小等
您可以通过 ViTheme 单例进行配置
// configure default font
ViTheme.sharedInstance.default_font = ...
- ViButtonConfig : 按钮的默认样式
- ViLabelConfig : 标签(标题、标签、价格、折扣价格)的默认样式
- ViImageConfig : 产品图像配置
对于特定小部件的自定义(例如显示/隐藏按钮、更改文本/按钮颜色等),请参阅 ViBaseSearchViewController 的 UI Settings 部分。
7.3 高级
对于需要创建您自己的小部件或修改/扩展产品卡的复杂场景,请连接到 ViSearchViewControllerDelegate 回调。
- configureCell(sender:collectionView:indexPath:cell:) : 允许您在显示之前配置产品单元格。您可以通过标签在cell.contentView中检索各种产品卡片UI元素,例如cell.contentView.viewWithTag(ViProductCardTag.productImgTag.rawValue)然后相应配置。标签在此处定义这里。
- configureLayout(sender:layout:) : 如果您需要拥有自己的控制器,该控制器将更改内置collectionview的布局。
- controllerWillTransition(controller:to size:with coordinator:) : 在方向更改时重新配置控制器
- willShowSimilarController(sender:controller:collectionView:indexPath:product:) : 在显示之前配置类似控制器。
- willShowFilterController(sender:controller:) : 在显示筛选器屏幕之前配置筛选器控制器。
- didSelectProduct(sender:collectionView:indexPath:product:) : 产品选择通知即用户点击产品卡片
- actionBtnTapped(sender:collectionView:indexPath:product:) : 动作按钮点击通知即用户点击产品卡片单元右上角的动作按钮
- similarBtnTapped(sender:collectionView:indexPath:product:) : 用户点击了产品卡片单元右下角的类似按钮
- searchSuccess(sender:searchType:reqId:products:) : 搜索成功
- searchFailed(sender:searchType:err:apiErrors:) : 搜索失败,原因是网络错误或ViSenze API错误
7.4 错误处理
使用小部件时有两种可能的错误类型
- 尝试调用API时的错误,例如与网络相关的错误,如离线/损坏/超时互联网连接
- ViSenze搜索API相关的错误,例如搜索参数配置错误、无效的应用程序密钥、API限制超限、无效的im_name
默认情况下,小部件将显示通用错误消息(即对于所有错误,“发生了错误。请重试。”)。此外,搜索无结果将显示“没有找到结果”。
要向最终用户提供自定义错误消息,您可以在searchFailed(sender:searchType:err:apiErrors:)回调中挂钩到ViSearchViewControllerDelegate并采取适当的操作。
...

// set delegate to current view controller
controller.delegate = self

// turn off default error message display
controller.showDefaultErrMsg = false

// turn off default no results message display
controller.showNoSearchResultsMsg = false

...

// sender here is refering to the controller that called this search
// hook into this to display your custom error view
func searchFailed(sender: AnyObject, searchType: ViSearchType , err: Error?, apiErrors: [String]) {
    if let err = err {
        // display network error e.g. with UIAlertController
        // default network error are stored in err.localizedDescription

    }

    else if apiErrors.count > 0 {
    	  // ViSenze server will return list of error messages in an array
    	  let msg = apiErrors.joined(separator: ",")
    	  // display message here if necessary
    }

    // you can create a custom view (UIView)
    // and then call
    DispatchQueue.main.async {
	    var your_custom_view = ...
	    controller.setMsgView(your_custom_view)

	    // display
	    controller.showMsgView = true
    }
}

// hook into this to display no results found custom view
func searchSuccess( sender: AnyObject, searchType: ViSearchType, reqId: String? , products: [ViProduct])
{
	 if(self.products.count == 0 ){
        DispatchQueue.main.async {
             var your_custom_view = ...
	    		controller.setMsgView(your_custom_view)
	    		// display
	    		controller.showMsgView = true
        }
    }
}
作为备选方案,您可以通过重写displayDefaultErrMsg、displayNoResultsFoundMsg来子类化视图控制器,并更改消息显示。
7.5 自定义搜索栏
要在UISearchBar中添加“按图片搜索”和“按颜色搜索”按钮,请参阅WidgetsExample项目 > CustomSearchBarViewController类。

7.5.1 将摄像头和拾色器按钮添加到UISearchBar
您可以通过在自定义UIViewController中实现以下代码,将摄像头和拾色器按钮添加到UISearchBar中。
// point the searchbar to your storyboard
@IBOutlet weak var searchBar: UISearchBar!

override func viewDidAppear(_ animated: Bool) {
        super.viewDidAppear(animated)

	// retrieve the text field within UISearchBar
	if let textFieldInsideSearchBar = self.searchBar.value(forKey: "searchField") as? UITextField {

	    // customize the right view to include our 2 buttons
	    textFieldInsideSearchBar.rightView = self.getCameraColorSearchButtons()
	    textFieldInsideSearchBar.rightViewMode = .always
	}

}

/// Add color picker and search by image buttons to search bar
///
/// - Returns: custom view to be put into the UITextField of UISearchBar
public func getCameraColorSearchButtons() -> UIView {
    let customView = UIView()
    customView.autoresizingMask = [ .flexibleLeftMargin , .flexibleRightMargin ]

    let btnWidth = ViIcon.camera!.width + 4
    var floatWidth = btnWidth

    let button = UIButton(type: .custom)

    button.setImage(ViIcon.camera, for: .normal)
    button.setImage(ViIcon.camera, for: .highlighted)

    button.tintColor = UIColor.black
    button.tag = ViProductCardTag.cameraBtnTag.rawValue

    button.frame = CGRect(x: 0, y: 0, width: btnWidth, height: btnWidth)


    button.addTarget(self, action: #selector(self.openCameraView), for: .touchUpInside)
    customView.addSubview(button)

    let colorButton = UIButton(type: .custom)

    colorButton.setImage(ViIcon.color_pick, for: .normal)
    colorButton.setImage(ViIcon.color_pick, for: .highlighted)

    colorButton.tintColor = UIColor.black
    //colorButton.imageEdgeInsets = UIEdgeInsetsMake( 4, 4, 4, 4)
    colorButton.tag = ViProductCardTag.colorPickBtnTag.rawValue


    colorButton.addTarget(self, action: #selector(self.openColorPicker), for: .touchUpInside)
    colorButton.frame = CGRect(x: btnWidth + 4, y: 0, width: btnWidth, height: btnWidth)
    floatWidth = colorButton.frame.origin.x + btnWidth

    customView.addSubview(colorButton)

    customView.frame = CGRect(x: 0 , y: 0 , width: floatWidth , height: btnWidth )

    return customView
}
7.5.2 拾色器
要实现拾色器按钮的动作,您需要实现以下代码。
// make sure your custom controller implements ViColorPickerDelegate , UIPopoverPresentationControllerDelegate
// UIPopoverPresentationControllerDelegate is needed to display color picker in a popover
class CustomSearchBarViewController: UIViewController, ViColorPickerDelegate, UIPopoverPresentationControllerDelegate{

...

	var colorParms: ViColorSearchParams? = nil

	// list of colors for the color picker in hex format e.g. e0b0ff, 2abab3
	open var colorList: [String] = [
	    "000000" , "555555" , "9896a4" ,
	    "034f84" , "00afec" , "98ddde" ,
	    "00ffff" , "f5977d" , "91a8d0",
	    "ea148c" , "f53321" , "d66565" ,
	    "ff00ff" , "a665a7" , "e0b0ff" ,
	    "f773bd" , "f77866" , "7a2f04" ,
	    "cc9c33" , "618fca" , "79c753" ,
	    "228622" , "4987ec" , "2abab3" ,
	    "ffffff"
	]

	/// Open color picker view in a popover
	///
	/// - Parameters:
	///   - sender: color picker button
	///   - event: button event
	public func openColorPicker(sender: UIButton, forEvent event: UIEvent) {
	    let controller = ViColorPickerModalViewController()
	    controller.modalPresentationStyle = .popover
	    controller.delegate = self
	    controller.colorList = self.colorList
	    controller.paddingLeft = 8
	    controller.paddingRight = 8
	    controller.preferredContentSize = CGSize(width: self.view.bounds.width, height: 300)

	    if let colorParams = self.colorParms {
	        controller.selectedColor = colorParams.color
	    }

	    if let popoverController = controller.popoverPresentationController {
	        popoverController.sourceView = sender
	        popoverController.sourceRect = sender.bounds
	        popoverController.permittedArrowDirections = UIPopoverArrowDirection.up
	        popoverController.delegate = self

	    }

	    self.present(controller, animated: true, completion: nil)
	}

	// MARK: UIPopoverPresentationControllerDelegate
    // important - this is needed so that a popover will be properly shown instead of fullscreen
    public func adaptivePresentationStyle(for controller: UIPresentationController,
                                          traitCollection: UITraitCollection) -> UIModalPresentationStyle{
        return .none
    }


	// MARK: ViColorPickerDelegate
    public func didPickColor(sender: ViColorPickerModalViewController, color: String) {
        // set the color params

        self.colorParms = ViColorSearchParams(color: color)

        // refresh data
        let controller = ViColorSearchViewController()
        self.colorParms!.limit = 16

        controller.searchParams = self.colorParms

        // configure schema mapping if needed
        controller.schemaMapping = ...

        // configure filter
        controller.filterItems = ...

        let containerWidth = self!.view.bounds.width

        // configure product image size
        controller.imageConfig.size = ...
        controller.itemSize = controller.estimateItemSize(numOfColumns: 2, containerWidth: containerWidth)

        self.navigationController?.pushViewController(controller, animated: true)

        controller.refreshData()

        sender.dismiss(animated: false, completion: nil)


    }


}
7.5.3 摄像头按钮
要实现摄像头按钮的动作,将以下代码复制以触发摄像头搜索。
// MARK: camera
/// Open camera to take picture
///
/// - Parameters:
///   - sender: camera button
///   - event: button event
public func openCameraView(sender: UIButton, forEvent event: UIEvent) {
    let cameraViewController = CameraViewController(croppingEnabled: false, allowsLibraryAccess: true) { [weak self] image, asset in

        // see the code in Search by Image solution

        // user cancel photo taking
        if( image == nil) {
            self?.dismiss(animated: true, completion: nil)
            return
        }

        let controller = ViSearchImageViewController()

        // save recent photo
        controller.asset = asset

        let params = ViUploadSearchParams(image: image!)
        params.limit = 16

        // upload higher res image i.e. max 1024
        params.img_settings = ViImageSettings(setting: .highQualitySetting)

        controller.searchParams = params

        controller.croppingEnabled = true
        controller.allowsLibraryAccess = true

        // configure your schema mapping
        controller.schemaMapping = ...

        // configure filter items if needed
        controller.filterItems = ...

        // sample configuration
        let containerWidth = self!.view.bounds.width


        // configure product image size
        controller.imageConfig.size = ...
        controller.imageConfig.contentMode = .scaleAspectFill

        controller.itemSize = controller.estimateItemSize(numOfColumns: 2, containerWidth: containerWidth)

        // set to same delegate
        //controller.delegate = self
        self?.navigationController?.pushViewController(controller, animated: true)

        controller.refreshData()

        self?.dismiss(animated: false, completion: nil)
    }

    present(cameraViewController, animated: true, completion: nil)

}
7.6 方向变更
要处理方向变更,例如,您希望在纵向时显示两列而在横向时显示四列,您可以通过挂钩ViSearchViewControllerDelegate的controllerWillTransition方法来实现。
func controllerWillTransition(controller: UIViewController , to size: CGSize, with coordinator: UIViewControllerTransitionCoordinator) {

    coordinator.animate(alongsideTransition: { context in
    	  // ViGridSearchViewController is the super class of Find Similar, Search By Color, Search by Image widgets
        if controller is ViGridSearchViewController {
            // reconfigure size
            self.configureSize(controller: controller as! ViGridSearchViewController)
            (controller as? ViGridSearchViewController)?.collectionView?.reloadData()
        }
    }, completion: { context in

        // after rotate

    })

}

// configure controller size during different orientation
public func configureSize(controller: ViGridSearchViewController) {
    let isPortrait = UIApplication.shared.statusBarOrientation.isPortrait
    let numOfColumns = isPortrait ? 2 : 4
    let containerWidth = UIScreen.main.bounds.size.width

    let imageWidth = isPortrait ? (UIScreen.main.bounds.size.width / 2.5) : (UIScreen.main.bounds.size.width / 4.5)
    let imageHeight = imageWidth * 1.2

    controller.imageConfig.size = CGSize(width: imageWidth, height: imageHeight )
    controller.itemSpacing = 0
    controller.rowSpacing = 0

    // this must be called last after setting schema mapping
    // the item size is dynamic and depdend on schema mapping
    // For example, if label is not provided, then the estimated height would be shorter
    controller.itemSize = controller.estimateItemSize(numOfColumns: numOfColumns, containerWidth: containerWidth)

}
7.7 超时设置
默认情况下,API搜索请求将在10秒后超时。要更改超时时间,您可以在AppDelegate的didFinishLaunchingWithOptions方法中实现以下代码。
// setup search client
ViSearch.sharedInstance.setup(appKey: yourAppKey)

// configure timeout to 30s example. By default timeout is set 10s.
ViSearch.sharedInstance.client?.timeoutInterval = 30
ViSearch.sharedInstance.client?.sessionConfig.timeoutIntervalForRequest = 30
ViSearch.sharedInstance.client?.sessionConfig.timeoutIntervalForResource = 30
ViSearch.sharedInstance.client?.session = URLSession(configuration: (ViSearch.sharedInstance.client?.sessionConfig)!)

// configure timeout for downloading an image, default is 15s
KingfisherManager.shared.downloader.downloadTimeout = 30
8. 实现ViSenze分析
分析报告页面位于您的ViSenze仪表板中,允许您方便地通过点击指标和使用的统计信息查看每个解决方案的概述。通过分析报告工具,您可以轻松跟踪性能,通过点击率、加入愿望清单率、加入购物车率和点击排名等指标量化我们解决方案的附加值。
8.1 默认动作
以下是我们分析报告支持的默认动作列表
| 已记录动作 | 描述 |
|---|---|
点击 |
当用户点击查看产品的详细信息时 |
加入购物车 |
当用户点击按钮将产品加入购物车时 |
加入愿望清单 |
当用户点击按钮将产品加入愿望清单时 |
通过集成我们的解决方案小部件,实施跟踪“点击”(点击搜索结果中的产品卡)和“加入愿望清单”(点击默认为心形图标的行为按钮)的动作已包括在内。
自定义动作按钮跟踪
默认情况下,点击动作按钮(位于产品卡片右上角)时将跟踪“加入愿望清单”动作。您可以通过配置“actionBtnConfig”将此动作更改为您的自定义动作。
...
controller.actionBtnConfig.actionToRecord = "your_custom_action"
8.2 自定义动作
如果您想跟踪在部件UI外执行的动作或想自定义自己UI,动作跟踪需要显式实现。对于每个发送的动作,都需要与动作名称一起发送一个“reqId”(请求ID)。这个“reqId”将动作与其触发的API调用绑定到我们的服务。每次对我们的服务进行API调用时,响应中都会返回一个“reqId”。由此特定API调用返回的结果产生的任何用户动作都应该与其“reqId”绑定。请参阅下面的代码片段以了解实现方式。
我们的部件自动记录视图控制器(ViBaseSearchViewController)中最最近API调用的请求ID(查找类似、你可能也会喜欢、按颜色/图像搜索)。
可以通过请求ID发送用户操作。
if sender is ViBaseSearchViewController {
    let controller = sender as! ViBaseSearchViewController
    let recentReqId = controller.reqId

    let params = ViTrackParams(reqId: recentReqId, action: "custom_action" )
	 params.imName = product.im_name

	// send tracking request to server
	ViSearch.sharedInstance.track(params: params!, handler: nil)
}
9. 已知问题
-
在搜索结果中显示大量图片可能会导致崩溃。
如果您在API调用中将搜索参数配置为返回大量图片,在长时间或高强度的使用后可能会引起崩溃。例如,您将
controller.searchParams?.limit设置为1000(绝对限制)并继续滚动到小部件的末尾并触发连续的搜索(例如,通过点击“查找相似”按钮)。然后可能会发生崩溃。请注意,通常对于普通用户来说,这种行为不会观察到,因为大多数人可能在翻到第一个40个结果后会停止。建议您将limit设置为一个较小的数字,例如16-100,以节省带宽并加快加载速度。如果您想为小部件实现分页或无限滚动,可以增加页面数并重新触发搜索。// For example, when the server side has 60 items, the search operation will return // the first 30 items with page = 1 and limit = 30. By changing the page to 2, // the search will return the last 30 items. ... controller.searchParams?.page = 2; controller.searchParams?.limit = 30; // refresh data controller.refreshData()
...