UPPlatformSDK 1.1.5
- 作者:
- Andy Roth
UP Platform iOS SDK
完整的 SDK 文档可以在 http://jawbone.github.io/UPPlatform_iOS_SDK/ 查看
概述
此 SDK 为 iOS 应用与 UP 平台 集成提供 Objective-C 接口。它通过 UIWebView 使用 OAuth 2.0 处理身份验证,并提供了简单的接口来调用平台 REST 终端。
要求
开始使用 UP iOS SDK 开发的要求只有 OS X Mavericks、Xcode 5 和 iOS 7。如果您还没有升级,建议使用 OS X Mavericks、Xcode 5 和 iOS 7。
为了验证 UP 平台,您需要有 Jawbone UP 用户账户。您可以通过访问 jawbone.com/start/signup 创建新账户。
目录
入门
获取 OAuth 凭证
使用您的 Jawbone UP 账户登录到 Jawbone UP 开发者门户。如果您还没有账户,您可以通过访问 jawbone.com/start/signup 创建一个。
通过点击 "管理账户" 来注册您的组织。
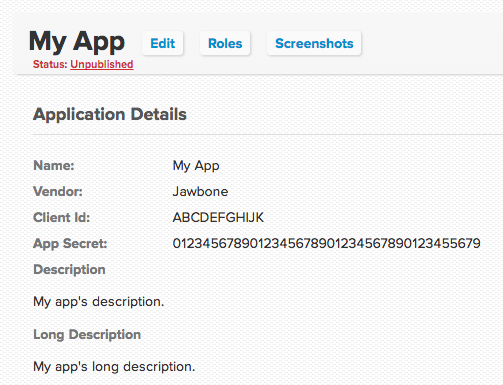
按照说明创建一个新应用,并获取您用于通过 UP 平台进行身份验证的 OAuth 客户端 ID 和 应用程序密钥。
在 "OAuth 重定向 URI" 字段中指定您自定义的重定向 URI 或使用默认值 up-platform://redirect。
下载 Jawbone UP iOS SDK。
您可以通过以下链接下载最新的iOS SDK版本,或者直接从本GitHub仓库克隆。
选项 1:下载UP iOS SDK v1.0.0(2013年11月)
https://github.com/Jawbone/UPPlatformSDK/releases/tag/v0.1-alpha
选项 2:从GitHub克隆此仓库
git clone [email protected]:Jawbone/UPPlatformSDK.git
运行示例应用
Jawbone UP iOS SDK附带一个iOS示例应用,您可以使用它通过UP平台进行身份验证并开始与Jawbone UP账户交互。
您可以在UPPlatformSDK/HelloUP/HelloUP.xcodeproj中找到并打开PlatformTest项目。
将SDK添加到您的项目中
- 将
UPPlatformSDK.framework拖放到Xcode项目或工作区中的Frameworks组中。
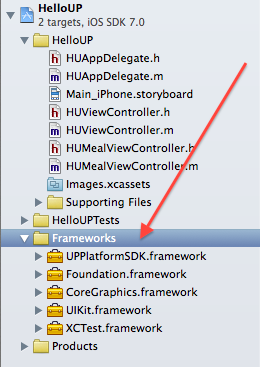
- 在编译设置中,将
-ObjC添加到其他链接器标志。

这样就完成了!
现在只需在项目中任何要使用SDK的地方添加#import <UPPlatformSDK/UPPlatformSDK.h>即可。
文档
身份验证
身份验证通过共享的UPPlatform对象来处理。要启动一个新会话,请使用startSessionWithClientID:clientSecret:authScope:completion:方法。
注意:如果您在Jawbone UP开发者门户中指定了您的应用的定制重定向URI,则可以使用startSessionWithClientID:clientSecret:authScope:redirectURI:completion:方法指定它。
[[UPPlatform sharedPlatform] startSessionWithClientID:@"MY_CLIENT_ID"
                                         clientSecret:@"MY_CLIENT_SECRET"
                                            authScope:(UPPlatformAuthScopeExtendedRead | UPPlatformAuthScopeMoveRead)
                                           completion:^(UPSession *session, NSError *error) {
                                               if (session != nil) {
                                                   // Your code to start making API requests goes here.
                                               }
}];注意:可用的UPPlatformAuthScope值可以在UPPlatform.h中找到。
一旦建立了有效的会话,有几种方式可以创建API请求。您可以使用提供的封装大部分可用端点的对象,或者创建自定义请求。API对象是创建REST平台请求的最简单方式。它们将创建网络请求并解析结果JSON到NSObject中。
会话验证
要验证现有会话是否仍然有效,请调用validateSessionWithCompletion:。如果传递给完成块中的session对象不是nil,则会话有效,可以发起API请求。此方法有助于防止在用户的访问令牌无效时意外返回401未授权响应。
调试选项
为了启用通过SDK发送和接收的网络请求和响应的额外日志记录,应将[UPPlatform SharedPlatform].enableNetworkLogging设置为YES。
用户信息
注意:所有单位(重量、距离)均为公制。
获取用户的详细信息。
[UPUserAPI getCurrentUserWithCompletion:^(UPUser *user, UPURLResponse *response, NSError *error) {
    // Your code to process returned UPUser object.
}];
获取朋友的列表(标识符)
[UPUserAPI getFriendsWithCompletion:^(NSArray *friends, UPURLResponse *response, NSError *error) {
    // Your code here to process an array of UPUser objects.
}];
获取用户趋势
[UPUserAPI getTrendsWithEndDate:nil
                      rangeType:UPUserTrendsRangeTypeDays
                  rangeDuration:10U
                     bucketSize:UPUserTrendsBucketSizeDays
                     completion:^(NSArray *trends, UPURLResponse *response, NSError *error) {
    // Your code here to process an array of UPTrend objects.
}];
移动
获取用户的移动列表(按日期或按时间戳分页)。
[UPMoveAPI getMovesWithLimit:10U completion:^(NSArray *moves, UPURLResponse *response, NSError *error) {
    // Your code here to process an array of UPMove objects.
}];
获取用户的移动图。

您可以通过请求一个560x300的具有透明背景的PNG图像,将用户的移动数据可视化。
[UPMoveAPI getMoveGraphImage:move completion:^(UIImage *image) {
    // Your code here to process the graph image.
}];
锻炼
获取用户的锻炼列表(按日期或按时间戳分页)。
[UPWorkoutAPI getWorkoutsWithLimit:10U completion:^(NSArray *workouts, UPURLResponse *response, NSError *error) {
    // Your code here to process an array of UPWorkout objects.
}];
创建新的锻炼。
我们可以从创建一个新的锻炼事件开始。
UPWorkout *workout = [UPWorkout workoutWithType:UPWorkoutTypeBike
                                      startTime:startTime
                                        endTime:endTime
                                      intensity:UPWorkoutIntensityEasy
                                 caloriesBurned:@300];

workout.distance = @7;
workout.imageURL = @"YOUR_IMAGE_URL.png";
然后,我们可以将此锻炼事件发布到用户的帖子中。
[UPWorkoutAPI postWorkout:workout completion:^(UPWorkout *workout, UPURLResponse *response, NSError *error) {
    // Your completion code here.
}];
获取用户的锻炼图。

您可以通过请求一个560x300的具有透明背景的PNG图像,将用户的锻炼数据可视化。
[UPWorkoutAPI getWorkoutGraphImage:workout completion:^(UIImage *image) {
    // Your code here to use the graph image.
}];
睡眠
获取用户的最近睡眠事件。
[UPSleepAPI getSleepsWithLimit:10U completion:^(NSArray *sleeps, UPURLResponse *response, NSError *error) {
    // Your code here to process an array of UISleep objects.
}];
获取用户的睡眠图。

您可以通过请求一个560x300的具有透明背景的PNG图像,将用户的睡眠数据可视化。
[UPSleepAPI getSleepGraphImage:sleep completion:^(UIImage *image) {
    // Your code here to handle the graph image.
}];
餐食
获取用户的最近餐食事件。
[UPMealAPI getMealsWithLimit:5U completion:^(NSArray *meals, UPURLResponse *response, NSError *error) {
    // Your code here to process the meals array.
}];
创建新的餐食。
餐食事件应包含一个或多个餐食品项。要创建新的餐食事件,我们首先指定单个餐食品项的营养信息。
UPMealNutritionInfo *info = [[UPMealNutritionInfo alloc] init];

info.calories = @130;
info.sugar = @30;
info.carbohydrates = @10;
info.calcium = @80;
然后,我们创建一个新的餐食品项并设置其营养信息。
UPMealItem *item = [UPMealItem mealItemWithName:@"Granola Bar"
                                    description:@"A fancy granola bar."
                                         amount:@1
                               measurementUnits:@"bar"
                                    servingType:UPMealItemServingTypePlate
                                       foodType:UPMealItemFoodTypeBrand
                                 nutritionInfo:info];
然后,我们创建一个新的餐食事件来保存我们刚才创建的餐食品项。
UPMeal *meal = [UPMeal mealWithTitle:@"Delicious Granola Bar"
                                note:@"It was tasty"
                               items:@[item]];

meal.photoURL = @"YOUR_PHOTO_URL.png";
最后,让我们在自己的用户帖子中发布新的餐食事件!
[UPMealAPI postMeal:meal completion:^(UPMeal *meal, UPURLResponse *response, NSError *error) {
    // Your code here to process the meal object.
}];
获取特定餐食的信息。
[UPMealAPI getMealDetails:meal completion:^(UPMeal *meal, UPURLResponse *response, NSError *error) {
    // Your code here to process the meal object.
}];
心情
获取用户的心情。
[UPMoodAPI getCurrentMoodWithCompletion:^(UPMood *mood, UPURLResponse *response, NSError *error) {
    [self showResults:mood];
}];
记录用户的心情。
要设置用户的心情,我们首先需要创建一个新的UPMood对象。
UPMood *newMood = [UPMood moodWithType:UPMoodTypePumpedUp title:@"I'm pumped!"];然后,我们可以将新的UPMood对象发布到用户的帖子中。
[UPMoodAPI postMood:newMood completion:^(UPMood *mood, UPURLResponse *response, NSError *error) {
    // Your code goes here.
}];
获取用户当前的心情。
[UPMoodAPI getCurrentMoodWithCompletion:^(UPMood *mood, UPURLResponse *response, NSError *error) {
        // Your code goes here.
}];
删除一个心情事件。
[UPMoodAPI deleteMood:mood completion:^(id result, UPURLResponse *response, NSError *error) {
    // Your code goes here.
}];
心脏
要创建一个新的心脏事件,我们首先需要创建一个新的UPCardiacEvent对象。
UPCardiacEvent *cardiacEvent = [UPCardiacEvent eventWithTitle:@"Run"
                                                    heartRate:@120
                                             systolicPressure:@120
                                            diastolicPressure:@80
                                                         note:@"Good weather."
                                                        image:nil];
然后,我们可以将新的UPCardiacEvent对象发布到用户的帖子中。
[UPCardiacEventAPI postCardiacEvent:cardiacEvent
                         completion:^(UPCardiacEvent *event, UPURLResponse *response, NSError *error) {

                         }];
请求最近的心脏事件。
[UPCardiacEventAPI getCardiacEventsWithCompletion:^(NSArray *results, UPURLResponse *response, NSError *error) {
        // Your code goes here.
}];
删除心事件。
[UPCardiacEventAPI deleteCardiacEvent:event
                           completion:^(id result, UPURLResponse *response, NSError *error) {
                            // Your code goes here.
                           }};
正文
要创建一个新的正文事件,我们首先需要创建一个新的 UPBodyEvent 对象。
UPBodyEvent *bodyEvent = [UPBodyEvent eventWithTitle:@"Morning start."
                                              weight:@70
                                             bodyFat:@0.14f
                                            leanMass:@29.5f
                                                 bmi:@18.5f
                                                note:@"Good progress."
                                               image:nil];
然后,我们可以将新的 UPBodyEvent 对象发布到用户的动态里。
[UPBodyEventAPI postBodyEvent:bodyEvent
                   completion:^(UPBodyEvent *event, UPURLResponse *response, NSError *error) {
                   // Your code goes here.
}];
请求最近的活动事件。
[UPBodyEventAPI getBodyEventsWithCompletion:^(NSArray *results, UPURLResponse *response, NSError *error)
      // Your code goes here.
}];
删除活动事件。
[UPBodyEventAPI deleteBodyEvent:bodyEvent
                     completion:^(id result, UPURLResponse *response, NSError *error) {
                             // Your code goes here.
                     }];
通用
要创建一个新的通用事件,我们首先需要创建一个新的 UPGenericEvent 对象。
UPGenericEvent *genericEvent = [UPGenericEvent eventWithTitle:@"Good deed."
                                                         verb:@"Done well."
                                                   attributes:@{}
                                                         note:@"Indeed."
                                                        image:nil];
然后,我们可以将新的 UPGenericEvent 对象发布到用户的动态里。
[UPGenericEventAPI postGenericEvent:genericEvent
                             completion:^(UPGenericEvent *event, UPURLResponse *response, NSError *error) {
                                   // Your code goes here.
}];
请求最近的通用事件。
[UPGenericEventAPI getGenericEventsWithCompletion:^(NSArray *results, UPURLResponse *response, NSError *error) {
     // Your code goes here.
}];
删除通用事件。
[UPGenericEventAPI deleteGenericEvent:genericEvent
                           completion:^(id result, UPURLResponse *response, NSError *error) {
                               // Your code goes here.
                           }];
自定义请求
可以使用 UPURLRequest 对象进行自定义 API 请求,这也是 API 对象所使用的。这允许您向任何端点发出请求,提供任何参数,并接收结果的 JSON 对象。以下是一些示例
获取当前用户的信息。
UPURLRequest *request = [UPURLRequest getRequestWithEndpoint:@"nudge/api/users/@me"
                                                      params:nil];

[[UPPlatform sharedPlatform] sendRequest:request
                              completion:^(UPURLRequest *request, UPURLResponse *response, NSError *error) {
    // The resulting response.data is an NSDictionary with the JSON results.
}];
在 UP 上发布新的心情。
NSDictionary *params = @{
                         @"title": @"I feel great!",
                         @"sub_type": @1,
                         @"tz": [NSTimeZone localTimeZone].name
                         };

UPURLRequest *request = [UPURLRequest postRequestWithEndpoint:@"nudge/api/users/@me/mood"
                                                       params:params];

[[UPPlatform sharedPlatform] sendRequest:request
                              completion:^(UPURLRequest *request, UPURLResponse *response, NSError *error) {
    // The resulting response.data is an NSDictionary describing the created mood.
}];
单元测试
SDK 包含了一组覆盖 API 功能的 XCTest 单元测试。您可以通过在 Xcode 5 中打开 UP iOSK SDK 项目并按 ⌘ + Shift + U 来运行测试。
其他资源
您可以在 https://jawbone.com/up/developer 找到额外的 Jawbone UP 平台文档。
服务条款
管理 UP API 使用的主要原则
- 数据属于用户。我们是数据的管理者,有责任保护它并负责任地使用。
- 只有在明确获得用户许可的情况下才能收集数据。只收集您需要的,并且按您所说的方式使用。
- 用户必须有机制禁用访问并要求删除任何收集的数据。
- UP API 的使用受 UP API 服务条款 的约束。
通过使用 API,您同意服务条款,并可进行审查。
API 状态
请访问 UP 平台的 状态页面 查看平台的实时状态更新。
支持
关注我们的 Twitter @JawboneDev 获取有关 API 的最新消息和更新。
通过发送电子邮件到 [email protected] 联系开发人员支持团队。
致谢
开发
Andy Roth
资深软件工程师
Jawbone
许可证
使用遵循Apache许可证(v2.0)。详细信息请见LICENSE文件。