TimelineCards 1.0.5
| 测试测试 | ✗ |
| 语言语言 | SwiftSwift |
| 许可 | MIT |
| 发布时间上次发布时间 | 2017年12月 |
| SwiftSwift 版本 | 4.0 |
| SPM支持 SPM | ✗ |
由 Vlad Averin 维护。
TimelineCards 1.0.5
- 由
- Vlad Averin
TimelineCards
安装
CocoaPods(《它是什么?》(https://cocoapods.org.cn/about))
- 将
pod 'TimelineCards'添加到您的Podfile; - 然后在Terminal中运行
pod update; - 重新打开您的项目,使用
.xcworkspace,在您计划从中创建精美卡片的swift文件中放置import TimelineCards(或在Obj-C项目中使用桥接); - 重新构建并享受吧。
老旧方式
将.swift源文件夹拖放到您的项目中。完成。
用法
TL;DR
请访问演示项目,那里有很多演示!如果您对任何内容感到困惑,欢迎继续阅读。
单个卡片
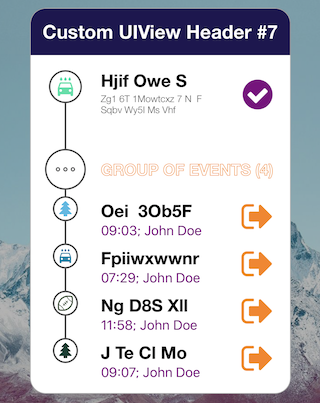
TimelineCards套件中的卡片是高度可定制的视图,它们以有序的数据集表示。它们旨在描述事件或里程碑,但这并不妨碍您根据每个元素可以无限复杂性的条件,以不同的目的使用它们。
卡片支持元素分组,尽管当前版本不支持递归嵌套的组(也许永远不会)。
创建
如果您要显示一个单一的静态时间线,则TimelineCard对象正是您需要的。让我们创建它
// Let's say you want card to be 80% of its superview's width
let timelineWidth: CGFloat = view.bounds.width * 0.8

let demoCard = TimelineCard(width: timelineWidth)
demoCard.dataProvider = self
demoCard.eventsHandler = self
view.addSubview(demoCard) // Calls `reloadData()` implicitly

// Optionally
demoCard.reloadData()
卡片的高度将根据其数据源自动计算,并在执行reloadData()方法后或在卡片被添加到父视图后可用。
自定义
上述创建代码足以使一个简单但不错的卡片正常工作。然而,卡片的外观可以通过多种方式自定义。以下是一些例子
demoCard.backgroundColor = .white
demoCard.borderAppearance = (.orange, 2.0) // color and width
demoCard.cornerRadius = 20.0
demoCard.lineColor = .darkGray
demoCard.itemShapeHeight = 30.0 // basically diameter of milestone "circle" thing
demoCard.timelinePathWidth = 2.0 // width of drawn timeline itself
demoCard.margins = (20, 10, 20, 10) // css-like notation
您还可以将卡片的header和footer设置为任何您想要的自定义UIView。卡片将相应地更新其布局。
let header = UIView(frame: CGRect(x: 0, y: 0, width: detailsCard.bounds.width, height: 60))
header.backgroundColor = .purple
demoCard.headerView = header

let footer = UIView(frame: CGRect(x: 0, y: 0, width: detailsCard.bounds.width, height: 100))
footer.backgroundColor = .purple
demoCard.footerView = footer
一旦您进行上述更新,卡片会自动重新构建。如果您想手动控制此过程(节省资源),只需关闭此功能即可
demoCard.autoreload = false
数据源和事件处理
首先,通过将它们添加到相应的类声明,使您的数据提供程序符合TimelineCardDataProvider和TimelineCardEventsHandler协议。
实现TimelineCardDataProvider
现在,让我们在请求时向您的卡片发送一些数据。您可以通过创建一个由TimelineItem和/或TimelineItemGroup对象组成的数组来完成此操作,它们是您在TimelineCards套件中使用的的主要数据单元。它们都符合TimelineSourceElement协议——您必须返回的类型。
func elementsForTimelineCard(_ timelineCard: TimelineCard, containerWidth: CGFloat) -> [TimelineSourceElement] {
	var cardSource = [] as [TimelineSourceElement]

	for someData in myDataModel.objects {
		if someData.isGroup {
			var childTimelineItems = [TimelineItem]()
			for childData in someData.children {
				let timelineItem = TimelineItem(...)
				childTimelineItems.append(timelineItem)
			}

			let timelineItemGroup = TimelineItemGroup(...)
			cardSource.append(timelineItemGroup)
		} else {
			let timelineItem = TimelineItem(...)
			cardSource.append(timelineItem)
		}
	}

	return cardSource
}
注意:containerWidthTell you the width of the containers to which your custom item description views will be added. Any content beyond this width limit will be invisible.
有两种方式创建TimelineItem和TimelineItemGroup。
- 使用只有标题和副标题的简单预设来显示项目。您仍然可以影响它们的样式,因为您发送带有属性的字符串作为参数。
let attrubitedTitle = NSAttributedString(string: "Event title", attributes: [.foregroundColor : UIColor.white])
let attrubitedSubTitle = NSAttributedString(string: "Event subtitle", attributes: [.foregroundColor : UIColor.white])

let simpleItemOne = TimelineItem(title: attrubitedTitle, subtitle: attrubitedSubTitle, icon: UIImage(named: "icon.png"))

let simpleItemTwo = TimelineItem(title: simpleItemOne, subtitle: attrubitedSubTitle, icon: UIImage(named: "icon.png"))

// And, if you want them to be part of the group
let groupItem = TimelineItemGroup(title: attrubitedTitle, subtitle: attrubitedSubTitle, items: [simpleItemOne, simpleItemTwo], icon: UIImage(named: "icon.png"))
- 使用自定义视图的任何高度(但受限于
containerWidth),以您想要的方式描述项目
let itemDescView = UIView(frame: CGRect(x: 0, y: 0, width: containerWidth, height: 65.0))
itemDescView.backgroundColor = .lightGray
// Customize it the way you want!

let simpleItemOne = TimelineItem.init(customView: itemDescView, icon: UIImage(named: "icon.png"))

let simpleItemTwo = TimelineItem.init(customView: itemDescView, icon: UIImage(named: "sub_icon.png"))

// And, if you want them to be part of the group
let groupItem = TimelineItemGroup(customView: itemDescView, items: [simpleItemOne, simpleItemTwo], icon: UIImage(named: "sub_icon.png"))
这样您可以构建卡片的唯一自定义项目数组。
实现TimelineCardEventsHandler
这种方式很简单,本身就描述了。您只需使用这些方法来处理卡片事件即可
func didSelectElement(at index: Int, in timelineCard: TimelineCard)

func didSelectSubElement(at index: (Int, Int), in timelineCard: TimelineCard)

func didTouchHeaderView(_ headerView: UIView, in timelineCard: TimelineCard)

func didTouchFooterView(_ footerView: UIView, in timelineCard: TimelineCard)
卡片流
卡片流由TimelineFeed视图表示,这是一种基于垂直滚动的TimelineCard对象。它使用内部UITableView以内存效率高重新使用,这使得构建由大量卡片组成的流成为可能。
创建
初始化新的TimelineFeed对象并设置其dataSource和delegate
let timelineWidth: CGFloat = view.bounds.width * 0.8

let timelineFeed = TimelineFeed(frame: CGRect(x: 0, y: 0, width: view.bounds.width * 0.8, height: view.bounds.height))
timelineFeed.center = view.center

timelineFeed.dataSource = self
timelineFeed.delegate = self

// Optional customization options
timelineFeed.paddingBetweenCards = 20.0
timelineFeed.topMargin = 20.0
timelineFeed.bottomMargin = 20.0

view.addSubview(timelineFeed)
timelineFeed.reloadData()
数据源和事件处理
确保您的数据提供者符合TimelineFeedDataSource和TimelineFeedDelegate协议,通过将它们添加到相应的类声明中。
实现TimelineFeedDataSource
使用该方法告诉流您希望它显示多少张卡片
func numberOfCards(in timelineFeed: TimelineFeed) -> Int {
	return timelinesCollection.items.count
}
现在,每次流请求给定索引时,我们将初始化新的卡片
func card(at index: Int, in timelineFeed: TimelineFeed) -> TimelineCard {
	let timelineCard = TimelineCard(width: timelineFeed.bounds.width)
	// Customize as you'd do with Single Card
	return timelineCard
}
注意:在此处不要为TimelineCard对象设置dataProvider或eventHandler。TimelineFeed负责此操作。
好的!现在,每当特定卡片要在流中重新使用时,它将礼貌地请求您提供数据。这与我们对单个卡片所做的一样。只需创建一些TimelineSourceElement即可。
func elementsForTimelineCard(at index: Int, containerWidth: CGFloat) -> [TimelineSourceElement] {
	var elements = [] as [TimelineSourceElement]

	// Creating those `TimelineItem` and/or `TimelineItemGroup` objects..

	return elements
}
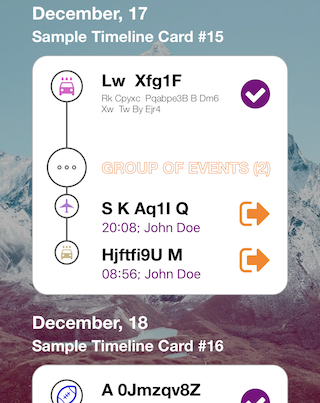
好的,卡片已设置并运行顺利,但您还可以在任一卡片上方添加标题,这样我们可以跟踪这种无休止的滚动。和其他许多功能一样,这里您有两个选择。
- 保持简单,并使用属性化的标题和副标题预设(或只要
标题即可,如果想要保持最小化)
func titleAndSubtitle(at index: Int, in timelineFeed: TimelineFeed) -> (NSAttributedString, NSAttributedString?)? {

	let timelineData = timelinesCollection.items[index]

	let testTitle = NSAttributedString(string: "Timeline Card #\(index)", attributes: [.foregroundColor : UIColor.white, .font : UIFont(name: "HelveticaNeue-Bold", size: 23.0)])

	let testSubtitle = NSAttributedString(string: "Subtitle text", attributes: [.foregroundColor : UIColor.white])

	return (testTitle, testSubtitle)

	// Subtitle is optional
	//return (testTitle, nil)
}
- 使用自定义的
UIView
func headerViewForCard(at index: Int, in timelineFeed: TimelineFeed) -> UIView? {
	let customHeader = UIView(frame: CGRect(x: 0, y: 0, width: timelineFeed.bounds.width, height: 60.0))
	customHeader.backgroundColor = .purple
	return customHeader
}
实现TimelineFeedDelegate
相对简单,类似于单个卡片的处理事件。区别在于您会获得发生事件的卡片索引。
func didSelectElement(at index: Int, timelineCardIndex: Int)

func didSelectSubElement(at index: (Int, Int), timelineCardIndex: Int)

func didTouchHeaderView(_ headerView: UIView, timelineCardIndex: Int)

func didTouchFooterView(_ footerView: UIView, timelineCardIndex: Int)
TODO
- 支持
.square和.diamond里程碑形状 - 水平滚动/分页
- 为嵌入式元素强制触摸预览
联系方式
欢迎发送拉取请求或提出更改。
在Facebook上找到我。
或查看其他联系我vladaverin.me的方法。
许可
TimelineCards是在MIT许可证下发布的。请参阅LICENSE文件。