
一个零依赖的网络解决方案,用于构建现代、安全且适用于 iOS、watchOS、macOS 和 tvOS 的应用程序。
![]()


这是TermiNetwork的概要图,显示了其组件如何相互连接。
功能
- 多环境设置
- 使用 Codables 进行模型反序列化
- 支持异步 await
- 将响应解码为给定类型:Codable、Transformer、UIImage、Data 或 String
- UIKit/SwiftUI 扩展,用于下载远程图像
- 使用 Repositories 进行请求分组
- 使用 Reachability 检测网络状态
- Transformers:轻松将模型从一个类型转换为另一个类型
- 错误处理
- 拦截器
- 请求模拟
- 证书固定
- 灵活配置
- 中间件支持
- 支持文件/数据上传/下载
- 打印美观的调试信息
目录
安装
您可以使用以下方式之一安装 TermiNetwork...
CocoaPods
请将以下行添加到您的 Podfile 中,并在终端运行 pod install
pod 'TermiNetwork', '~> 3.2.0'Carthage
请将以下行添加到您的 Carthage 中,并在终端运行 carthage update
github "billp/TermiNetwork" ~> 3.2.0Swift 包管理器
转到 文件 > Swift 包 > 添加包依赖,并添加以下 URL
https://github.com/billp/TermiNetwork
演示应用程序
要查看TermiNetwork的所有功能实战演示,请下载源代码并运行 TermiNetworkExamples 方案。
使用方法
简单使用(请求)
假设你有一个以下可编码模型
struct Todo: Codable {
   let id: Int
   let title: String
}
以下示例创建一个添加新待办事项的请求
let params = ["title": "Go shopping."]
let headers = ["x-auth": "abcdef1234"]

Request(method: .get,
	url: "https://myweb.com/api/todos",
	headers: headers,
	params: params)
    .success(responseType: Todo.self) { todos in
	print(todos)
    }
    .failure { error in
	print(error.localizedDescription)
    }
或使用 async await
let request = Request(method: .get,
                      url: "https://myweb.com/api/todos",
                      headers: headers,
                      params: params)

do {
    let todos: [Todo] = try await request.async()
    print(todos)
} catch let error {
    print(error.localizedDescription)
}
参数解释
方法
以下HTTP方法之一受支持
.get, .head, .post, .put, .delete, .connect, .options, .trace or .patch
响应类型
以下响应类型之一受支持
Codable.self (implementations), UIImage.self, Data.self or String.self
onSuccess
一个回调,返回指定类型(在 responseType 参数中指定)的对象。
onFailure
一个回调,返回一个 错误 和响应数据(如果有)。
使用配置和自定义队列的高级请求使用方法
以下示例使用具有 maxConcurrentOperationCount 和配置对象的 自定义队列。要查看可用的配置属性的全列表,请参阅文档中的 配置属性。
let myQueue = Queue(failureMode: .continue)
myQueue.maxConcurrentOperationCount = 2

let configuration = Configuration(
    cachePolicy: .useProtocolCachePolicy,
    timeoutInterval: 30,
    requestBodyType: .JSON
)

let params = ["title": "Go shopping."]
let headers = ["x-auth": "abcdef1234"]

Request(method: .post,
        url: "https://myweb.com/todos",
        headers: headers,
        params: params,
        configuration: configuration)
    .queue(queue)
    .success(responseType: String.self) { response in
        print(response)
    }
    .failure { error in
        print(error.localizedDescription)
    }
或使用 async await
do {
    let response = try Request(
    	method: .post,
	url: "https://myweb.com/todos",
	headers: headers,
	params: params,
	configuration: configuration
    )
    .queue(queue)
    .async(as: String.self)
} catch let error {
    print(error.localizedDescription)
}
上面的请求使用一个自定义队列 myQueue,其错误模式为 继续(默认),意味着在请求失败时队列继续其执行。
使用环境与仓库的完整设置
TermiNetwork 的完整和推荐设置包括定义 环境 和 仓库。
环境设置
创建一个实现 EnvironmentProtocol 的 枚举 并定义你的环境。
示例
enum MyAppEnvironments: EnvironmentProtocol {
    case development
    case qa

    func configure() -> Environment {
        switch self {
        case .development:
            return Environment(scheme: .https,
                               host: "localhost",
                               suffix: .path(["v1"]),
                               port: 3000)
        case .qa:
            return Environment(scheme: .http,
                               host: "myqaserver.com",
                               suffix: .path(["v1"]))
        }
    }
}
可选地,你可以传递一个 配置 对象使所有 Repositories 和 Endpoints 继承给定的配置设置。
要设置你的全局环境,请使用 Environment.set 方法。
Environment.set(MyAppEnvironments.development)仓库设置
创建一个实现 EndpointProtocol 的 枚举 并定义你的端点。
以下示例创建了一个包含所有必需端点的 TodosRepository。
示例
enum TodosRepository: EndpointProtocol {
    // Define your endpoints
    case list
    case show(id: Int)
    case add(title: String)
    case remove(id: Int)
    case setCompleted(id: Int, completed: Bool)

    static let configuration = Configuration(requestBodyType: .JSON,
                                             headers: ["x-auth": "abcdef1234"])


    // Set method, path, params, headers for each endpoint
    func configure() -> EndpointConfiguration {

        switch self {
        case .list:
            return .init(method: .get,
                         path: .path(["todos"]), // GET /todos
                         configuration: Self.configuration)
        case .show(let id):
            return .init(method: .get,
                         path: .path(["todo", String(id)]), // GET /todos/[id]
                         configuration: Self.configuration)
        case .add(let title):
            return .init(method: .post,
                         path: .path(["todos"]), // POST /todos
                         params: ["title": title],
                         configuration: Self.configuration)
        case .remove(let id):
            return .init(method: .delete,
                         path: .path(["todo", String(id)]), // DELETE /todo/[id]
                         configuration: configuration)
        case .setCompleted(let id, let completed):
            return .init(method: .patch,
                         path: .path(["todo", String(id)]), // PATCH /todo/[id]
                         params: ["completed": completed],
                         configuration: configuration)
        }
    }
}
如果你想为每个端点提供不同的配置,可以可选地传递一个 配置 对象给每个情况。
发起请求
要创建请求,您需要初始化一个 Client 实例,并用您定义的存储库对其进行特殊化,在我们的例子中是 TodosRepository
Client<TodosRepository>().request(for: .add(title: "Go shopping!"))
    .success(responseType: Todo.self) { todo in
        // do something with todo
    }
    .failure { error in
        // do something with error
    }
或使用 async await
do {
    let toto: Todo = Client<TodosRepository>()
	.request(for: .add(title: "Go shopping!"))
	.async()
} catch let error {
    print(error.localizedDescription)
}
队列钩子
钩子是在队列中请求执行前后运行的闭包。以下是一些可用的钩子:
Queue.shared.beforeAllRequestsCallback = {
    // e.g. show progress loader
}

Queue.shared.afterAllRequestsCallback = { completedWithError in
    // e.g. hide progress loader
}

Queue.shared.beforeEachRequestCallback = { request in
    // do something with request
}

Queue.shared.afterEachRequestCallback = { request, data, urlResponse, error
    // do something with request, data, urlResponse, error
}
有关更多信息,请查阅文档中的 Queue。
错误处理
TermiNetwork 为所有可能发生的错误情况下提供了自己的错误类型(TNError)。这些错误通常在 start 方法的onFailure回调中返回。
要查看所有可用的错误,请访问文档中的 TNError。
示例
Client<TodosRepository>().request(for: .add(title: "Go shopping!"))
      .success(responseType: Todo.self) { todo in
         // do something with todo
      }
      .failure: { error in
          switch error {
          case .notSuccess(let statusCode):
               debugPrint("Status code " + String(statusCode))
               break
          case .networkError(let error):
               debugPrint("Network error: " + error.localizedDescription)
               break
          case .cancelled:
               debugPrint("Request cancelled")
               break
          default:
               debugPrint("Error: " + error.localizedDescription)
       }
或使用 async await
do {
    let todo: Todo = Client<TodosRepository>()
	.request(for: .add(title: "Go shopping!"))
	.async()
} catch let error {
    switch error as? TNError {
    case .notSuccess(let statusCode, let data):
         let errorModel = try? data.deserializeJSONData() as MyErrorModel
	 debugPrint("Status code " + String(statusCode) + ". API Error: " + errorModel?.errorMessage)
	 break
    case .networkError(let error):
	 debugPrint("Network error: " + error.localizedDescription)
	 break
    case .cancelled:
	 debugPrint("Request cancelled")
	 break
    default:
	 debugPrint("Error: " + error.localizedDescription)
 }
取消请求
您可以通过调用 .cancel() 方法来取消正在执行的请求。
示例
let params = ["title": "Go shopping."]
let headers = ["x-auth": "abcdef1234"]

let request = Request(method: .get,
	      url: "https://myweb.com/api/todos",
	      headers: headers,
	      params: params)


request.success(responseType: Todo.self) { todos in
    print(todos)
}
.failure { error in
    print(error.localizedDescription)
}

request.cancel()
或使用 async await
let task = Task {
    let request = Request(method: .get,
	url: "https://myweb.com/api/todos",
	headers: headers,
	params: params)
    do {
        let todos: [Todo] = try await request.async()
        print(todos)
    } catch let error {
        print(error.localizedDescription)
    }
}

task.cancel()
可达性
使用可达性,您可以监控设备的网络状态,例如它是否通过Wi-Fi或蜂窝网络连接。
示例
let reachability = Reachability()
try? reachability.monitorState { state in
    switch state {
    case .wifi:
        // Connected through wifi
    case .cellular:
        // Connected through cellular network
    case .unavailable:
        // No connection
    }
}
变换器
变换器允许您通过定义自定义的 变换 函数将 REST 模型转换为领域模型。为此,您必须创建一个继承自 Transformer 类的类,并通过提供 FromType 和 ToType 泛型来专门化它。
以下示例通过重写 transform 函数将 RSCity(REST)数组转换为 City(领域)数组。
示例
final class CitiesTransformer: Transformer<[RSCity], [City]> {
    override func transform(_ object: [RSCity]) throws -> [City] {
        object.map { rsCity in
            City(id: UUID(),
                 cityID: rsCity.id,
                 name: rsCity.name,
                 description: rsCity.description,
                 countryName: rsCity.countryName,
                 thumb: rsCity.thumb,
                 image: rsCity.image)
        }
    }
}
最后,在请求的 start 方法中传递 CitiesTransformer。
示例
Client<CitiesRepository>()
    .request(for: .cities)
    .success(transformer: CitiesTransformer.self) { cities in
        self.cities = cities
    }
    .failure { error in
        switch error {
        case .cancelled:
            break
        default:
            self.errorMessage = error.localizedDescription
        }
    }
或使用 async await
do {
    let cities = await Client<CitiesRepository>()
        .request(for: .cities)
        .async(using: CitiesTransformer.self)
} catch let error {
    switch error as? TNError {
    case .cancelled:
        break
    default:
        self.errorMessage = error.localizedDescription
    }
}
模拟响应
模拟响应是TermiNetwork的一个强大功能,允许您提供本地资源文件作为请求的响应。这在API服务尚不可用并且您需要不浪费时间地实现应用功能时非常有用。(此操作的前提是您有一个API合约)
启用模拟响应步骤
- 创建一个包资源并将文件放入其中。(文件 > 新建 -> 文件... > 包设置)
- 在配置中指定包路径
示例
let configuration = Configuration()
if let path = Bundle.main.path(forResource: "MockData", ofType: "bundle") {
    configuration.mockDataBundle = Bundle(path: path)
}
- 在配置中启用模拟响应
示例
configuration.mockDataEnabled = true
- 在您的端点中定义mockFilePath路径。
示例
上述示例从MockData.bundle加载了Cities/cities.json,并将其数据作为请求的响应返回。enum CitiesRepository: EndpointProtocol { case cities func configure() -> EndpointConfiguration { switch self { case .cities: return EndpointConfiguration(method: .get, path: .path(["cities"]), mockFilePath: .path(["Cities", "cities.json"])) } } }
要查看完整示例,请打开演示应用程序并查看“City Explorer - 离线模式”。
拦截器
拦截器提供了一种更改或增强请求常规处理流程的方法。例如,您可以刷新过期的访问令牌(未授权状态码401)然后重试原始请求。为此,您只需实现InterceptorProtocol。
以下拦截器实现通过重试限制(5次)尝试刷新访问令牌。
示例
final class UnauthorizedInterceptor: InterceptorProtocol {
    let retryDelay: TimeInterval = 0.1
    let retryLimit = 5

    func requestFinished(responseData data: Data?,
                         error: TNError?,
                         request: Request,
                         proceed: @escaping (InterceptionAction) -> Void) {
        switch error {
        case .notSuccess(let statusCode):
            if statusCode == 401, request.retryCount < retryLimit {
                // Login and get a new token.
                Request(method: .post,
                        url: "https://www.myserviceapi.com/login",
                        params: ["username": "johndoe",
                                 "password": "p@44w0rd"])
                    .success(responseType: LoginResponse.self) { response in
                        let authorizationValue = String(format: "Bearer %@", response.token)

                        // Update the global header in configuration which is inherited by all requests.
                        Environment.current.configuration?.headers["Authorization"] = authorizationValue

                        // Update current request's header.
                        request.headers["Authorization"] = authorizationValue

                        // Finally retry the original request.
                        proceed(.retry(delay: retryDelay))
                    }
            } else {
	 	// Continue if the retry limit is reached
	    	proceed(.continue)
            }
        default:
            proceed(.continue)
        }
    }
}
最后,您必须将UnauthorizedInterceptor传递给配置中的interceptors属性
示例
let configuration = Configuration()
configuration.interceptors = [UnauthorizedInterceptor.self]
SwiftUI/UIKit 图像辅助函数
TermiNetwork 为设置远程图像提供了两种不同的辅助函数。
SwiftUI 图像辅助函数
示例
-
使用 URL 的示例
var body: some View {
    TermiNetwork.Image(withURL: "https://example.com/path/to/image.png",
	               defaultImage: UIImage(named: "DefaultThumbImage"))
}
-
使用请求的示例
var body: some View {
    TermiNetwork.Image(withRequest: Client<CitiesRepository>().request(for: .image(city: city)),
                       defaultImage: UIImage(named: "DefaultThumbImage"))
}
UIImageView, NSImageView, WKInterfaceImage 扩展
-
使用 URL 的示例
let imageView = UIImageView() // or NSImageView (macOS), or WKInterfaceImage (watchOS)
imageView.tn_setRemoteImage(url: sampleImageURL,
                            defaultImage: UIImage(named: "DefaultThumbImage"),
                            preprocessImage: { image in
    // Optionally pre-process image and return the new image.
    return image
}, onFinish: { image, error in
    // Optionally handle response
})
-
使用请求的示例
let imageView = UIImageView() // or NSImageView (macOS), or WKInterfaceImage (watchOS)
imageView.tn_setRemoteImage(request: Client<CitiesRepository>().request(for: .thumb(withID: "3125")),
                            defaultImage: UIImage(named: "DefaultThumbImage"),
                            preprocessImage: { image in
    // Optionally pre-process image and return the new image.
    return image
}, onFinish: { image, error in
    // Optionally handle response
})
中间件
中间件允许你修改在成功/失败回调之前到达的头部、参数和响应。您可以通过实现 RequestMiddlewareProtocol 并将其传递给一个 Configuration 对象来创建自己的中间件。
查看 ./Examples/Communication/Middleware/CryptoMiddleware.swift 以获取一个示例,该示例为应用程序添加了额外的加密层。
调试日志
您可以通过将您的 Configuration 中的 verbose 属性设置为 true 来启用调试日志。
let configuration = Configuration()
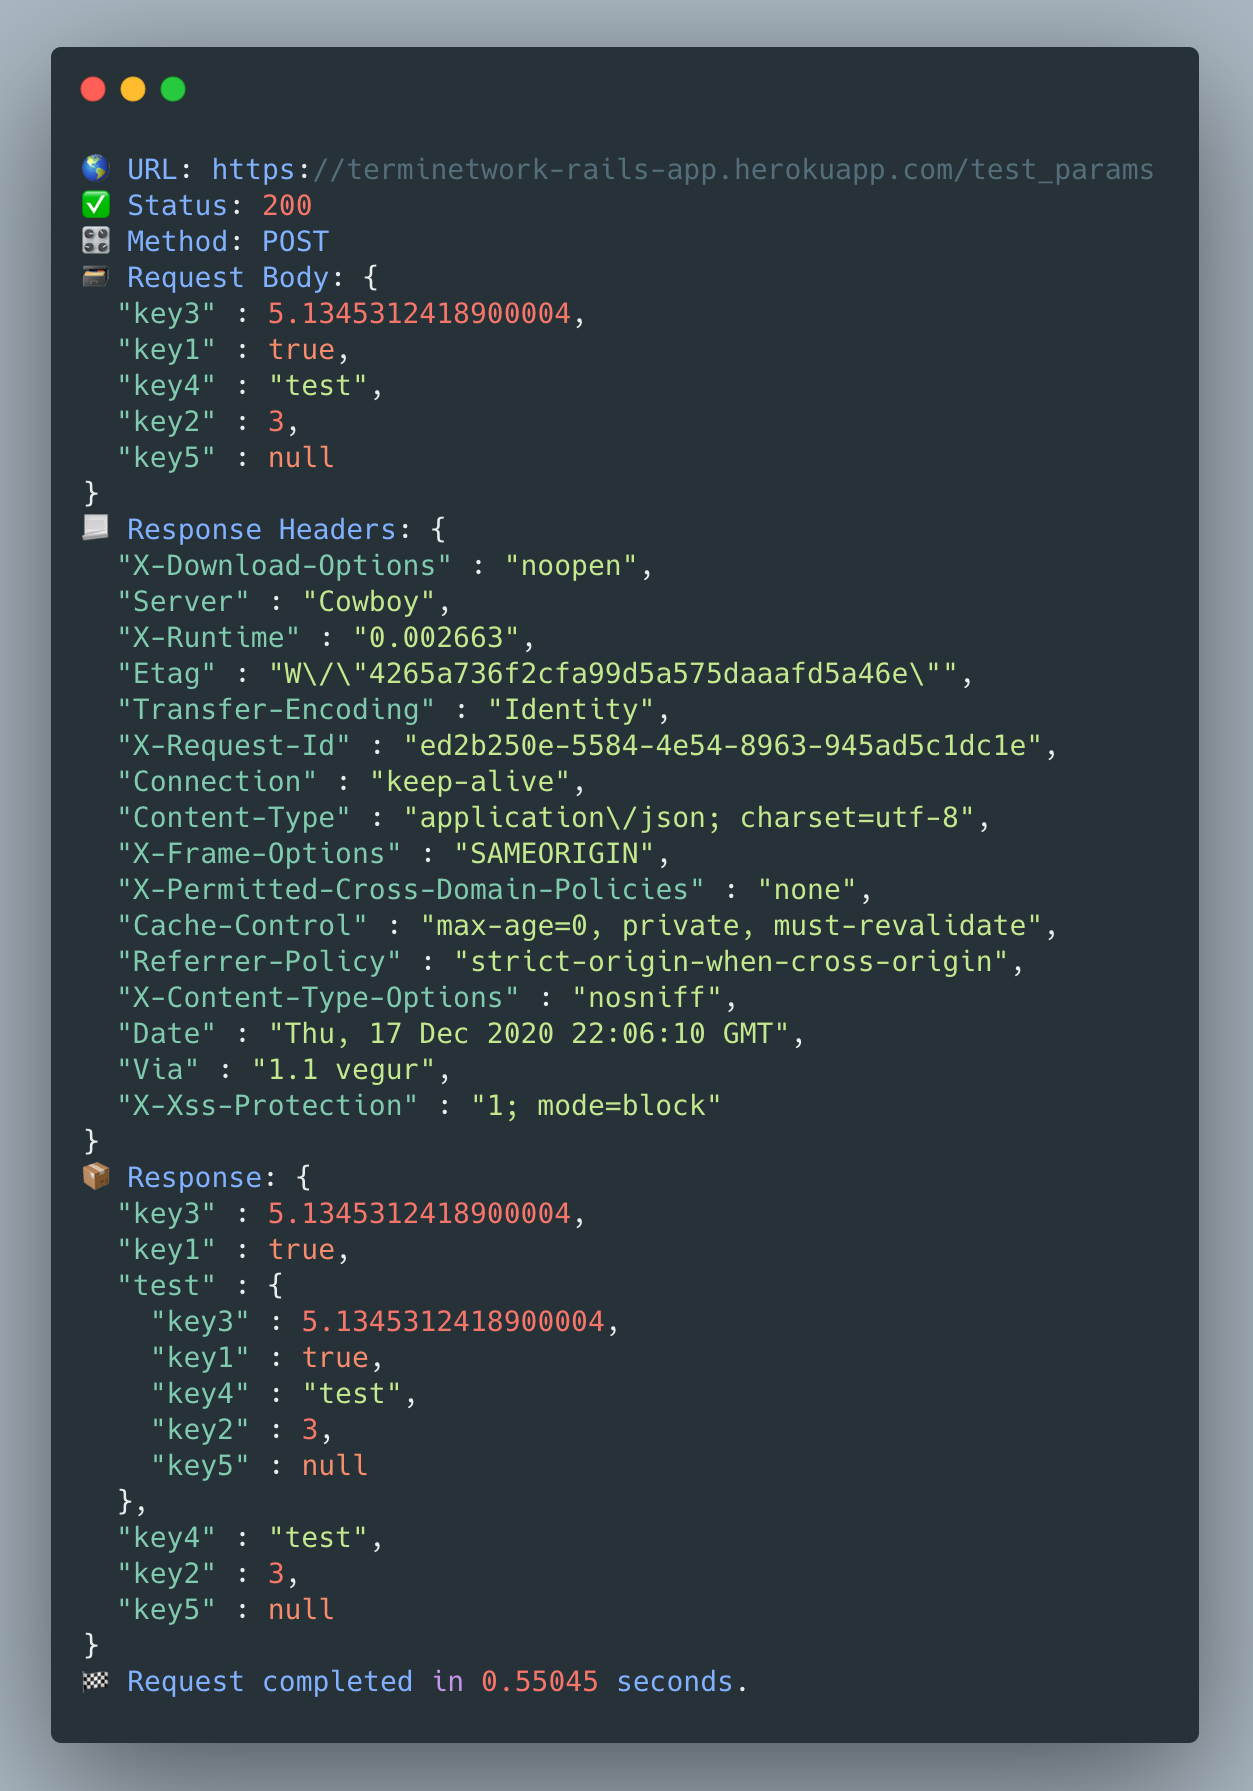
configuration.verbose = true...并在调试窗口中看到漂亮的格式化调试输出
测试
要运行测试,请打开 Xcode 项目 > TermiNetwork 方案,选择 Product -> Test 或直接在键盘上按 ⌘U。
贡献者
Alex Athanasiadis, [email protected]
许可证
TermiNetwork 以 MIT 许可协议提供。有关更多信息,请参阅 LICENSE 文件。