TOCropViewController
TOCropViewController 是一个开源的 UIViewController 子类,用于裁剪 UIImage 对象的一部分,以及执行基本旋转。它非常适合编辑个人资料图片或在线共享照片的一部分。该功能旨在面向 iOS Photos 应用程序的编辑器,因此,它的行为应该让 iOS 用户提供熟悉的体验。
对于 Swift 开发者来说,CropViewController 是一个完全封装 TOCropViewController 的 Swift 包装器,并提供了一个更原生、Swiftier 接口。
自豪地为应用程序提供动力
需要更多功能?如果 TOCropViewController 无法满足您的要求,请考虑使用具有视频编辑和照片滤镜功能的 IMG.LY 作为替代方案!(免责声明:合作伙伴链接)
功能
- 通过拖动网格覆盖的边缘来裁剪图像。
- 可选地,裁剪图像的圆形副本。
- 将图像旋转 90 度的段。
- 将裁剪框夹在特定的宽高比中。
- 重置按钮以完全撤销所有更改。
- 为了方便观察裁剪区域,iOS 7/8的透明度处理。
- 控制器选择将裁剪后的图片返回给代理,还是立即传递给
UIActivityViewController。 - 在设备旋转到横向模式时,自定义动画和布局。
- 自定义“打开”和“关闭”动画。
- 支持28种语言的本地化。
系统要求
iOS 8.0 或更高版本
安装
CocoaPods
Objective-C
将以下内容添加到您的 Podfile 中
pod 'TOCropViewController'Swift
将以下内容添加到您的 Podfile 中
pod 'CropViewController'Swift 包管理器
将以下内容添加到您的 Package.swift
dependencies: [
  // ...
  .package(url: "https://github.com/TimOliver/TOCropViewController.git"),
],
Carthage
- 将以下内容添加到您的 Cartfile
github "TimOliver/TOCropViewController"
-
运行
carthage update -
从
Carthage/Build目录中,将其中两个框架之一导入到您的 Xcode 项目中。对于 Objective-C 项目,导入TOCropViewController.framework,对于 Swift,导入CropViewController.framework。每个框架都是独立的;您不需要导入两个。 -
按照Carthage 入门页面上的剩余步骤完成框架的集成。
手动安装
所有必要的源代码和资源文件都位于 Objective-C/TOCropViewController 目录中,而所有必要的 Swift 文件都位于 Swift/CropViewController 目录中。
对于 Objective-C 项目,将 TOCropViewController 目录复制到您的 Xcode 项目中。对于 Swift 项目,将 TOCropViewController 和 CropViewController 目录都复制到您的项目中。
示例
使用 TOCropViewController 非常简单。只需创建一个新的实例,传递要裁剪的 UIImage 对象,然后在屏幕上以模态方式显示。
虽然 TOCropViewController 倾向于以模态方式显示,但它也可以推送到 UINavigationController 栈中。
对于完整的示例,请查看此存储库中包含的示例应用。
基本实现
Swift
func presentCropViewController() {
  let image: UIImage = ... //Load an image

  let cropViewController = CropViewController(image: image)
  cropViewController.delegate = self
  present(cropViewController, animated: true, completion: nil)
}

func cropViewController(_ cropViewController: CropViewController, didCropToImage image: UIImage, withRect cropRect: CGRect, angle: Int) {
        // 'image' is the newly cropped version of the original image
    }
Objective-C
- (void)presentCropViewController
{
  UIImage *image = ...; // Load an image

  TOCropViewController *cropViewController = [[TOCropViewController alloc] initWithImage:image];
  cropViewController.delegate = self;
  [self presentViewController:cropViewController animated:YES completion:nil];
}

- (void)cropViewController:(TOCropViewController *)cropViewController didCropToImage:(UIImage *)image withRect:(CGRect)cropRect angle:(NSInteger)angle
{
  // 'image' is the newly cropped version of the original image
}
与许多类似于 MFMailComposeViewController 的 UIKit UIViewController 子类相似,负责显示视图控制器的类还应负责在取消时将其解散。要解散 TOCropViewController,实现 cropViewController:didFinishCancelled: 代理方法,并从该方法中调用 dismissViewController:animated:。
创建圆形裁剪图片
Swift
func presentCropViewController() {
    var image: UIImage? // Load an image
    let cropViewController = CropViewController(croppingStyle: .circular, image: image)
    cropViewController.delegate = self
    self.present(cropViewController, animated: true, completion: nil)
}

func cropViewController(_ cropViewController: TOCropViewController?, didCropToCircularImage image: UIImage?, with cropRect: CGRect, angle: Int) {
    // 'image' is the newly cropped, circular version of the original image
}
Objective-C
- (void)presentCropViewController
{
UIImage *image = ...; // Load an image

TOCropViewController *cropViewController = [[TOCropViewController alloc] initWithCroppingStyle:TOCropViewCroppingStyleCircular image:image];
cropViewController.delegate = self;
[self presentViewController:cropViewController animated:YES completion:nil];
}

- (void)cropViewController:(TOCropViewController *)cropViewController didCropToCircularImage:(UIImage *)image withRect:(CGRect)cropRect angle:(NSInteger)angle
{
// 'image' is the newly cropped, circular version of the original image
}
通过分享表单共享裁剪后的图片
Swift
func presentCropViewController() {
    var image: UIImage? // Load an image
    let cropViewController = CropViewController(image: image)
    cropViewController.showActivitySheetOnDone = true
    self.present(cropViewController, animated: true, completion: nil)
}
Objective-C
- (void)presentCropViewController
{
  UIImage *image = ...; // Load an image

  TOCropViewController *cropViewController = [[TOCropViewController alloc] initWithImage:image];
  cropViewController.showActivitySheetOnDone = YES;
  [self presentViewController:cropViewController animated:YES completion:nil];
}
使用自定义动画进行展示
可选地,TOCropViewController 也支持自定义展示动画,其中已可见的图片副本将放大以填满屏幕。
Swift
func presentCropViewController() {
    var image: UIImage? // Load an image
    var imageView = UIImageView(image: image)
    var frame: CGRect = view.convert(imageView.frame, to: view)

    let cropViewController = CropViewController(image: image)
    cropViewController.delegate = self
    self.present(cropViewController, animated: true, completion: nil)
    cropViewController.presentAnimated(fromParentViewController: self, fromFrame: frame, completion: nil)
}
Objective-C
- (void)presentCropViewController
{
  UIImage *image = ...;
  UIImageView *imageView = [[UIImageView alloc] initWithImage:image];
  CGRect frame = [self.view convertRect:imageView.frame toView:self.view];

  TOCropViewController *cropViewController = [[TOCropViewController alloc] initWithImage:image];
  cropViewController.delegate = self;
  [self presentViewController:cropViewController animated:YES completion:nil];
  [cropViewController presentAnimatedFromParentViewController:self fromFrame:frame completion:nil];
}
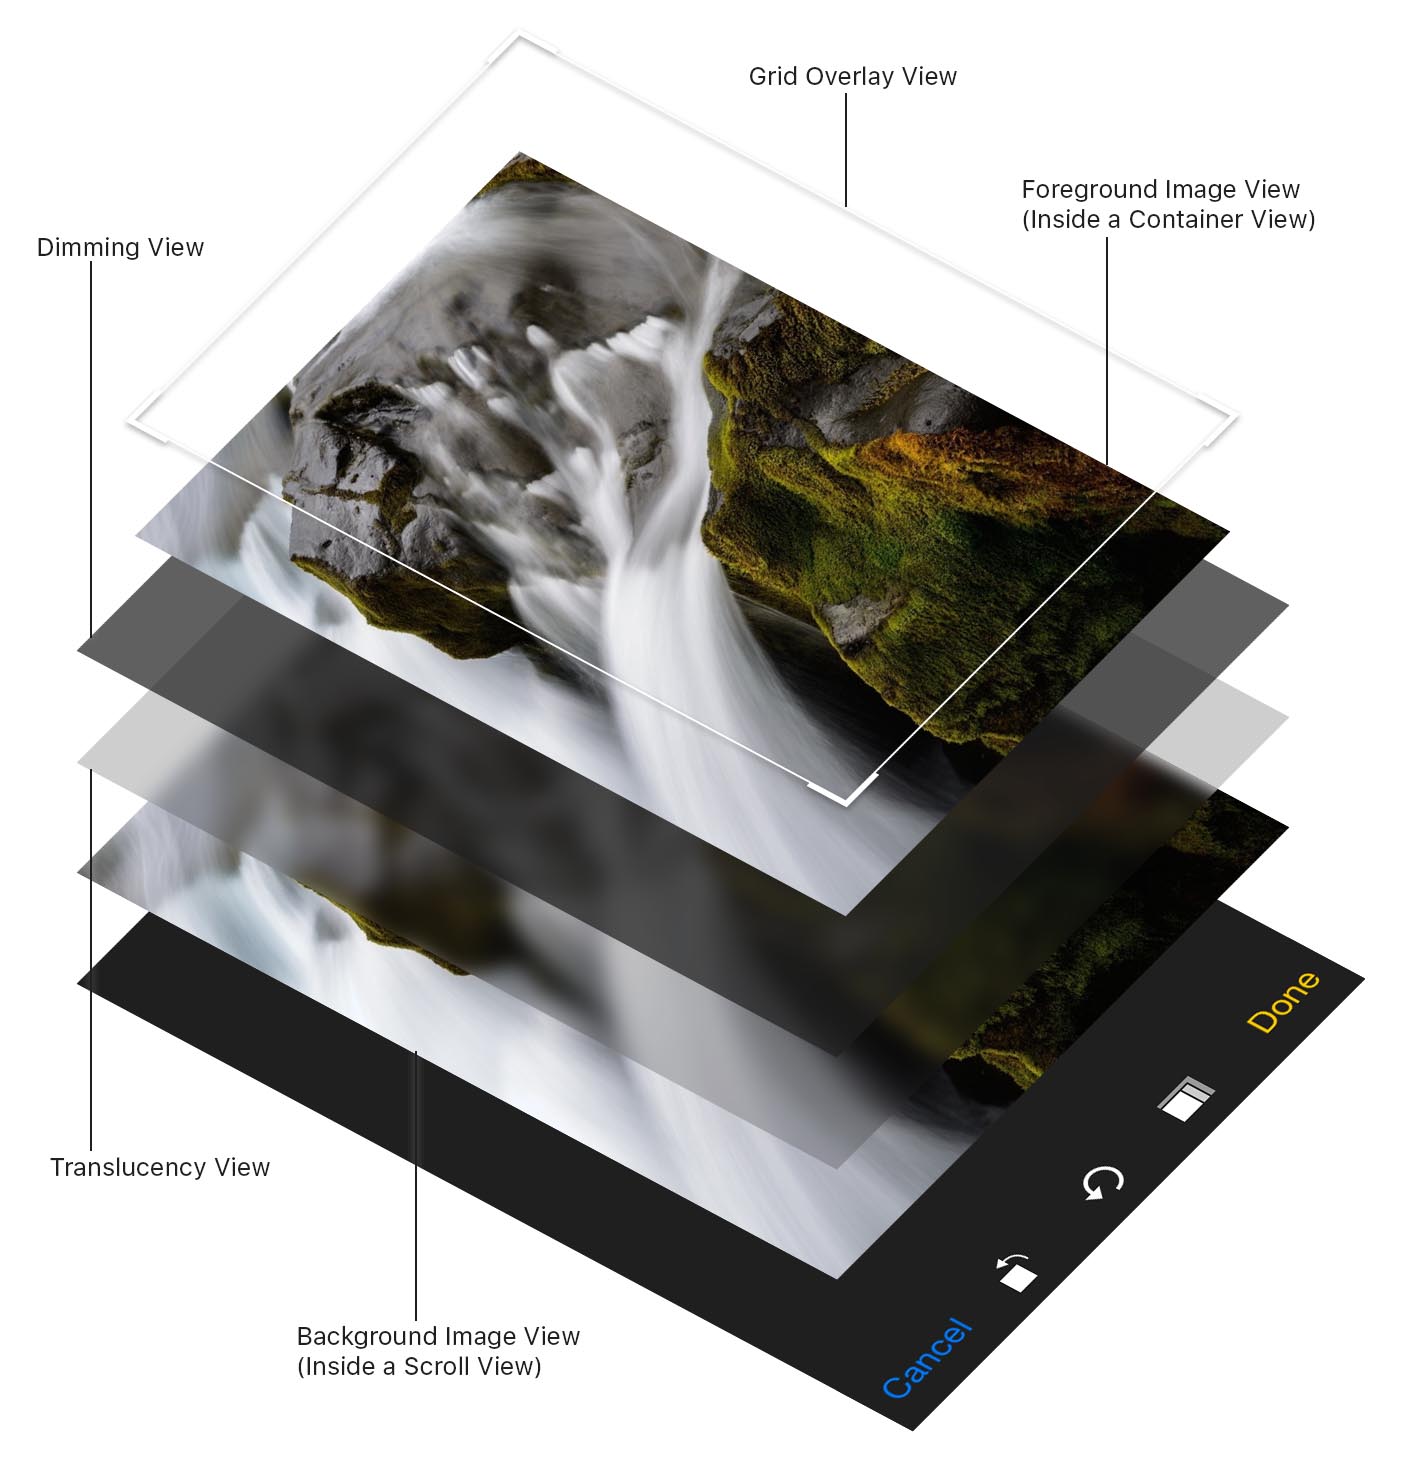
TOCropViewController 的架构
与传统裁剪 UI 实现通常只是具有一个半透明视图和一些中间的方块孔洞相比,TOCropViewController 在实现上略有不同。
由于有两个视图叠加在图片上(一个半透明视图和一个透明度视图),同时在它们中间切一个洞会比较复杂。取而代之的是,在背景中放置一个图像视图到滚动视图中,然后在顶部放置一个图像视图的副本,它放在一个容器视图中,该容器视图裁剪到指定的裁剪尺寸。然后让前景图像的大小和位置与背景视图相匹配,从而营造出在半透明视图中存在一个洞的错觉,同时最小化屏幕上的视图数量。
致谢
TOCropViewController最初是由Tim Oliver为iOS漫画阅读应用iComics创建的组件。
感谢TOCropViewController日益增长的贡献者!
截图中的iOS设备由Pixeden创建。
许可证
TOCropViewController采用MIT许可证授权,请参阅LICENSE文件。


