![]()
![]()
SwiftyMenu 是一个简单但强大的 iOS 下拉菜单组件。它允许您拥有不会覆盖您视图的下拉菜单,从而为您提供出色的用户体验。
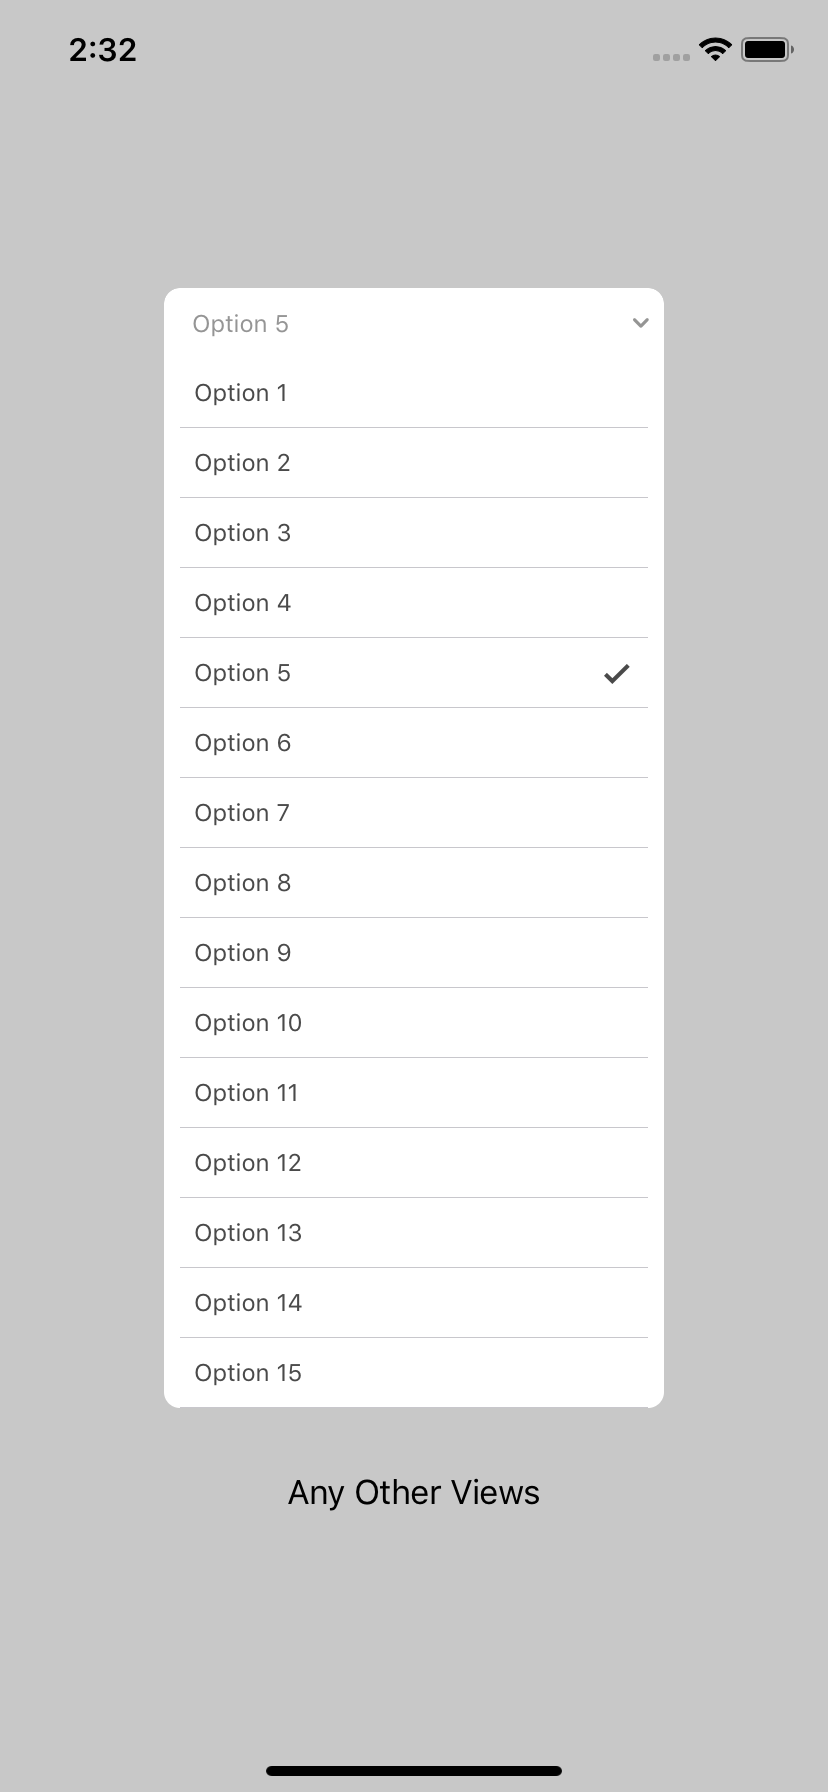
屏幕截图


要求
- Xcode 10.2+
- Swift 5+
- iOS 10+
安装
CocoaPods
CocoaPods 是 Cocoa 项目的依赖管理器。有关使用和安装说明,请访问他们的网站。要使用 CocoaPods 将 SwiftyMenu 集成到您的 Xcode 项目中,请在 Podfile 中指定它。
pod 'SwiftyMenu', '~> 1.0.1'Swift 包管理器
- 自动在 Xcode 中
- 点击 文件 > Swift 包 > 添加包依赖...
- 使用包 URL
https://github.com/KarimEbrahemAbdelaziz/SwiftyMenu将 TimelaneCombine 添加到您的项目中。
- 在您的 Package.swift 文件中手动添加
.package(url: "https://github.com/KarimEbrahemAbdelaziz/SwiftyMenu", from: "1.0.1")使用方法
SwiftyMenu 支持从 Storyboard 和 代码 初始化。
初始化
Storyboard
设置视图控制器
// Connect view in storyboard with you outlet
@IBOutlet private weak var dropDownMenu: SwiftyMenu!
然后连接 IBOutlet 到 Storyboard,并连接菜单的高度约束,如下所示。

代码
- 初始化
SwiftyMenu
/// Init SwiftyMenu from Code
let dropDownCode = SwiftyMenu(frame: CGRect(x: 0, y: 0, width: 0, height: 40))- 将
SwiftyMenu作为子视图添加
/// Add it as subview
view.addSubview(dropDownCode)- 设置约束
/// Add constraints to SwiftyMenu
/// You must take care of `hegiht` constraint, please.
dropDownCode.translatesAutoresizingMaskIntoConstraints = false

let horizontalConstraint = NSLayoutConstraint(item: dropDownCode, attribute: NSLayoutConstraint.Attribute.centerX, relatedBy: NSLayoutConstraint.Relation.equal, toItem: view, attribute: NSLayoutConstraint.Attribute.centerX, multiplier: 1, constant: 0)

let topConstraint = NSLayoutConstraint(item: dropDownCode, attribute: NSLayoutConstraint.Attribute.top, relatedBy: NSLayoutConstraint.Relation.equal, toItem: otherView, attribute: NSLayoutConstraint.Attribute.top, multiplier: 1, constant: 64)

let widthConstraint = NSLayoutConstraint(item: dropDownCode, attribute: NSLayoutConstraint.Attribute.width, relatedBy: NSLayoutConstraint.Relation.equal, toItem: nil, attribute: NSLayoutConstraint.Attribute.notAnAttribute, multiplier: 1, constant: 255)

dropDownCode.heightConstraint = NSLayoutConstraint(item: dropDownCode, attribute: NSLayoutConstraint.Attribute.height, relatedBy: NSLayoutConstraint.Relation.equal, toItem: nil, attribute: NSLayoutConstraint.Attribute.notAnAttribute, multiplier: 1, constant: 40)

NSLayoutConstraint.activate(
    [
        horizontalConstraint,
        topConstraint,
        widthConstraint,
        dropDownCode.heightConstraint
    ]
)
配置数据源
要配置 SwiftyMenu 数据源,您需要准备好您的 Model 以便在菜单中展示和检索。然后,创建并分配数据源到 SwiftyMenu。
设置模型
我们支持通用数据源,您只需确保您的模型符合我们定义的通用协议,以便添加到菜单中。
String示例
extension String: SwiftyMenuDisplayable {
    public var displayableValue: String {
        return self
    }

    public var retrivableValue: Any {
        return self
    }
}- 自定义
Struct示例
struct MealSize {
    let id: Int
    let name: String
}

extension MealSize: SwiftyMenuDisplayable {
    public var displayableValue: String {
        return self.name
    }

    public var retrievableValue: Any {
        return self.id
    }
}
分配数据源
- 创建您模型的
Array数组
/// Define menu data source
/// The data source type must conform to `SwiftyMenuDisplayable`
private let dropDownOptionsDataSource = [
    MealSize(id: 1, name: "Small"),
    MealSize(id: 2, name: "Medium"),
    MealSize(id: 3, name: "Large"),
    MealSize(id: 4, name: "Combo Large")
]- 将其分配给
SwiftyMenu的数据源属性
dropDownCode.items = dropDownOptionsDataSource捕获选择
SwiftyMenu 支持两种捕获选中项的方式:Delegate 和 Closure。您可以使用其中一种或同时使用两种。
使用 Delegate
- 遵循
SwiftyMenuDelegate 协议
extension ViewController: SwiftyMenuDelegate {
    // Get selected option from SwiftyMenu
    func swiftyMenu(_ swiftyMenu: SwiftyMenu, didSelectItem item: SwiftyMenuDisplayable, atIndex index: Int) {
        print("Selected item: \(item), at index: \(index)")
    }

    // SwiftyMenu drop down menu will expand
    func swiftyMenu(willExpand swiftyMenu: SwiftyMenu) {
        print("SwiftyMenu willExpand.")
    }

    // SwiftyMenu drop down menu did expand
    func swiftyMenu(didExpand swiftyMenu: SwiftyMenu) {
        print("SwiftyMenu didExpand.")
    }

    // SwiftyMenu drop down menu will collapse
    func swiftyMenu(willCollapse swiftyMenu: SwiftyMenu) {
        print("SwiftyMenu willCollapse.")
    }

    // SwiftyMenu drop down menu did collapse
    func swiftyMenu(didCollapse swiftyMenu: SwiftyMenu) {
        print("SwiftyMenu didCollapse.")
    }
}- 分配
SwiftyMenu代理
dropDownCode.delegate = self使用闭包
您可以使用回调来了解发生了什么
/// SwiftyMenu also supports `CallBacks`
dropDownCode.didSelectItem = { menu, item, index in
    print("Selected \(item) at index: \(index)")
}

dropDownCode.willExpand = {
    print("SwiftyMenu Will Expand!")
}

dropDownCode.didExpand = {
    print("SwiftyMenu Expanded!")
}

dropDownCode.willCollapse = {
    print("SwiftyMenu Will Collapse!")
}

dropDownCode.didCollapse = {
    print("SwiftyMenu Collapsed!")
}
UI 定制化
拥有一个出色的下拉菜单是必不可少的。因此,为SwiftyMenu提供了很多用户界面定制选项(更多即将添加)。
要配置SwiftyMenu的用户界面定制
- 创建
SwiftyMenuAttributes属性
private var codeMenuAttributes = SwiftyMenuAttributes()- 将其分配给
SwiftyMenu
/// Configure SwiftyMenu with the attributes
dropDownCode.configure(with: codeMenuAttributes)在将其分配给SwiftyMenu之前,您可以使用以下属性来自定义菜单外观。
占位符
attributes.placeHolderStyle = .value(text: "Please Select Size", textColor: .lightGray)文本样式
attributes.textStyle = .value(color: .gray, separator: " & ", font: .systemFont(ofSize: 12))滚动
attributes.scroll = .disabled选择行为
attributes.multiSelect = .disabled
attributes.hideOptionsWhenSelect = .enabled
行样式
attributes.rowStyle = .value(height: 40, backgroundColor: .white, selectedColor: .white)框样式
/// Rounded Corners
attributes.roundCorners = .all(radius: 8)

/// Menu Maximum Height
attributes.height = .value(height: 300)

/// Menu Border
attributes.border = .value(color: .gray, width: 0.5)
箭头样式
/// `SwiftyMenu` have default arrow
attributes.arrowStyle = .value(isEnabled: true)
分隔符样式
attributes.separatorStyle = .value(color: .black, isBlured: false, style: .singleLine)标题样式
attributes.headerStyle = .value(backgroundColor: .white, height: 40)附件
attributes.accessory = .disabled动画
attributes.expandingAnimation = .linear
attributes.expandingTiming = .value(duration: 0.5, delay: 0)

attributes.collapsingAnimation = .linear
attributes.collapsingTiming = .value(duration: 0.5, delay: 0)
示例项目
您可以在此处检查完整的 示例 项目:这里。
待办事项
- 通过 Github Actions 自动化发布新版本到 Cocoapods。
- 为项目添加 CHANGELOG 文件。
- 允许自定义标题和选项单元格。
- 允许不同的交互来关闭 SwiftyMenu。
- 允许自定义默认分隔符。
- 支持通用数据源。
- 支持 SwiftMenu 中的多选。
🔥 . - 支持在同一屏幕中支持多个 SwiftyMenu。
- 支持堆叠视图并添加示例。
- 支持回调和委托。
- 支持不同类型的动画。
- 为默认单元格添加不同的颜色自定义。
还有更多想法来使其成为坚实的下拉菜单,用于 iOS 项目
Android
作者
Karim Ebrahem,[邮箱地址被屏蔽,请通过代码看到]
许可证
SwiftyMenu遵循MIT许可证。有关更多信息,请参阅LICENSE文件。
贡献
您可以在Twitter上找到我@k_ebrahem_。
根据需要更新,并在发现问题后立即修复以保持更新。
享受吧!