SwiftyMarkdown 1.0
SwiftyMarkdown 通过使用合理的默认值和 Swift 样式语法将 Markdown 文件和字符串转换为 `NSAttributedString`。它使用动态类型以设置所需字体的正确字体大小。
专为2020年全面重建
SwiftyMarkdown 现在具有更强大和可靠的基于规则的行处理和字符标记化引擎。它已增加对存储在 bundle 中的图片(``)、代码块、引用块和无序列表的支持!
行级属性现在可以应用段落对齐(例如,`h2.aligment = .center`),并且可以通过将 `underlineLinks` 设置为 `true` 可选地使用下划线链接。
此外,它还使用系统颜色 `.label` 作为 iOS 13 和以上版本暗黑模式的默认字体颜色。
已启用对 Apple 所有平台的支持。
安装
CocoaPods
pod 'SwiftyMarkdown'
SPM
在 Xcode 中,选择文件 -> Swift 包 -> 添加包依赖并添加 GitHub 网址。
如何使用 SwiftyMarkdown
从文本字符串中读取 Markdown...
let md = SwiftyMarkdown(string: "# Heading\nMy *Markdown* string")
md.attributedString()
...或从 URL 中读取。
if let url = Bundle.main.url(forResource: "file", withExtension: "md"), md = SwiftyMarkdown(url: url ) {
	md.attributedString()
}
如果在初始化 SwiftyMarkdown 后想要使用不同的字符串,现在可以这么做
let md = SwiftyMarkdown(string: "# Heading\nMy *Markdown* string")
md.attributedString(from: "A **SECOND** Markdown string. *Fancy!*")
然后将属性字符串分配给任何支持属性文本的标签或文本控件。
let md = SwiftyMarkdown(string: "# Heading\nMy *Markdown* string")
let label = UILabel()
label.attributedText = md.attributedString()
支持的 Markdown 功能
*italics* or _italics_
**bold** or __bold__
~~Linethrough~~Strikethroughs.
`code`
# Header 1
or
Header 1
====
## Header 2
or
Header 2
---
### Header 3
#### Header 4
##### Header 5 #####
###### Header 6 ######
Indented code blocks (spaces or tabs)
[Links](http://voyagetravelapps.com/)

[Referenced Links][1]
![Referenced Images][2]
[1]: http://voyagetravelapps.com/
[2]: <Name of asset in bundle>
> Blockquotes
- Bulleted
- Lists
- Including indented lists
- Up to three levels
- Neat!
1. Ordered
1. Lists
1. Including indented lists
- Up to three levels
复合规则也有效,例如
It recognises **[Bold Links](http://voyagetravelapps.com/)**

Or [**Bold Links**](http://voyagetravelapps.com/)
图片将被插入到返回的 NSAttributedString 中作为 NSTextAttachment(不幸的是,这在 watchOS 上无法工作,因为 NSTextAttachment 不可用)。
自定义
使用简单的点语法设置每个段落和字符样式类型的属性
md.body.fontName = "AvenirNextCondensed-Medium"

md.h1.color = UIColor.redColor()
md.h1.fontName = "AvenirNextCondensed-Bold"
md.h1.fontSize = 16
md.h1.alignmnent = .center

md.italic.color = UIColor.blueColor()

md.underlineLinks = true

md.bullet = "🍏"
在 iOS 上,指定的字体大小将根据用户的动态类型设置进行调整。
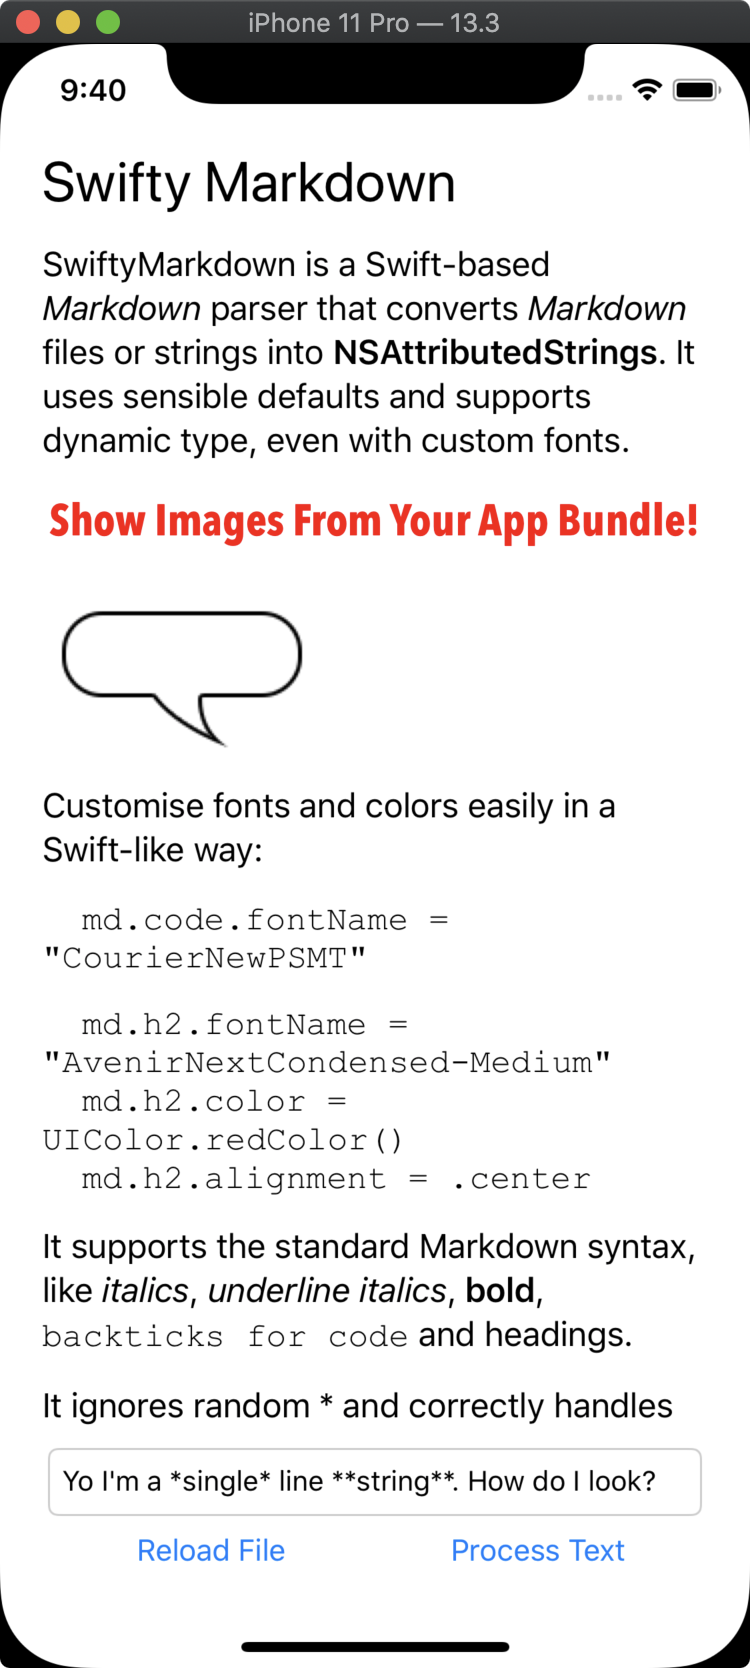
屏幕截图
代码仓库中包含了一个示例项目。打开 Example/SwiftyMarkdown.xcodeproj 文件开始使用。
前缀
SwiftyMarkdown 认可 YAML 前缀并将在它发现的键值对填充到 frontMatterAttributes 属性中。
附录
A) 所有的可定制属性
h1.fontName : String
h1.fontSize : CGFloat
h1.color : UI/NSColor
h1.fontStyle : FontStyle
h1.alignment : NSTextAlignment

h2.fontName : String
h2.fontSize : CGFloat
h2.color : UI/NSColor
h2.fontStyle : FontStyle
h2.alignment : NSTextAlignment

h3.fontName : String
h3.fontSize : CGFloat
h3.color : UI/NSColor
h3.fontStyle : FontStyle
h3.alignment : NSTextAlignment

h4.fontName : String
h4.fontSize : CGFloat
h4.color : UI/NSColor
h4.fontStyle : FontStyle
h4.alignment : NSTextAlignment

h5.fontName : String
h5.fontSize : CGFloat
h5.color : UI/NSColor
h5.fontStyle : FontStyle
h5.alignment : NSTextAlignment

h6.fontName : String
h6.fontSize : CGFloat
h6.color : UI/NSColor
h6.fontStyle : FontStyle
h6.alignment : NSTextAlignment

body.fontName : String
body.fontSize : CGFloat
body.color : UI/NSColor
body.fontStyle : FontStyle
body.alignment : NSTextAlignment

blockquotes.fontName : String
blockquotes.fontSize : CGFloat
blockquotes.color : UI/NSColor
blockquotes.fontStyle : FontStyle
blockquotes.alignment : NSTextAlignment

link.fontName : String
link.fontSize : CGFloat
link.color : UI/NSColor
link.fontStyle : FontStyle

bold.fontName : String
bold.fontSize : CGFloat
bold.color : UI/NSColor
bold.fontStyle : FontStyle

italic.fontName : String
italic.fontSize : CGFloat
italic.color : UI/NSColor
italic.fontStyle : FontStyle

code.fontName : String
code.fontSize : CGFloat
code.color : UI/NSColor
code.fontStyle : FontStyle

strikethrough.fontName : String
strikethrough.fontSize : CGFloat
strikethrough.color : UI/NSColor
strikethrough.fontStyle : FontStyle

underlineLinks : Bool

bullet : String
FontStyle 是一个枚举类型,包含以下情况:normal,bold,italic 和 bolditalic,以提供更精确的行和字符样式控制。例如,您可能希望块引用默认为斜体样式。
md.blockquotes.fontStyle = .italic或者,如果您喜欢一点混乱
md.bold.fontStyle = .italic
md.italic.fontStyle = .bold
B) 高级定制
SwiftyMarkdown 使用基于规则的行处理和自定义引擎,不再局限于 Markdown。规则按照从上到下的顺序处理。首先进行行处理,然后根据字符规则应用字符样式。
例如,这是 SwiftyMarkdown 中 Markdown 行标签的小子集的设置方式
enum MarkdownLineStyle : LineStyling {
	case h1
	case h2
	case previousH1
	case codeblock
	case body

	var shouldTokeniseLine: Bool {
		switch self {
		case .codeblock:
			return false
		default:
			return true
		}
	}

	func styleIfFoundStyleAffectsPreviousLine() -> LineStyling? {
		switch self {
		case .previousH1:
			return MarkdownLineStyle.h1
		default :
			return nil
		}
	}
}

static public var lineRules = [
	LineRule(token: "    ",type : MarkdownLineStyle.codeblock, removeFrom: .leading),
	LineRule(token: "=",type : MarkdownLineStyle.previousH1, removeFrom: .entireLine, changeAppliesTo: .previous),
	LineRule(token: "## ",type : MarkdownLineStyle.h2, removeFrom: .both),
	LineRule(token: "# ",type : MarkdownLineStyle.h1, removeFrom: .both)
]

let lineProcessor = SwiftyLineProcessor(rules: SwiftyMarkdown.lineRules, default: MarkdownLineStyle.body)
同样,字符样式也遵循规则
enum CharacterStyle : CharacterStyling {
	case link, bold, italic, code
}

static public var characterRules = [
    CharacterRule(primaryTag: CharacterRuleTag(tag: "[", type: .open), otherTags: [
			CharacterRuleTag(tag: "]", type: .close),
			CharacterRuleTag(tag: "[", type: .metadataOpen),
			CharacterRuleTag(tag: "]", type: .metadataClose)
	], styles: [1 : CharacterStyle.link], metadataLookup: true, definesBoundary: true),
	CharacterRule(primaryTag: CharacterRuleTag(tag: "`", type: .repeating), otherTags: [], styles: [1 : CharacterStyle.code], shouldCancelRemainingTags: true, balancedTags: true),
	CharacterRule(primaryTag: CharacterRuleTag(tag: "*", type: .repeating), otherTags: [], styles: [1 : CharacterStyle.italic, 2 : CharacterStyle.bold], minTags:1 , maxTags:2),
	CharacterRule(primaryTag: CharacterRuleTag(tag: "_", type: .repeating), otherTags: [], styles: [1 : CharacterStyle.italic, 2 : CharacterStyle.bold], minTags:1 , maxTags:2)
]
这些字符规则由 SwiftyMarkdown 定义
public struct CharacterRule : CustomStringConvertible {

	public let primaryTag : CharacterRuleTag
	public let tags : [CharacterRuleTag]
	public let escapeCharacters : [Character]
	public let styles : [Int : CharacterStyling]
	public let minTags : Int
	public let maxTags : Int
	public var metadataLookup : Bool = false
	public var definesBoundary = false
	public var shouldCancelRemainingRules = false
	public var balancedTags = false
}
primaryTag:每个规则必须至少有一个标签,可以是repeating、open、close、metadataOpen或metadataClose中的一个。repeating标签是指开放和关闭字符相同的标签(通常一个组中有多个情况下还会有超过1种样式)。例如,Markdown 中使用的*标签。tags:规则可以查找的其他标签数组。例如,这里的自定义规则你会放置close标签。escapeCharacters:出现在任何标签字符之前的字符,通知扫描器忽略该标签。styles:应用于开放标签和关闭标签之间每个字符的样式。minTags:被认为是成功匹配的重复字符的最小数量。例如,将primaryTag设置为*并将minTag设置为 2,意味着**foo**会是一个成功匹配,而*bar*则不会。maxTags:被认为是成功匹配的重复字符的最大数量。metadataLookup:用于 Markdown 引用链接。告诉扫描器尝试从该字典而不是从内联结果中查找元数据。definesBoundary:为了使开放和关闭标签有效,字符串给定位置的boundaryCount必须相同。将此属性设置为true表示该规则将增加其在开放标签和关闭标签之间每个字符的boundaryCount。例如,[规则定义了一个边界。应用后,字符串*foo[bar*]变为带边界计数的*foobar*00001111。应用*规则的结果是输出*foobar*因为开头的*标签和结尾的*标签现在有不同的边界计数值。这基本上是修复 Markdown 中的**[不允许加粗**](url)问题的方法。shouldCancelRemainingTags:成功的匹配将标记开放标签和关闭标签之间的每个字符为完整,从而防止规则套用到这些字符上的进一步应用。balancedTags:此标志要求开放和关闭标签长度完全相等。例如,如果设置为 true,则**foo*的结果是**foo*。如果为 false,则输出将是*foo。
规则子集
如果你只想支持 Markdown 的一小部分,现在很容易做到。
该示例将仅处理具有 * 和 _ 字符的字符串,忽略链接、图像、代码以及所有行级属性(标题、引用块等)。
SwiftyMarkdown.lineRules = []

SwiftyMarkdown.characterRules = [
	CharacterRule(primaryTag: CharacterRuleTag(tag: "*", type: .repeating), otherTags: [], styles: [1 : CharacterStyle.italic, 2 : CharacterStyle.bold], minTags:1 , maxTags:2),
	CharacterRule(primaryTag: CharacterRuleTag(tag: "_", type: .repeating), otherTags: [], styles: [1 : CharacterStyle.italic, 2 : CharacterStyle.bold], minTags:1 , maxTags:2)
]
自定义规则
如果您想创建一个规则,将Elf的样式应用于“%The elf will speak now: Here is my elf speaking%”之间的一组字符,您可以这样设置:
enum Characters : CharacterStyling {
	case elf

	func isEqualTo( _ other : CharacterStyling) -> Bool {
		if let other = other as? Characters else {
			return false
		}
		return other == self
	}
}

let characterRules = [
	CharacterRule(primaryTag: CharacterRuleTag(tag: "%", type: .repeating), otherTags: [], styles: [1 : CharacterStyle.elf])
]

let processor = SwiftyTokeniser( with : characterRules )
let string = "The elf will speak now: %Here is my elf speaking%"
let tokens = processor.process(string)
输出将是令牌数组,等效于
[
	Token(type: .string, inputString: "The elf will speak now: ", characterStyles: []),
	Token(type: .repeatingTag, inputString: "%", characterStyles: []),
	Token(type: .string, inputString: "Here is my elf speaking", characterStyles: [.elf]),
	Token(type: .repeatingTag, inputString: "%", characterStyles: [])
]
C) SpriteKit 支持
你知道吗?SKLabelNode支持带属性的文本?我不知道。
let smd = SwiftyMarkdown(string: "My Character's **Dialogue**")

let label = SKLabelNode()
label.preferredMaxLayoutWidth = 500
label.numberOfLines = 0
label.attributedText = smd.attributedString()