SwiftPrettyPrint
![]()


![]()
SwiftPrettyPrint 相较于 Swift 标准库中的 print()、debugPrint() 和 dump(),提供更易于阅读的输出。
特点🚀
- 风格
✅ 单行✅ 多行
- 集成
✅ LLDB✅ 终端✅ 组合- RxSwift
- 包管理器
✅ Swift 包管理器✅ CocoaPods✅ Carthage
- 操作系统支持
✅ Apple平台✅ Linux- Windows
目录📖
动机💪
print()、debugPrint() 和 dump() 是在 Swift 的标准库中实现的。但有时这些函数的输出难以阅读。
例如,有以下类型及其值:
enum Enum {
    case foo(Int)
}

struct ID {
    let id: Int
}

struct Struct {
    var array: [Int?]
    var dictionary: [String: Int]
    var tuple: (Int, string: String)
    var `enum`: Enum
    var id: ID
}

let value = Struct(array: [1, 2, nil],
                   dictionary: ["one": 1, "two": 2],
                   tuple: (1, string: "string"),
                   enum: .foo(42),
                   id: ID(id: 7))
使用 Swift 标准库
使用标准库时,您会得到以下结果。
print(value)
// Struct(array: [Optional(1), Optional(2), nil], dictionary: ["one": 1, "two": 2], tuple: (1, string: "string"), enum: SwiftPrettyPrintExample.Enum.foo(42), id: SwiftPrettyPrintExample.ID(id: 7))

debugPrint(value)
// SwiftPrettyPrintExample.Struct(array: [Optional(1), Optional(2), nil], dictionary: ["one": 1, "two": 2], tuple: (1, string: "string"), enum: SwiftPrettyPrintExample.Enum.foo(42), id: SwiftPrettyPrintExample.ID(id: 7))

dump(value)
// ▿ SwiftPrettyPrintExample.Struct
//   ▿ array: 3 elements
//     ▿ Optional(1)
//       - some: 1
//     ▿ Optional(2)
//       - some: 2
//     - nil
//   ▿ dictionary: 2 key/value pairs
//     ▿ (2 elements)
//       - key: "one"
//       - value: 1
//     ▿ (2 elements)
//       - key: "two"
//       - value: 2
//   ▿ tuple: (2 elements)
//     - .0: 1
//     - string: "string"
//   ▿ enum: SwiftPrettyPrintExample.Enum.foo
//     - foo: 42
//   ▿ id: SwiftPrettyPrintExample.ID
//     - id: 7
这些输出对于调试来说是足够的信息,但不是可读性强的输出。
使用 SwiftPrettyPrint
使用 SwiftPrittyPrint 后,它的样子如下所示
Pretty.print(value)
// Struct(array: [1, 2, nil], dictionary: ["one": 1, "two": 2], tuple: (1, string: "string"), enum: .foo(42), id: 7)
Pretty.prettyPrint(value)
// Struct(
// array: [
// 1,
// 2,
// nil
// ],
// dictionary: [
// "one": 1,
// "two": 2
// ],
// tuple: (
// 1,
// string: "string"
// ),
// enum: .foo(42),
// id: 7
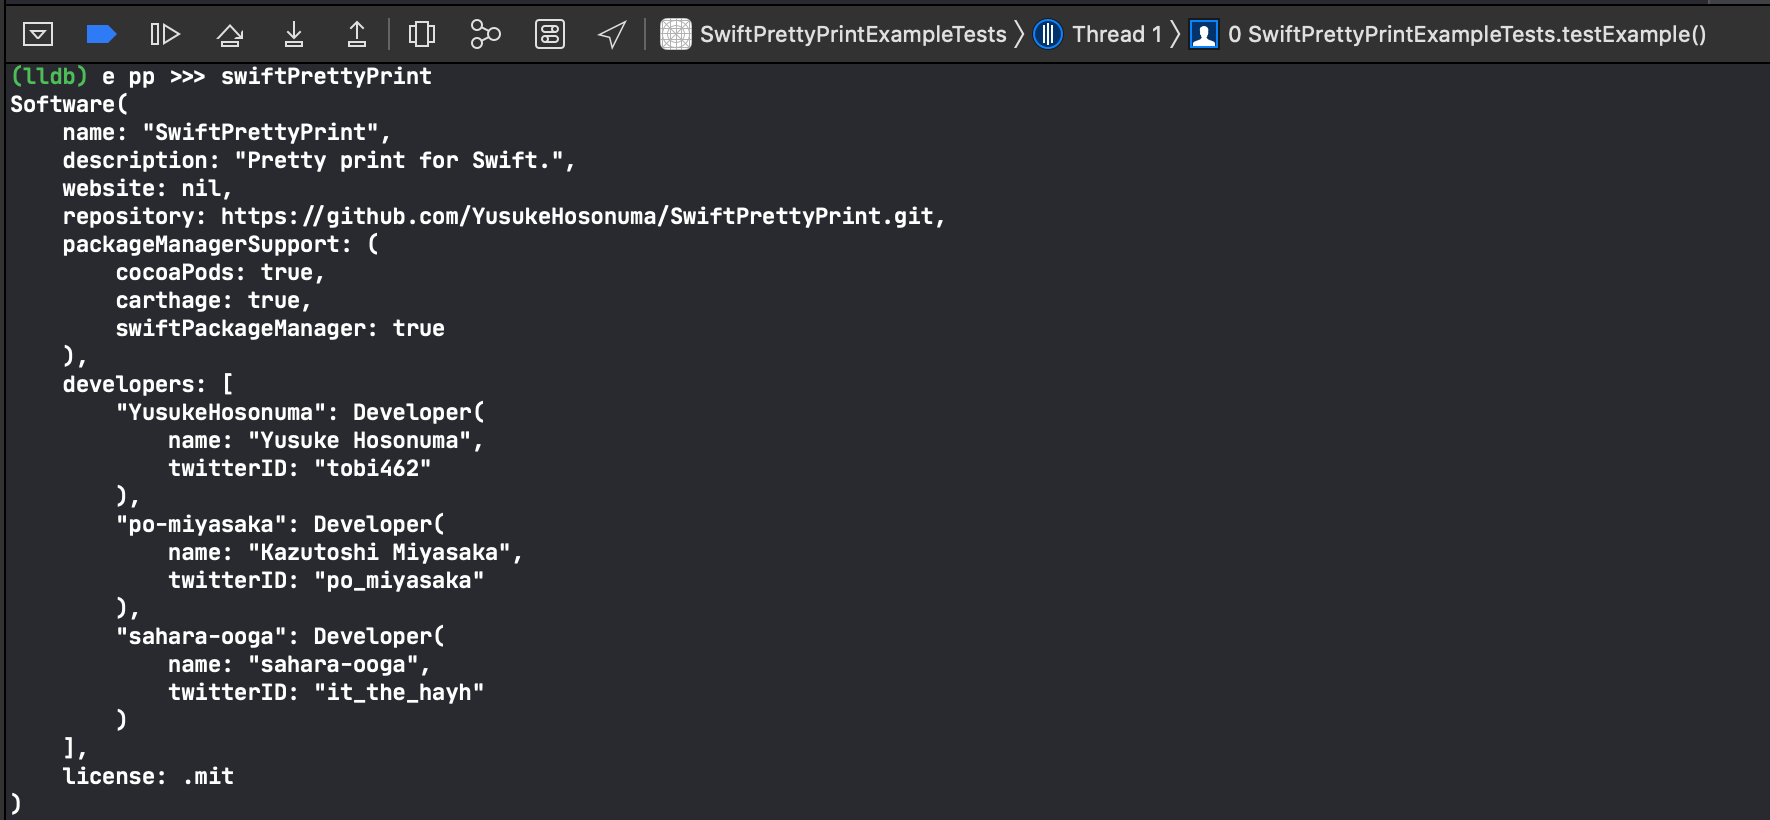
// )当然,我们还可以将 SwiftPrettyPrint 与 LLDB 结合使用。(通过使用 LLDB 集成,您可以使用更短的关键词如 _p 和 _pp)
(lldb) e Pretty.prettyPrint(value)
Struct(
    array: [
        1,
        2,
        nil
    ],
    dictionary: [
        "one": 1,
        "two": 2
    ],
    tuple: (
        1,
        string: "string"
    ),
    enum: .foo(42),
    id: 7
)
API
SwiftPrettyPrint 有四个基本功能,如下所述
print(label: String?, _ targets: Any..., separator: String, option: Pretty.Option)- 在一行中打印。
prettyPrint(label: String?, _ targets: Any..., separator: String, option: Pretty.Option)- 在多行中打印。
printDebug(label: String?, _ targets: Any..., separator: String, option: Pretty.Option)- 在一行中打印,同时包含 类型信息。
prettyPrintDebug(label: String?, _ targets: Any..., separator: String, option: Pretty.Option)- 在多行中打印,同时包含 类型信息。
唯一必需的参数是 targets,它通常可以描述如下。
let array: [URL?] = [
    URL(string: "https://github.com/YusukeHosonuma/SwiftPrettyPrint"),
    nil
]

Pretty.print(array)
// => [https://github.com/YusukeHosonuma/SwiftPrettyPrint, nil]

Pretty.prettyPrint(array)
// =>
// [
//     https://github.com/YusukeHosonuma/SwiftPrettyPrint,
//     nil
// ]

Pretty.printDebug(array)
// => [Optional(URL("https://github.com/YusukeHosonuma/SwiftPrettyPrint")), nil]

Pretty.prettyPrintDebug(array)
// =>
// [
//     Optional(URL("https://github.com/YusukeHosonuma/SwiftPrettyPrint")),
//     nil
// ]
基于操作符的 API
您可以使用类似于 Ruby 的操作符基础别名 API。
这不需要将表达式括在括号中,这样更方便用于长表达式。
p >>> 42
// => 42

p >>> 42 + 2 * 4 // It can also be applied to expression
// => 50

p >>> String(string.reversed()).hasSuffix("eH")
// => true

pp >>> ["Hello", "World"]
// =>
// [
//     "Hello",
//     "World"
// ]| 操作符语法 | 等效于 |
|---|---|
p >>> 42 |
Pretty.print(42) |
pp >>> 42 |
Pretty.prettyPrint(42) |
pd >>> 42 |
Pretty.printDebug(42) |
ppd >>> 42 |
Pretty.prettyPrintDebug(42) |
格式选项
您可以配置格式选项,可以是共享的或者通过参数传递。
缩进大小
您可以在如下洁面打印中指定缩进大小
// Global option
Pretty.sharedOption = Pretty.Option(indentSize: 4)

let value = (bool: true, array: ["Hello", "World"])

// Use `sharedOption`
Pretty.prettyPrint(value)
// =>
// (
//     bool: true,
//     array: [
//         "Hello",
//         "World"
//     ]
// )

// Use option that is passed by argument
Pretty.prettyPrint(value, option: Pretty.Option(prefix: nil, indentSize: 2))
// =>
// (
//   bool: true,
//   array: [
//     "Hello",
//     "World"
//   ]
// )
前缀和标签
您可以指定全局前缀和一个标签(例如变量名称),如下所示
Pretty.sharedOption = Pretty.Option(prefix: "[DEBUG]")

let array = ["Hello", "World"]

Pretty.print(label: "array", array)
// => [DEBUG] array: ["Hello", "World"]

Pretty.p("array") >>> array
// => [DEBUG] array: ["Hello", "World"]
在Console.app中输出
将.osLog应用于Option.outputStrategy将在Console.app中显示输出
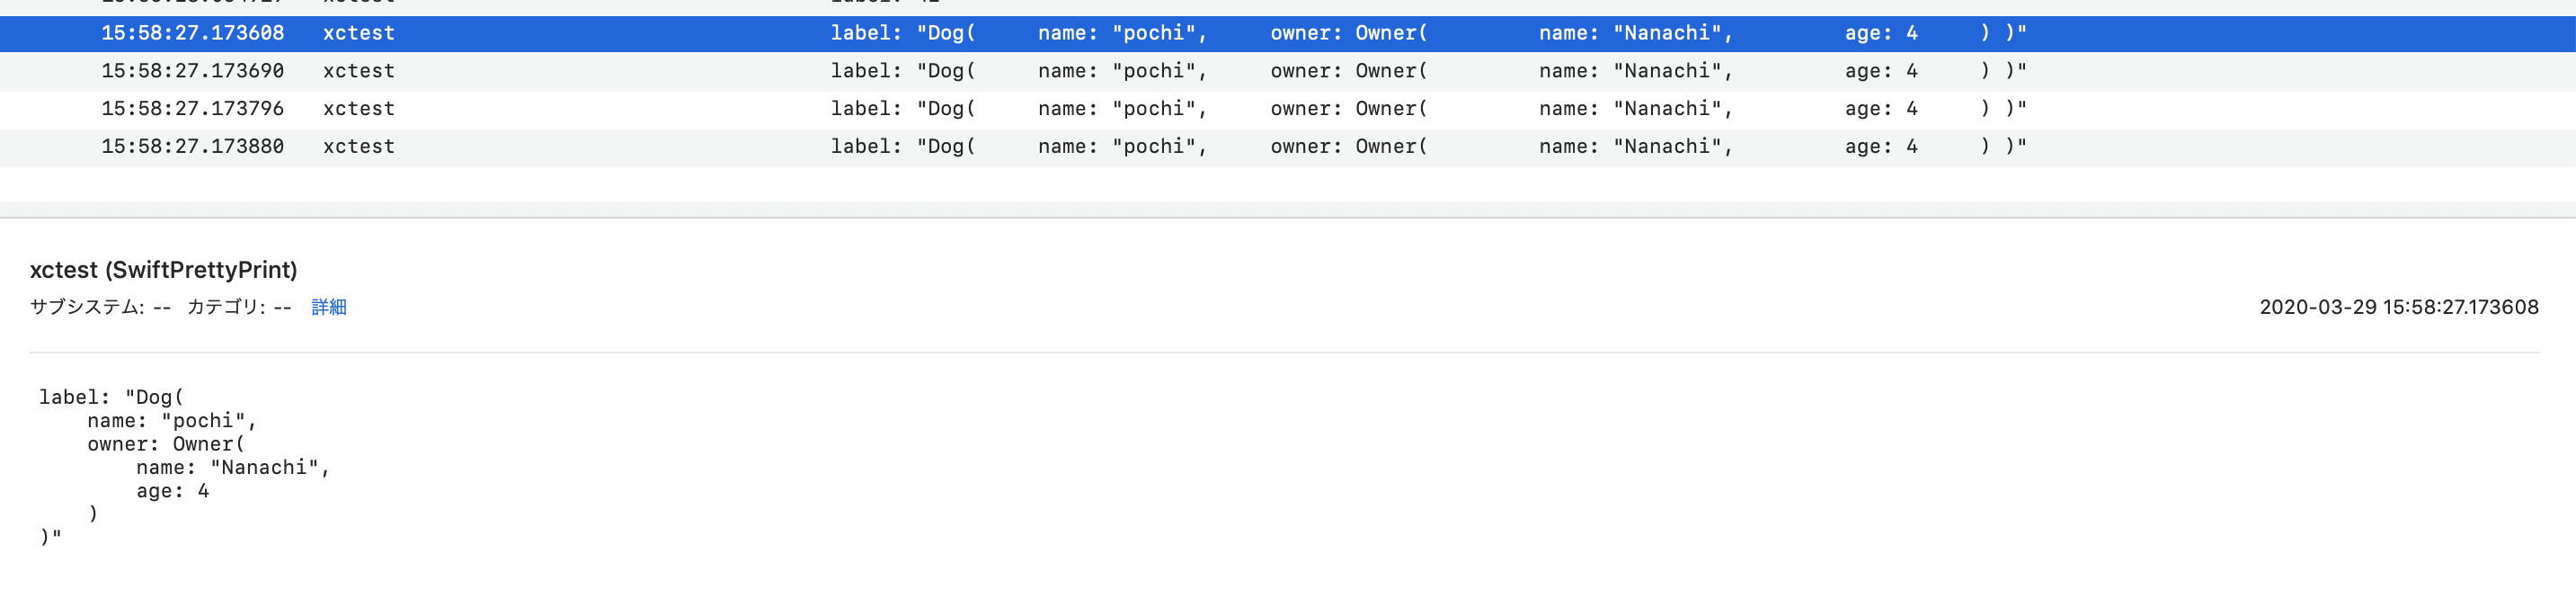
xcode-debug-console中的输出将是以下内容。
Debug.sharedOption = Debug.Option(outputStrategy: .osLog)

let dog = Dog(id: DogId(rawValue: "pochi"), price: Price(rawValue: 10.0), name: "ポチ")

Debug.print(dog)
// => 2020-04-02 11:51:10.766231+0900 SwiftPrettyPrintExample[41397:2843004] Dog(id: "pochi", price: 10.0, name: "ポチ")集成🔌
LLDB
请复制并添加以下内容到您的~/.lldbinit(如果文件不存在,请创建该文件)
command regex _p  's/(.+)/e -l swift -o -- var option = Pretty.sharedOption; option.prefix = nil; Pretty.print(%1, option: option)/'
command regex _pp 's/(.+)/e -l swift -o -- var option = Pretty.sharedOption; option.prefix = nil; Pretty.prettyPrint(%1, option: option)/'
或通过lowmad进行安装
$ lowmad install https://github.com/YusukeHosonuma/SwiftPrettyPrint.git
注意:如果您已经通过lowmad安装了SwiftPrettyPrint 1.1.0或更早版本,请在更新之前手动删除脚本。(例如,rm /usr/local/lib/lowmad/commands/YusukeHosonuma-SwiftPrettyPrint/swift_pretty_print.py)
这可以让您在使用调试控制台时,像下面这样使用lldb命令
(lldb) _p dog
Dog(id: "pochi", price: 10.0, name: "ポチ")

(lldb) _pp dog
Dog(
    id: "pochi",
    price: 10.0,
    name: "ポチ"
)
终端
SwiftPrettyPrint 在运行 iOS 模拟器 或 macOS 时,自动将日志文件输出到以下文件。
- /tmp/SwiftPrettyPrint/output.log
- /tmp/SwiftPrettyPrint/output-colored.log (ANSI 颜色)
因此您可以从中读取,例如使用 tail 或 grep 等其他工具。
$ tail -F /tmp/SwiftPrettyPrint/output-colored.log
output-colored.log 是 ANSI 颜色化的,因此在终端上看起来非常美观。

自定义
您可以通过设置 Debug.Option.theme 属性来自定义终端的 ANSI 颜色,例如。
let theme = ColorTheme(
    type: { $0.green().bold() },
    nil: { $0.yellow() },
    bool: { $0.yellow() },
    string: { $0.blue() },
    number: { $0.cyan() },
    url: { $0.underline() }
)

Debug.sharedOption = Debug.Option(theme: theme)
ANSI 颜色可以方便地通过 ColorizeSwift 来指定。
你创建了一个漂亮的主题吗?
请将新主题添加到 ColorTheme.swift 并提交 PR。
public struct ColorTheme {
    ...
+   public static let themeName = ColorTheme(
+       type: { ... },
+       nil: { ... },
+       bool: { ... },
+       string: { ... },
+       number: { ... },
+       url: { ... }
+   )

    public var type: (String) -> String
    public var `nil`: (String) -> String
    ...
谢谢!
组合
您可以在 Combine 框架中使用 prettyPrint() 操作符。
[[1, 2], [3, 4]]
    .publisher
    .prettyPrint("🍌")
    .sink { _ in }
    .store(in: &cancellables)
// =>
// 🍌: receive subscription: [[1, 2], [3, 4]]
// 🍌: request unlimited
// 🍌: receive value:
// [
//     1,
//     2
// ]
// 🍌: receive value:
// [
//     3,
//     4
// ]
// 🍌: receive finished
您可以指定 when: 和 format:。
[[1, 2], [3, 4]]
    .publisher
    .prettyPrint("🍌", when: [.output, .completion], format: .singleline)
    .sink { _ in }
    .store(in: &cancellables)
// =>
// 🍌: receive value: [1, 2]
// 🍌: receive value: [3, 4]
// 🍌: receive finished
您也可以使用别名的 API p() 和 pp()。
[[1, 2], [3, 4]]
    .publisher
    .p("🍎")  // Output as single-line
    .pp("🍊") // Output as multiline
    .sink { _ in }
    .store(in: &cancellables)
安装
CocoaPods (推荐)
pod "SwiftPrettyPrint", "~> 1.2.0", :configuration => "Debug" # enabled on `Debug` build only示例应用程序在此处:这里。
Carthage
github "YusukeHosonuma/SwiftPrettyPrint"
Swift Package Manager
将以下行添加到您的 Package.swift 文件中的依赖项
.package(url: "https://github.com/YusukeHosonuma/SwiftPrettyPrint.git", .upToNextMajor(from: "1.2.0"))最后,将 "SwiftPrettyPrint" 作为依赖项包含在您的任何目标中
let package = Package(
    // name, platforms, products, etc.
    dependencies: [
        .package(url: "https://github.com/YusukeHosonuma/SwiftPrettyPrint.git", .upToNextMajor(from: "1.2.0")),
        // other dependencies
    ],
    targets: [
        .target(name: "<your-target-name>", dependencies: ["SwiftPrettyPrint"]),
        // other targets
    ]
)
或者,使用 Xcode 集成。此功能自 Xcode 10 起可用。
推荐设置📝
如果您在调试时不想写 import 语句。
我们建议创建 Debug.swift 并声明任何类型为 typealias,如下所示
// Debug.swift
#if canImport(SwiftPrettyPrint)
    import SwiftPrettyPrint
    typealias Debug = SwiftPrettyPrint.Pretty // You can use short alias such as `D` too.
#endif
您不再需要在每个源文件中编写 import 语句。
// AnySource.swift
Debug.print(42)
Debug.prettyPrint(label: "array", array)
注意:这不能用于基于操作符的 API,例如 p >>>。 (这是 Swift 语言限制)
要求
- Xcode 11.3+(Swift 5.1+)
- 平台
- iOS 10.0+
- macOS 10.12+
- watchOS 5.0+
- tvOS 12.0+
开发
需要
- Xcode 11.3.1
- 注意:但在 macOS 11.0.1 上运行测试失败,请使用
make test或最新版本的 Xcode 运行单元测试。
- 注意:但在 macOS 11.0.1 上运行测试失败,请使用
- pre-commit
执行 make setup 安装开发工具到系统(不包括 Xcode 11.3)。
$ make help
setup      Install requirement development tools to system and setup (not include Xcode 11.3)
build      swift - build
test       swift - test
xcode      swift - generate xcode project
format     format sources by SwiftFormat
lint       cocoapods - lint podspec
release    cocoapods - release
info       cocoapods - show trunk information
作者
由 Penginmura 开发。