SpriteKitAutoLayout 0.3.1
| 测试已测试 | ✗ |
| 语语言 | Obj-Cobjective-c |
| 许可证 | MIT |
| 发布上次发布 | 2015年1月 |
由 Maksym Grebenets--dscription=cba-macbook-pro 维护。
SpriteKitAutoLayout 0.3.1
- 作者:
- Maksym Grebenets
- mgrebenets
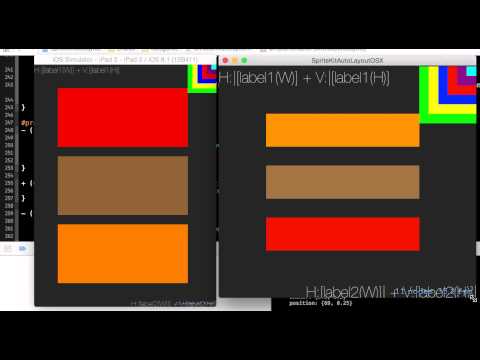
SpriteKitAutoLayout (SKAL) 是一个框架,它将 Auto Layout 的功能带给您的 SpriteKit 应用。
优点 / 缺点
SpriteKitAutoLayout 适用于相同的用途 Auto Layout 适用于 UIKit 或 AppKit,即布局您的应用 UI 元素,例如按钮、标签等。当场景尺寸变化时(iOS 的旋转或 OS X 的窗口大小调整),Auto Layout 将处理您的 UI 布局。
它不适用于不需要任何布局的情况。例如代表您(游戏)角色之一的精灵,它会移动,改变它的比例,旋转,动画并执行其他疯狂的事情。
安装
用法
从包含头文件开始。
#import <SpriteKitAutoLayout/SpriteKitAutoLayout.h>如果您的项目是 Swift 项目,请将其放在桥接头中。
关于配置,这就足够了,现在您可以使用 Auto Layout 对 SpriteKit 节点进行布局,就像使用 UIKit/AppKit 视图一样。
主要区别在于,您必须将 autoLayoutEnabled 设置为 true,这类似于在 UIKit/AppKit 中将 translatesAutoresizingMaskIntoConstraints 设置为 NO。
您还必须显式地调用 layoutNodes 方法。最佳做法是在 didChangeSize: 的实现中进行。注意,如果您希望您的 UI 更新得到适当应用,则必须在主队列上异步调度。
import SpriteKit

class DemoScene: SKScene {
    override func didMoveToView(view: SKView) {
        super.didMoveToView(view)

        self.scaleMode = .ResizeFill
        self.name = "DemoScene"

        // Add label to put it left bottom corner
        let leftBottomLabel = SKLabelNode()
        leftBottomLabel.text = "Left Bottom"
        leftBottomLabel.name = "leftBottomLabel"    // a C language identifier
        leftBottomLabel.autoLayoutEnabled = true    // enable autolayout for this node
        addChild(leftBottomLabel)

        // Add color sprite with non-default anchor point to put in the center
        let centerSprite = SKSpriteNode(color: SKColor.greenColor(), size: CGSizeZero)
        centerSprite.name = "centerSprite"
        centerSprite.anchorPoint = CGPoint(x: 1, y: 1)  // non-default anchor point
        centerSprite.autoLayoutEnabled = true
        addChild(centerSprite)

        // Get dictionary of all nodes in this scene
        let nodesDic = self.nodesDic()  // self. is required to avoid compile error

        // Configure Auto Layout constraints

        // Pin label to left bottom corner, use label's intrinsic size
        let width = Float(leftBottomLabel.frame.width)
        var format = "H:|[leftBottomLabel(\(width))]"
        var constraints = NSLayoutConstraint.constraintsWithVisualFormat(format, options: .DirectionLeadingToTrailing, metrics: nil, views: nodesDic)
        addConstraints(constraints) // add constraints

        let height = Float(leftBottomLabel.frame.height)
        format = "V:|[leftBottomLabel(\(height))]"
        constraints = NSLayoutConstraint.constraintsWithVisualFormat(format, options: .DirectionLeadingToTrailing, metrics: nil, views: nodesDic)
        addConstraints(constraints) // add constraints

        // Put color sprite in the center
        // Make it's size related to parent (aka "superview")

        // Constraint center (x, y) to parent's (x, y)
        // it's save to do it here because parent is skene filling whole SKView
        var constraint = NSLayoutConstraint(item: centerSprite, attribute: .CenterX, relatedBy: .Equal, toItem: self, attribute: .CenterX, multiplier: 1, constant: 0)
        addConstraint(constraint)
        constraint = NSLayoutConstraint(item: centerSprite, attribute: .CenterY, relatedBy: .Equal, toItem: self, attribute: .CenterY, multiplier: 1, constant: 0)
        addConstraint(constraint)

        // Make the the centerSprite's width to be 20% of the parent's width
        constraint = NSLayoutConstraint(item: centerSprite, attribute: .Width, relatedBy: .Equal, toItem: self, attribute: .Width, multiplier: 0.2, constant: 0)
        addConstraint(constraint)

        // Make the centerSprite's height to be equal to centerSprite's width
        constraint = NSLayoutConstraint(item: centerSprite, attribute: .Height, relatedBy: .Equal, toItem: centerSprite, attribute: .Height, multiplier: 1, constant: 0)
        centerSprite.addConstraint(constraint)  // centerSprite's constraint on itself
    }

    override func didChangeSize(oldSize: CGSize) {
        dispatch_async(dispatch_get_main_queue()) {
            layoutNodes()
        }
    }
}
与其他自动布局框架一起使用
您想与其他自动布局包装器和辅助工具一起使用它吗?
没问题,使用自 0.2.0 起提供的 SKNode 的只读属性 layoutProxyView()。
例如,您的代码可能看起来像这样,使用 Cartography。
let button = SKSpriteNode(color: SKColor.greenColor(), size: CGSizeZero)
button.autoLayoutEnabled = true
addChild(button)

layout(button.layoutProxyView()) { button in
    // button in closure is not the same as 'let button' declared before
    button.left == button.superview!.left   // same as "H:|[button]"
    button.bottom == button.superview!.bottom   // same as "V:|[button]"
    button.height == button.superview!.height * 0.1
    button.width == button.height
}
示例
要运行示例项目,请克隆仓库,然后首先从示例目录中运行 pod install。
要求
就像 SpriteKit 本身一样,SpriteKitAutoLayout 对 iOS 和 macOS 平台都可用。
- 最小 iOS 版本是 7.0
- 最小 macOS 版本是 10.9
限制与问题
- 如果想要使用
.CenterX、.CenterY或其他属性,为 SKLabelNode 设置约束很棘手。 - 不支持标签和精灵的内在大小。
路线图
- 支持 SKScene 的非默认锚点。现在只支持(0.5,0.5)。
- 支持 SKLabelNode 和 SKSpriteNode 的内在大小概念。
- 越来越多的单元测试!
- 通过使用 UIView 实例的虚拟子类来使其更加轻量。
作者
马克西姆·格雷本尼斯,[email protected]
许可证
SpriteKitAutoLayout 以 MIT 许可证可用。有关更多信息,请参阅 LICENSE 文件。