Render 4.9.1
| 测试已测试 | ✗ |
| 语言语言 | SwiftSwift |
| 许可证 | MIT |
| 发布最后发布 | 2017年8月 |
| SwiftSwift 版本 | 3.1 |
| SPM支持 SPM | ✗ |
由 Alex Usbergo 维护。
Render 4.9.1
- 由
- Alex Usbergo
- alexdrone
![]()
Render 是一个灵感来源于 React 的 iOS 上构建高效 UI 的声明式库。
- 声明式: Render 使用声明式 API 定义 UI 组件。您只需根据一组输入描述您的 UI 布局,然后框架负责处理其余工作(diff 和 reconciliation 从虚拟视图层次结构到实际视图)。
-
- 细粒度回收: 任何组件(如文本或图像)都可以在任何 UI 位置进行回收和重复使用。
(框架)让我们将 UI 写作其状态的单值函数。
目前,我们通过戳击它们来编写 UI,手动突变属性以使它们发生变化,添加和删除视图等。这是脆弱且易出错的 [...]。
(框架)允许我们为给定状态描述整个 UI,然后它会完成所有艰难的工作,了解需要更改的内容。它将所有脆弱且易出错的代码抽象出来。
安装
如果您使用 CocoaPods
将以下内容添加到您的 Podfile
pod 'Render'如果您使用 Carthage
将以下行添加到您的 Cartfile
github "alexdrone/Render" "master"
手动
将 bin/Render.framework 拖放到您的项目中并将其添加为嵌入的二进制文件。
TL;DR
Render 的构建块是 组件(在协议 ComponentViewType 中描述)。此为组件的外观:
struct CounterState: StateType {
  let count: Int = 0
}

class CounterComponentView: ComponentView<CounterState> {

  override func render() -> NodeType {
    let circle = Node<UIView> { view, layout, size in
      view.backgroundColor = UIColor.green
      layout.alignSelf = .center
      layout.width = 128
      layout.aspectRatio = 1
    }
    let text = Node<UILabel> { view, layout, size in
      view.text = "\(state.count)"
      view.textAlignment = .center
      layout.margin = 16
    }
    let container = Node<UIView> { view, layout, _ in
      view.backgroundColor = UIColor.black
      view.onTap { [weak self] _ in
      	// When the state changes the component is automatically re-rendered.
        self?.setState { state in state.count += 1 }
      }
      layout.justifyContent = .center
    }
    return container.add(children: [avatar, text])
  }
}

组件
Node<T> 是任何类型的视图的抽象,知道如何在必要时构建、配置和布局视图。
每次调用 update(options:) 时,都会构建一个新的树,与现有的树进行比较,并且只执行对实际视图层次结构所需的更改 - 如果您具有静态的视图层次结构,您可能需要传递 '.preventViewHierarchyDiff' 选项来跳过此渲染部分。此外,作为参数传递的 configure 封闭调用会被重新应用于在 render() 方法中定义的每个视图,并且根据节点的内边距属性重新计算布局。
查看演示项目以获取更多示例
Render 中的组件可以是 无状态 的或 有状态 的。
无状态 组件本质上是从当前组件属性值(props)返回视图层次结构描述的纯函数
您可以通过简单地使一个函数返回节点树来定义无状态组件。
 func PaddedLabel(text: String) -> NodeType {
    return Node<UIView>(resueIdentifier: "PaddedLabel") { view, layout, size in
      layout.padding = 4
      view.backgroundColor = ...
      }.add(children: [
        Node<UILabel> { view, _, _ in
          view.text = text
          view.font = ...
        }
    ])
  }
或者通过定义具有一些属性的 StatelessComponent 子类。
class PaddedLabelComponentView: StatelessComponent {
  var text: String = ""

  func render() -> NodeType {
    return Node<UIView>(resueIdentifier: "PaddedLabel") { view, layout, size in
      layout.padding = 4
      view.backgroundColor = ...
      }.add(children: [
        Node<UILabel> { view, _, _ in
          view.text = text
          view.font = ...
        }
    ])
  }
组件可以以层次结构的方式进行组合
class ParentComponentView: StatelessComponent {

  func render() -> NodeType {
    return Node<UIScrollView>.add(children: [
        // A pure function returning a node can be be simply added to the node desciption.
        PaddedLabel(text: "foo"),
        // While a component define as a class needs to be added as a child
        // using the ComponentNode function.
        // N.B. Stateful components need to provide a unique 'key' as well in the
        // ComponentNode function - see the stateful components section.
        ComponentNode(PaddedLabelComponentView(), in: self) { $0.text = "foo" }
      ])
    }
  }
与 无状态 组件相反,有状态 组件不仅依赖于 props 来渲染,而且维护内部状态。
Props 与 State
props 和 state 之间的具体区别是什么?
它们的工作方式相对容易理解 - 尤其是当在上下文中看到时 - 但从概念上讲也有些困难。它们首先很混乱,因为它们都有抽象的术语,并且它们的值看起来很相似,但它们也具有非常不同的 角色。
您可以这样说,props + state 是组件的 render() 函数的输入数据,因此我们需要放大并查看每种数据类型代表什么以及它来自哪里。
props
props 是组件的 配置,就像是其 选项。它们从上方接收并且对于接收它们的组件来说 不可变。
组件不能更改其 props,但它负责整理其子组件的 props。
state
当组件挂载时,state 以默认值开始,然后随着时间(主要是用户事件生成)经历变化。 它是时间的某一点的表示 - 一个快照。
组件内部管理其自己的 state,但是 - 除了设置初始状态之外 - 没有理由干涉其子组件的 state。您可以这样说,状态是 私有的。
在 Render 中,通过调用 setState(options:change:) 函数,组件可以更改其内部状态。
struct CounterState: StateType {
  let count: Int = 0
}
class CounterComponentView: ComponentView<CounterState> {

  // A property configurable from the outside.
  // The component will increment on tap if this is true, decrement otherwise.
  var shouldIncrement: Bool = true
  // Another simple property.
  var background: UIColor = UIColor.black

  override func render() -> NodeType {
    let circle = ...
    let text = ...
    let container = Node<UIView> { view, layout, _ in
      view.backgroundColor = self.background
      view.onTap { _ in
      	// When the state changes the component is automatically re-rendered.
        self.setState { state in
          if self.shouldIncrement {
            state.count += 1
          } else {
            state.count -= 1
          }
      }
    }
    return container.add(children: [avatar, text])
  }
}
当将有状态组件作为子组件添加时,必须指定其唯一键,以便基础设施能够存储其内部状态
class ParentComponentView: StatelessComponent {
  func render() -> NodeType {
    return Node<UIScrollView>.add(children: [
        ComponentNode(CounterComponentView(), in: self, key:"counter") { $0.text = "foo" }
      ])
    }
  }
此组件需要 state 吗?
state 是可选的。因为 state 增加了复杂性并降低了可预测性,所以没有 state 的组件更可取。尽管在一个交互式应用程序中显然不能没有状态,您应该避免具有过多的 有状态组件。
总结
-
无状态组件 - 只有 props,没有 state。除了
render()函数之外,没有什么可做的,而且它们的逻辑完全围绕所接收的 props。这使得它们非常容易跟踪(并且为此而测试)。 - 有状态组件 — 同时拥有 属性 和 状态。它们应该负责用户交互和一些复杂的业务逻辑,而所有的可视化和完善逻辑则应该尽可能地下移,进入多多益善的 无状态组件。
类标识符重新使用与 key
每个节点都公开上述两个属性,尽管一开始可能会令人困惑,但它们的作用截然不同。
- 类标识符 - 主要出于性能优化的考虑 - 它是一种标记方式,用于标识最优化的复用途径。如果节点具有自定义创建Closure,则为 必需项。
- key - 用于为节点赋予唯一标识以便存储状态 - 每个子组件都必须使用一个唯一的 key。在列表中使用 非常实用。
与 UIKit 轻量级集成
组件只是普通的 UIView,因此它们可以在具有 自动布局 或 layoutSubviews 的普通视图层次结构中使用。类似地,普通的 UIView(UIKit组件或自定义组件)可以包含在 Node 中。
该框架不强制你使用组件抽象。你可以在组件内部使用具有自动布局的普通 UIView,反之亦然。这可能是与 Facebook 的 ComponentKit 最大的区别之一。
性能 & 线程模型
渲染 的 update(options:) 函数在主线程上执行。Diff+Reconciliation+Layout+Configuration 通常在一个具有复杂视图层次结构的组件上运行时间不超过 16ms,这使得它适用于单元格实现(具有平滑滚动)。
单元格内的组件
你可以将你的组件包在 ComponentTableViewCell 或 ComponentCollectionViewCell 中,并用经典的数据源/代理模式为你的视图控制器设置。
声明式 UI(Table/Collection)View 实现
你可以在你的子节点为容器的表单节点(TableNode)或集合节点(CollectionNode)快速利用UITableView和UICollectionView的效率,以及它们的单元格复用能力。这样,节点的子节点将被封装在UITableViewCollectionCell或UICollectionNode中。
只要集合中的每个子节点都有一个唯一的 key,集合中的更改就会导致精细粒度的表格更改(添加/删除/移动单元格)。
 override func render() -> NodeType {
    let table = TableNode { _, layout, _ in
      // Size, margins and padding can also be expressed as a % of the parent.
      (layout.percent.height, layout.percent.width) = (100%, 100%)
    }
    return table.add(children: [
      // Any node definition will be wrapped inside a UITableViewCell.
      PaddedLabel(text: "foo"),
      PaddedLabel(text: "bar"),
      // ComponentViews can also be added as child-nodes.
      ComponentNode(MyComponent(), state: state.bar) { $0.props = ... }
    ])
  }
示例项目
Render目录应用包含许多复杂组件和布局。
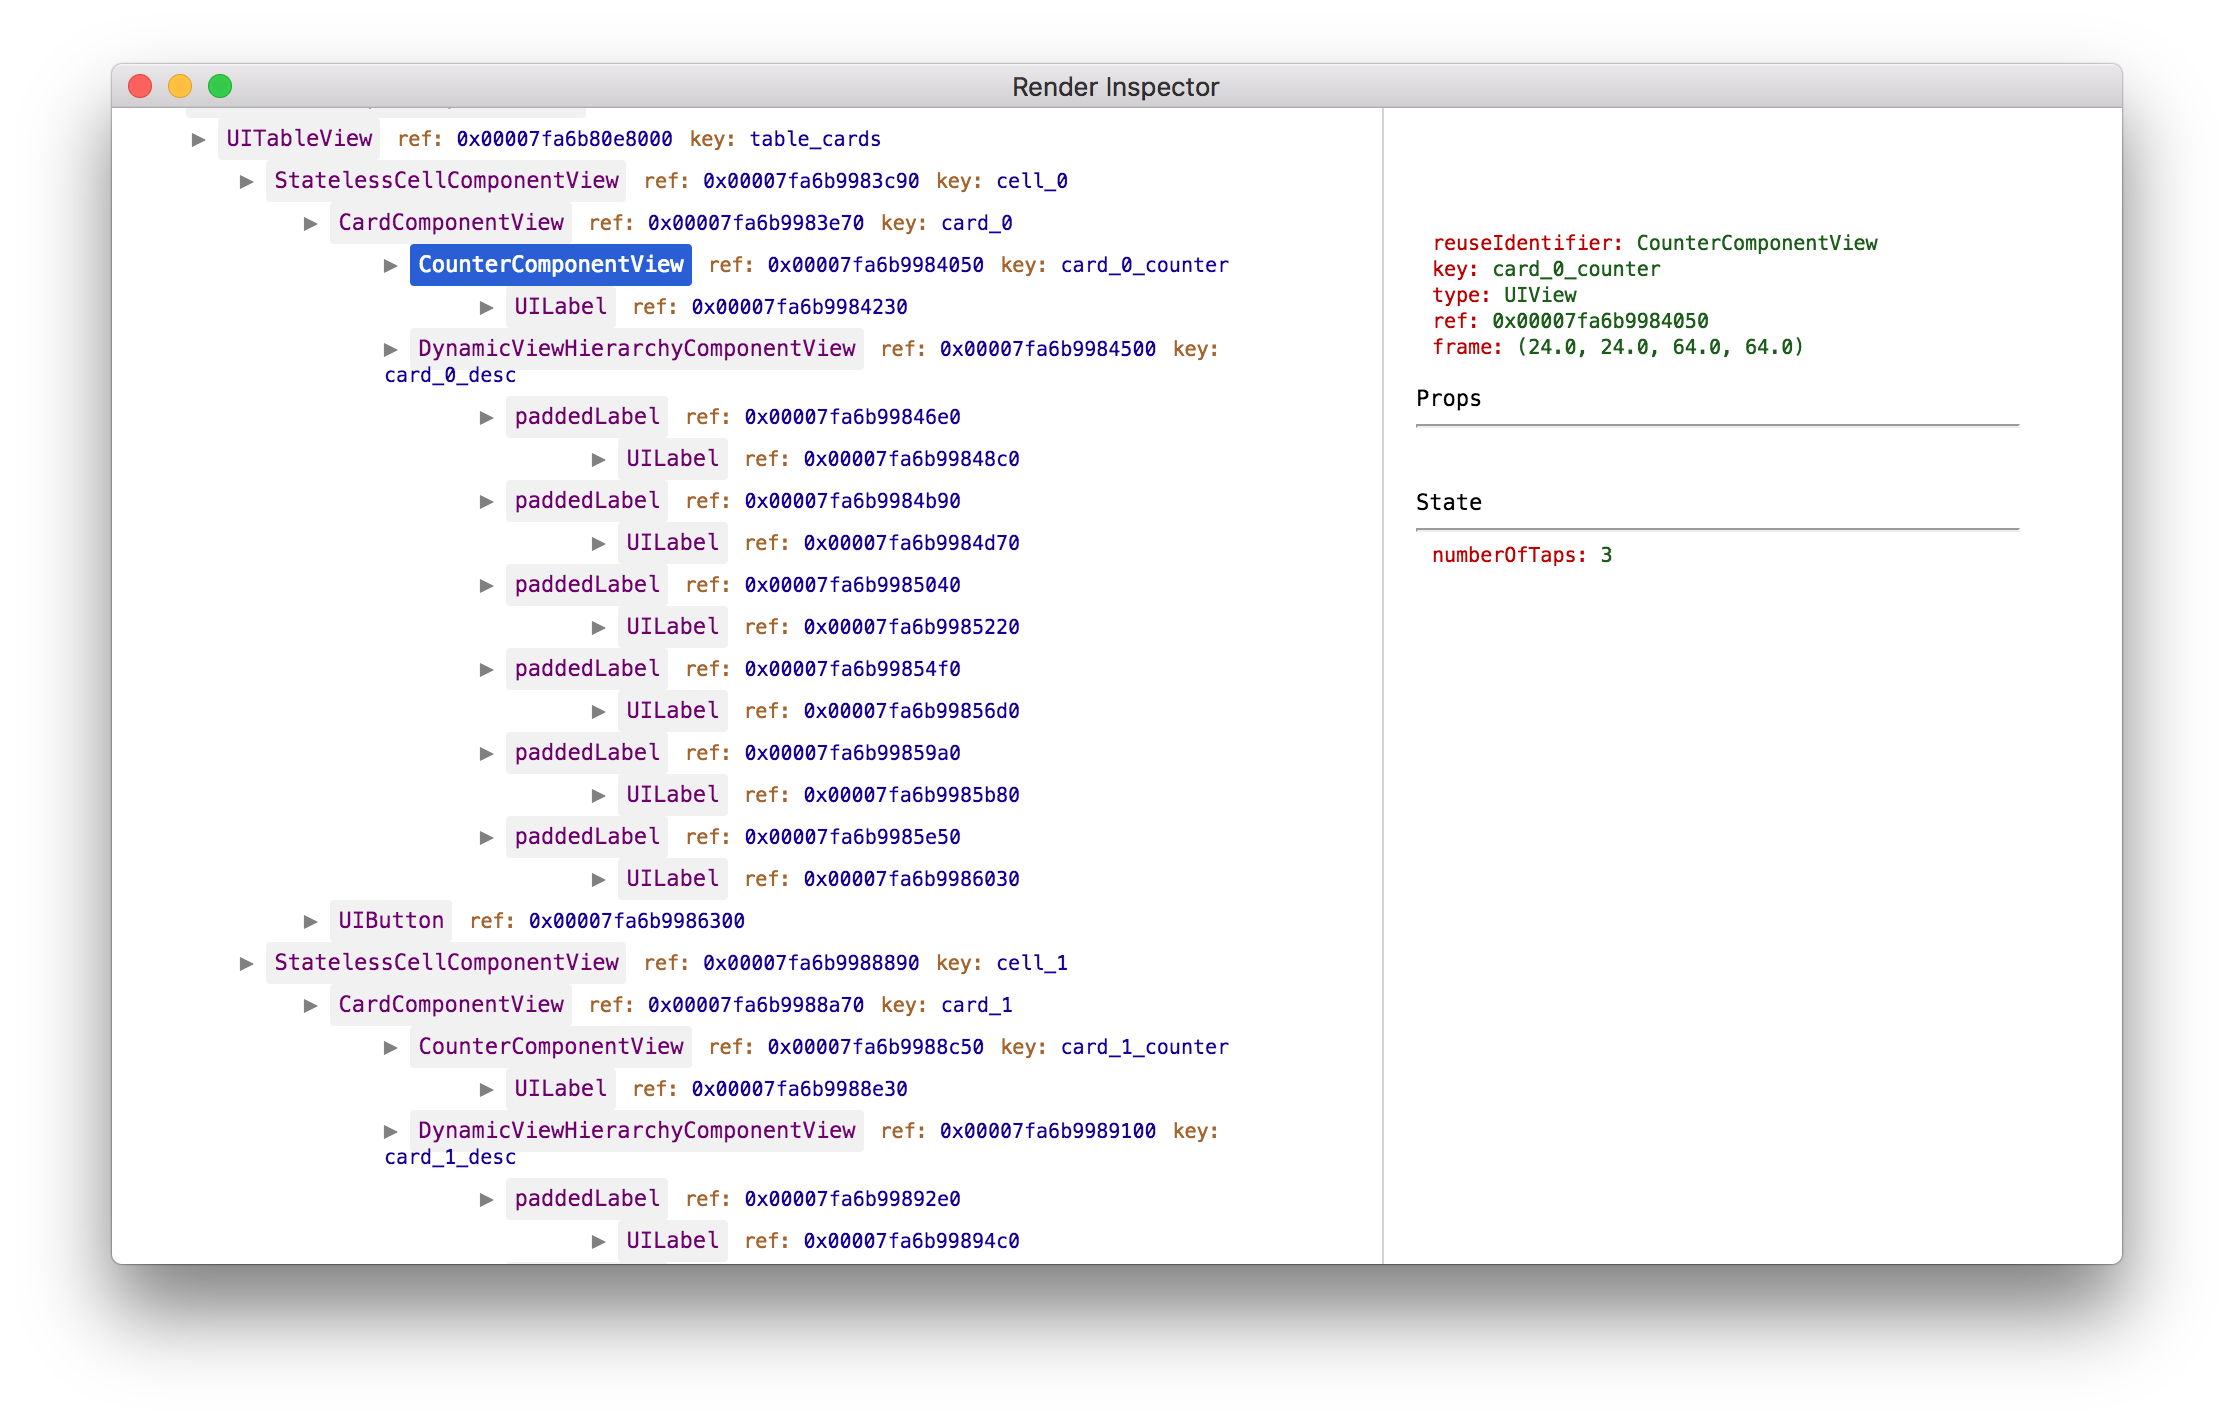
检查器(实验性)
在模拟器中运行应用程序时,可以使用inspector伙伴mac应用程序检查Render组件及其属性和状态。
要启用应用程序中的调试服务器,只需在你的AppDelegate的application(_:didFinishLaunchingWithOptions)中调用startDebugServer()即可。
class AppDelegate: UIResponder, UIApplicationDelegate {

  func application(_ application: UIApplication, didFinishLaunchingWithOptions launchOptions: [UIApplicationLaunchOptionsKey: Any]?) -> Bool {
    /// Starts the debug server at localhost:8080/inspect
    startDebugServer()
    ...
 }
与 Dispatch 或 Reswift 一起使用
- Dispatch 是 Swift 中的单向数据流架构的一种类似Flux的实现。在这种架构中,视图是状态的简单函数 - 这与Render的声明性编程风格非常兼容。
查看 TodoApp 示例,了解如何最大限度地发挥 Dispatch 和 Render 的优势。
- ReSwift 是 Swift 中类似 Redux 的单向数据流架构实现。
授权
请参阅授权文件以获取授权详情。