![]()

![]()


Prestyler是一个基于原生的NSAttributedString类的文本样式库。它简化并扩展了原始的工作流程,使您能够获得更简洁的语法。您可以在以下位置找到完整的文档。请查阅并留下您的反馈!
Prestyler允许您将以下代码替换为:
let baseString = "It is a pain to use attributed strings in ios."
let attributedString = NSMutableAttributedString(string: baseString, attributes: nil)
let painWord = (attributedString.string as NSString).range(of: "pain")
let attributes: [NSAttributedStringKey : Any] = [
    NSAttributedStringKey.font : UIFont.boldSystemFont(ofSize: 18),
    NSAttributedStringKey.underlineStyle : 2,
    NSAttributedStringKey.foregroundColor : UIColor.red]
attributedString.setAttributes(attributes, range: painWord)
label.attributedText = attributedString
到
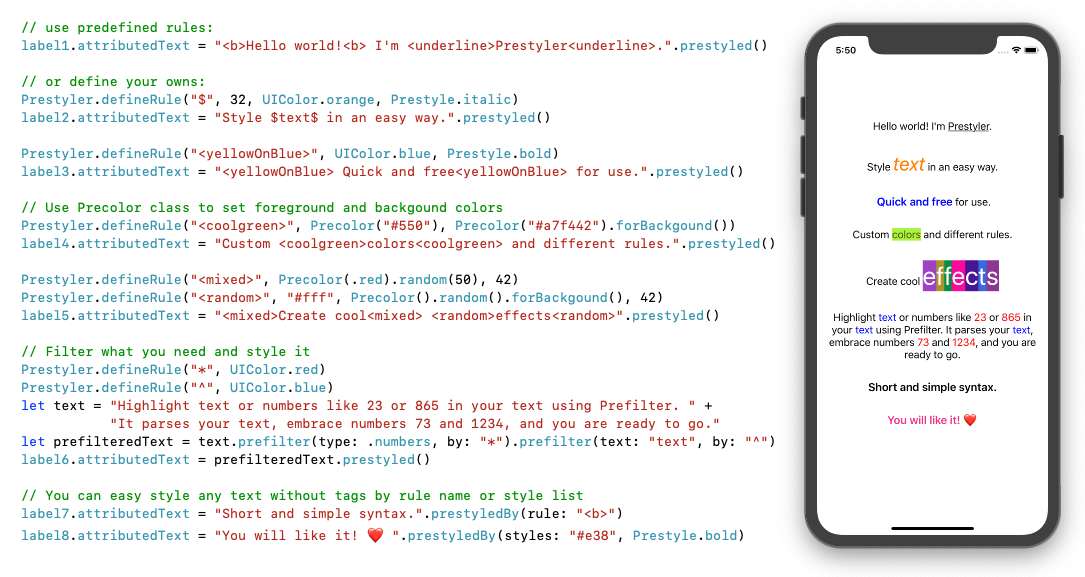
Prestyler.defineRule("$", Prestyle.bold, Prestyle.underline, UIColor.red)
label.attributedText = "Prestyler does $everything$ for you.".prestyled()
要求和安装
- iOS 9.0+
- Xcode 10.0+
- Swift 4.2+
CocoaPods是Cocoa项目的依赖管理器。要安装Prestyler,请将以下行添加到您的Podfile中
pod 'Prestyler'Carthage是去中心化的依赖管理器。要将Prestyler集成到您的Xcode项目中,请在Cartfile中进行指定
github "kruil/Prestyler" "1.0.0"
使用方法
Prestyler会解析您的字符串,应用定义的规则,并返回NSAttributedString内容
import Prestyler
...
label.attributedText = "Hello, i am <b>bold<b> text!".prestyled()
您也可以通过列出文本样式来直接对文本进行样式化
label.attributedText = "Prestyler".prestyledBy(styles: UIColor.green)或通过定义的规则
Prestyler.defineRule("myRule", UIColor.green)
...
label.attributedText = "All this text is bold.".prestyledBy(rule: "myRule")
预定义规则
已经定义了一些规则。它是一个<b>用于加粗,<i>用于倾斜,<strike>和 <underline>等。
label.attributedText = "And here is <i>italic<i> text!".prestyled()自定义规则
您可以轻松定义您自己的简单规则。
Prestyler.defineRule("$", UIColor.green)
label.attributedText = "It's a $green$ text.".prestyled()
或者更复杂的,不同样式的组合
Prestyler.defineRule("<BigYellowBold>", 48, UIColor.yellow, Prestyle.bold)
label.attributedText = "It's a <BigYellowBold>green<BigYellowBold> text.".prestyled()
当你定义一个规则时,第一个参数是一个以 String 格式搜索的模式,然后你放置一个样式列表。为了定义一个样式,你可以使用以下类:
* Prestyle.bold // .italic, .strike, .underline
* Precolor(.red) // Precolor("#af45392"), Precolor().random . Read more about colors below
* UIFont // UIFont.italicSystemFont(ofSize: 33)
* UIColor // UIColor.green
* String // "432" or "#432"or "#648362" treated as hex color
* Int // 18, treated as a font size
预过滤器
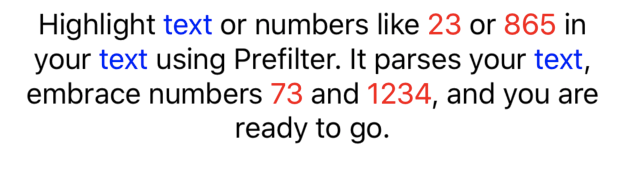
您可以使用 预过滤器 轻松突出显示数字或其他信息。它解析字符串并插入提供的标签,这些标签将被用于稍后进行样式设置。现在有三种方法来突出显示数字和文本的特定部分。这两种形式都包含在示例中。
// Filter what you need and style it
Prestyler.defineRule("*", UIColor.red)
let text = "Highlight text or numbers like 23 or 865 in your text using Prefilter. " +
           "It parses your text, embrace numbers 73 and 1234, and you are ready to go."
let prefilteredText = text.prefilter(type: .numbers, by: "*").prefilter(text: "text", by: "^")
label.attributedText = prefilteredText.prestyled()
使用颜色🎨
您有几种方式可以在 Prestyler 中管理颜色。最简单的方法是只是传递 UIColor 或十六进制字符串作为样式。
Prestyler.defineRule("<colored>", UIColor.yellow)
Prestyler.defineRule("<colored>", "#b5e253")
Prestyler.defineRule("<colored>", "#ff0")
Prestyler.defineRule("<colored>", "ff2")
这些颜色将应用于前景文本颜色。要设置背景颜色,您必须使用 Precolor 类,它有更多有趣选项。
Prestyler.defineRule("<colored>", Precolor(UIColor.yellow).forBackgound())
Prestyler.defineRule("<colored>", Precolor("#b5e253").forBackgound())
Prestyler.defineRule("<colored>", Precolor("#ff0").forBackgound())
Precolor 有一个 random(_ percent: Int) 方法则允许你在几秒钟内获取酷炫的效果。
// Color is mixed for 50% with random color
Prestyler.defineRule("<randomRed>", Precolor(UIColor.red).random(50))
// 100% random
Prestyler.defineRule("<random>", Precolor().random())
你需要知道的一些事情
- 请不要将标签嵌套在其他标签内。结果可能不可预期(但安全)。相反,创建一个具有所需样式的新规则。
- 当你定义已经存在样式时,旧样式将被替换。
示例
要运行示例项目,首先克隆仓库,然后从示例目录中运行 pod install。
作者
Ilia Krupko。我在我的 Monetal 项目中使用 Prestyler。
许可协议
Prestyler采用MIT许可协议。更多信息请查看LICENSE文件。