铅笔杯 1.0.0
- 作者:
- Jo Albright
- joalbright
用于帮助更快速地使用CoreGraphics的工具
使用方法
为了运行示例项目,请克隆仓库,并首先从Example目录运行 pod install
将这些代码片段添加到Xcode中,以帮助使用新操作符。
代码片段目录: ~/Library/Developer/Xcode/UserData/CodeSnippets/
动机
Core Graphics是一个非常实用的库,我在构建的每个应用程序中都使用它。但我花了很多时间编写简单的绘图代码。
主要问题
- 路径上的每个点都使用一行新代码
- 必须为每个CGContext函数传递 "context"
- 使用函数而不是方法设置CGContext选项
let context = UIGraphicsGetCurrentContext()
UIColor(white: 0.9, alpha: 1).set()
CGContextFillRect(context, rect)
UIColor(white: 0.2, alpha: 1).set()

CGContextSetLineCap(context, .Round)
CGContextSetLineJoin(context, .Round)
CGContextSetLineWidth(context, 1)
CGContextTranslateCTM(context, (rect.width - 188) / 2, (rect.height - 300) / 2)

CGContextMoveToPoint(context,126.01,89.44)
CGContextAddCurveToPoint(context,116.37, 89.19, 105.65, 89.06, 94.35, 89.06)
CGContextAddCurveToPoint(context, 52.35, 89.06, 18.3, 90.8, 18.3, 94.24)
CGContextAddCurveToPoint(context, 18.3, 97.68, 52.35, 101.51, 94.35, 101.51)
CGContextAddCurveToPoint(context, 104.7, 101.51, 114.57, 101.28, 123.57, 100.87)
CGContextAddLineToPoint(context,126.01,89.44)
CGContextFillPath(context)

CGContextMoveToPoint(context,140, 99.75)
CGContextAddLineToPoint(context, 150.28, 49.72)
CGContextAddCurveToPoint(context, 150.5, 48.64, 151.56, 47.94, 152.64, 48.17)
CGContextAddLineToPoint(context, 162.37, 50.18)
CGContextAddCurveToPoint(context, 163.46, 50.4, 164.15, 51.46, 163.93, 52.54)
CGContextAddLineToPoint(context, 154.43, 98.52)
CGContextStrokePath(context)
22行代码
新的模式
现在您可以使用扩展方法设置上下文选项。中缀操作符允许在单行代码上构建多点的路径。
新功能
- 类型别名 PCPoint, PCSize, PCScale, PCDelta
- CGRect 扩展了内边距方法和全局初始化函数
- CGContextRef 扩展了简化设置的函数
- 点和平行线的中缀操作符
操作符模式
let (bgColor,cupColor) = (UIColor(white: 0.9, alpha: 1).CGColor, UIColor(white: 0.2, alpha: 1).CGColor)

let context = UIGraphicsGetCurrentContext()?.round()?.color(bgColor)?.rect(rect)?.fill()
context?.color(cupColor)?.round()?.line(1)?.offset((rect.width - 188) / 2, (rect.height - 300) / 2)

context ->- (126.01,89.44) -~- (116.37,89.19,105.65,89.06,94.35,89.06) -~- (52.35,89.06,18.3,90.8,18.3,94.24)
context -~- (18.3,97.68,52.35,101.51,94.35,101.51) -~- (104.7,101.51,114.57,101.28,123.57,100.87) -+- (126.01,89.44) -■ nil

context ->- (140,99.75) -+- (150.28,49.72) -~- (150.5,48.64,151.56,47.94,152.64,48.17) -+- (162.37,50.18)
context -~- (163.46,50.4,164.15,51.46,163.93,52.54) -+- (154.43,98.52) -□ nil
7行代码
函数模式
let (bgColor,cupColor) = (UIColor(white: 0.9, alpha: 1).CGColor, UIColor(white: 0.2, alpha: 1).CGColor)

let context = UIGraphicsGetCurrentContext()?.round()?.color(bgColor)?.rect(rect)?.fill()
context?.color(cupColor)?.round()?.line(1)?.offset((rect.width - 188) / 2, (rect.height - 300) / 2)

context?.m(126.01,89.44)?.c(116.37,89.19,105.65,89.06,94.35,89.06)?.c(52.35,89.06,18.3,90.8,18.3,94.24)
context?.c(18.3,97.68,52.35,101.51,94.35,101.51)?.c(104.7,101.51,114.57,101.28,123.57,100.87)?.l(126.01,89.44)?.fill()

context?.m(140,99.75)?.l(150.28,49.72)?.c(150.5,48.64,151.56,47.94,152.64,48.17)?.l(162.37,50.18)
context?.c(163.46,50.4,164.15,51.46,163.93,52.54)?.l(154.43,98.52)?.stroke()
7行代码
我特别喜欢操作符模式,因为它使我更容易阅读操作符的视觉形象。但两者都是很好的模式。
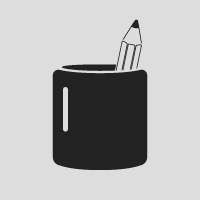
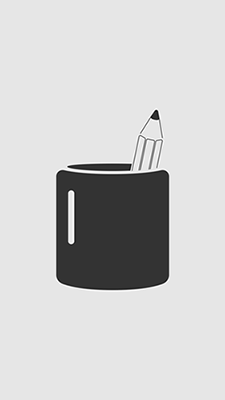
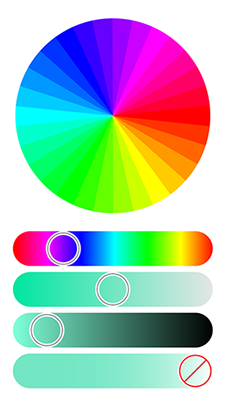
屏幕
- 使用CoreGraphics绘制的铅笔杯标志
- 示例项目中的ColorWheel和ColorBar类
- 渐变步骤可更改
- 条具有更改色调、饱和度、亮度、不透明度的值

安装
PencilCup可通过CocoaPods获得。要安装,只需将以下行添加到您的Podfile中
pod "PencilCup"PencilCup也通过Swift Package Manager可用。请查看链接以了解有关如何使用SwiftPM的更多信息。
import PackageDescription

let package = Package(
    name: "YOUR_PACKAGE_NAME",
    dependencies: [
        .Package(url: "https://github.com/joalbright/PencilCup.git", majorVersion: 0)
    ]
)
作者
许可证
铅笔杯(PencilCup)采用MIT许可协议。详见LICENSE文件以获取更多信息。