有机 0.3
- 由
- Mike Amaral
- MikeAmaral
![]() 标志设计者 T.E.D. Andrick
标志设计者 T.E.D. Andrick
这是一个考虑效率和维护的 UITableViewController 子类,尽可能为您处理各种事情。
不再需要在每一个表格视图的数据源和代理方法中使用 if-else 和 switch 语句。不再需要将每一行和每个区段的所有逻辑拆分成十几个不同的方法,使得添加、删除或进行小的格式和布局更改变得头疼。我们感同身受,我们知道这种挑战。移动一个区段的单元格到另一个区段下方,在区段间移动单元格,向现有区段添加新的单元格等,在一个稍微复杂的表格视图中可能变成一场噩梦,但使用 Organic 只需简单地对数组中对象的顺序进行更改。
有机允许您一次性定义区段和它们包含的单元格,并为您处理其余的维护工作。
忽略在各自的类中创建的定制单元格,使用 Organic 创建下面的表格视图仅需不到 20 行代码。
安装
通过 CocoaPods 可用
pod ‘Organic’开始
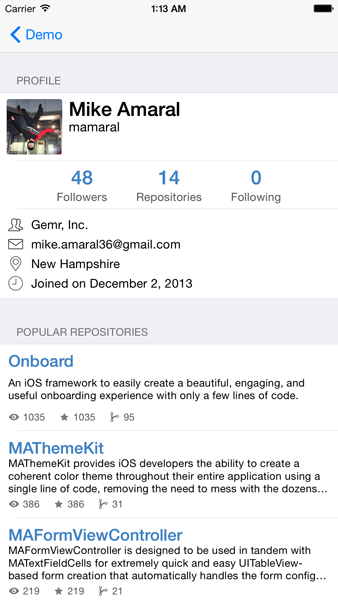
Organic 视图控制器由静态和预生成的区段组成,或者可以包含可重用的单元格,这些单元格可以被 dequeued 和定制以提高性能和效率。在上面的示例中,显示 GitHub 个人资料,第一个具有 3 个单元格的区段是预生成的,而存储库区段则是使用可重用单元格构建的。
构建预生成的单元格(不可重用)
为此,您首先需要子类化或创建 OrganicCell 的实例。这些单元格封装了两个主要属性,高度 和 actionBlock。
高度 属性,如同其名,定义了单元格的高度。当您布局单元格及其所有子视图时,可以基于内容设置高度,单元格本身将负责在 heightForRowAtIndexPath: 中报告正确的大小。如果这个值从未设置,则 UITableViewAutomaticDimension 是后备选项。
actionBlock属性定义了在单元格被选中并调用didSelectRowAtIndexPath:时将执行的操作。在创建单元格时设置该单元格的actionBlock属性,可以使单元格的选择行为与其创建配对,因此,如果您想修改此单元格及其相关的操作,就不需要在整个代码中搜索它是在哪里定义的。如果此属性从未设置,则单元格选择时不会发生任何操作。
OrganicCell *myCell = [OrganicCell cellWithStyle:UITableViewCellStyleDefault height:44 actionBlock:^{
    // Do whatever you want here when the cell is selected.
}];
使用预生成单元格构建部分
OrganicSection对象封装了定义表格视图部分的所有属性。将headerTitle和/或footerTitle属性设置为何物,将分别返回到titleForHeaderInSection:和titleForFooterInSection:方法中。
如果您想将UIView定义为viewForHeaderInSection:或viewForFooterInSection:,请在该对象上设置headerView和/或footerView属性。在定义任何标题或页脚视图时,请确保还设置了相应的headerHeight和footerHeight属性,这样当调用heightForHeaderInSection和heightForFooterInSection:时,表格视图将相应地使其适应。
最后,每个部分将包含一个您创建的OrganicCell对象的数组,这些对象将按定义的顺序返回到cellForRowAtIndexPath:中。
已创建各种便利类方法,以不同标题和视图的组合,使您的生活更加便捷。只要不使用标题和视图来同时创建标题或页脚,部分可以包含任何组合的标题和视图。如果发生这种情况,视图将优先。
+ (instancetype)sectionWithCells:(NSArray *)cells;
+ (instancetype)sectionWithHeaderTitle:(NSString *)headerTitle cells:(NSArray *)cells;
+ (instancetype)sectionWithHeaderTitle:(NSString *)headerTitle footerTitle:(NSString *)footerTitle cells:(NSArray *)cells;
+ (instancetype)sectionWithHeaderTitle:(NSString *)headerTitle footerView:(UIView *)footerView footerHeight:(CGFloat)footerHeight cells:(NSArray *)cells;
+ (instancetype)sectionWithHeaderView:(UIView *)headerView headerHeight:(CGFloat)headerHeight cells:(NSArray *)cells;
+ (instancetype)sectionWithHeaderView:(UIView *)headerView headerHeight:(CGFloat)headerHeight footerTitle:(NSString *)footerTitle cells:(NSArray *)cells;
+ (instancetype)sectionWithHeaderView:(UIView *)headerView headerHeight:(CGFloat)headerHeight footerView:(UIView *)footerView footerHeight:(CGFloat)footerHeight cells:(NSArray *)cells;
+ (instancetype)sectionWithFooterTitle:(NSString *)footerTitle cells:(NSArray *)cells;
+ (instancetype)sectionWithFooterView:(UIView *)footerView footerHeight:(CGFloat)footerHeight cells:(NSArray *)cells;
构建支持单元格重用的部分
OrganicSections现在支持单元格重用。要创建这样的部分,您需要调用下面的便利初始化器并提供一些参数
+ (instancetype)sectionSupportingReuseWithTitle:(NSString *)title cellCount:(NSInteger)cellCount cellHeight:(CGFloat)cellHeight cellForRowBlock:(CellForRowBlock)cellForRowBlock actionBlock:(CellActionBlock)actionBlock;-
title将是表格视图部分的标题。如果您不需要标题,请将其留为nil。 -
cellCount听起来就是这样,这些行中将有多少个单元格。您应该使用通常用于您的dataSource的内容,例如一个NSArray的计数。 -
cellHeight是您通常在heightForRowAtIndexPath:中返回的内容。目前,Organic只支持在支持重用的部分中的所有单元格具有单一高度。我正在寻找一种方法来克服heightForRowAtIndexPath:在调用cellForRowAtIndexPath:之前调用的事实,这对于想要让其单元格确定其高度的创建的人来说是一个大问题。 -
cellForRowBlock是一个在父OrganicViewController的cellForRowAtIndexPath:被调用时被调用的块。您将获得对表格视图和行索引的引用,并应该以您通常实现单元格重用相同的方式进行实施。 -
actionBlock是一个当单元格被选中时被调用的块。您将提供此索引,并可以定义当点击该索引的单元格时要执行的操作。
将它们全部组合在一起
首先,为OrganicViewController子类化。您可以选择何时何地定义您的部分。viewDidLoad或viewWillAppear:是两个不错的选择。创建您的单元格,将它们插入到部分中,以所需顺序将它们插入到数组中,并将它们作为sections属性设置。完成后不需要调用reloadData,设置部分将自动处理。
这是一个带有三个部分(其中两个是预构建的,另一个支持重用,并且可以轻松地扩展到所需程度)的简单表格视图示例。所有的高度、操作、标题等,都逻辑上放在它们应该的同一个位置。
- (void)viewWillAppear:(BOOL)animated {
    [super viewWillAppear:animated];

    __weak typeof(self) weakSelf = self;
    OrganicCell *helloWorldCell = [OrganicCell cellWithStyle:UITableViewCellStyleDefault height:40 actionBlock:^{
        [weakSelf doA];
    }];
    helloWorldCell.textLabel.text = @"Say Hello";

    OrganicCell *goodbyeWorldCell = [OrganicCell cellWithStyle:UITableViewCellStyleDefault height:55 actionBlock:^{
        [weakSelf doB];
    }];
    goodbyeWorldCell.textLabel.text = @"Say Goodbye";

    OrganicSection *firstStaticSection = [OrganicSection sectionWithHeaderTitle:@"Welcome" cells:@[helloWorldCell, goodbyeWorldCell]];

    OrganicCell *randomCell = [OrganicCell cellWithStyle:UITableViewCellStyleSubtitle height:44 actionBlock:^{
        [weakSelf doC];
    }];
    randomCell.textLabel.text = @"Knock knock...";
    randomCell.detailTextLabel.text = @"Who's there?";

    OrganicSection *secondStaticSection = [OrganicSection sectionWithCells:@[randomCell]];

    NSArray *demoDataSource = @[@"One", @"Two", @"Three"];
    OrganicSection *sectionWithReuse = [OrganicSection sectionSupportingReuseWithTitle:@"Section with Reuse" cellCount:demoDataSource.count cellHeight:55 cellForRowBlock:^UITableViewCell *(UITableView *tableView, NSInteger row) {
        static NSString *cellReuseID = @"CellReuseID";

        UITableViewCell *cell = [tableView dequeueReusableCellWithIdentifier:cellReuseID];

       if (!cell) {
            cell = [[UITableViewCell alloc] initWithStyle:UITableViewCellStyleDefault reuseIdentifier:cellReuseID];
        }

        cell.textLabel.text = demoDataSource[row];

       return cell;

    } actionBlock:^(NSInteger row) {
        [weakSelf doDForRow:row];
    }];

    self.sections = @[firstStaticSection, secondStaticSection, sectionWithReuse];
}
步骤 4. 比较
我们刚刚用几行代码和无需逻辑的方式创建了一个极其简单的表格视图控制器。与使用通用 UITableViewDataSource 进行的类似实现进行比较。
- (NSInteger)numberOfSectionsInTableView:(UITableView *)tableView {
    return 3;
}

- (NSString *)tableView:(UITableView *)tableView titleForHeaderInSection:(NSInteger)section {
    if (section == 0) {
        return @"Welcome";
    }

    else if (section == 2) {
        return @"Section with Reuse";
    }

    else {
        return nil;
    }
}

- (NSInteger)tableView:(UITableView *)tableView numberOfRowsInSection:(NSInteger)section {
    if (section == 0) {
        return 2;
    }

    else if (section == 1) {
        return 1;
    }

    else {
        return demoDataSource.count;
    }
}

- (CGFloat)tableView:(UITableView *)tableView heightForRowAtIndexPath:(NSIndexPath *)indexPath {
    if (indexPath.section == 0) {
        if (indexPath.row == 0) {
            return 40;
        }

       else {
            return 55;
        }
    }

    else if (indexPath.section == 1) {
        return 44;
    }

    else {
        return 55;
    }
}

- (UITableViewCell *)tableView:(UITableView *)tableView cellForRowAtIndexPath:(NSIndexPath *)indexPath {
    if (indexPath.section == 0) {
        if (indexPath.row == 0) {
            UITableViewCell *helloWorldCell = [[UITableViewCell alloc] initWithStyle:UITableViewCellStyleDefault reuseIdentifier:nil];
            helloWorldCell.textLabel.text = @"Say Hello";
            return helloWorldCell;
        }

        else {
            UITableViewCell *goodbyeWorldCell = [[UITableViewCell alloc] initWithStyle:UITableViewCellStyleDefault reuseIdentifier:nil];
            goodbyeWorldCell.textLabel.text = @"Say Goodbye";
            return goodbyeWorldCell;
        }
    }
    else if (indexPath.section == 1) {
        UITableViewCell *boringCell = [[UITableViewCell alloc] initWithStyle:UITableViewCellStyleSubtitle reuseIdentifier:nil];
        boringCell.textLabel.text = @"Knock knock..";
        boringCell.detailTextLabel.text = @"Who's there?";      return boringCell;
    }

    else {
        static NSString *cellReuseID = @"CellReuseID";

        UITableViewCell *cell = [tableView dequeueReusableCellWithIdentifier:cellReuseID];

        if (!cell) {
            cell = [[UITableViewCell alloc] initWithStyle:UITableViewCellStyleDefault reuseIdentifier:cellReuseID];
        }

        cell.textLabel.text = demoDataSource[indexPath.row];

        return cell;
    }
}

- (void)tableView:(UITableView *)tableView didSelectRowAtIndexPath:(NSIndexPath *)indexPath {
    [tableView deselectRowAtIndexPath:indexPath animated:YES];

    if (indexPath.section == 0) {
        if (indexPath.row == 0) {
            [self doA];
        }

        else {
            [self doB];
        }
    }

    else if (indexPath.section == 1) {
        [self doC];
    }

    else {
        [self doDForRow:indexPath.row];
    }
}
现在考虑一下,如果您想调整单元格的顺序,或在两个部分之间添加另一个单元格,或添加另一个部分并将一个单元格移动到另一部分时,您需要做什么。
使用 Organic 可以将上述示例(这是可能最简单的表格视图控制器之一)中的代码减少大约 70%。它将使初始实现对开发者来说变得非常快,并使得维护工作变得容易,或者您将全额退款。
社区
欢迎提问、评论、问题和pull request!
许可
本项目在MIT许可下发布。有关详情,请参阅LICENSE.txt。