NerdyUI 1.2.1
- 作者
- nerdycat
为 iOS 8 及以上版本创建和布局 UI 组件的简单方法。
还提供了一个 Swift 版本。
相关文章:
中文说明
NerdyUI 使用小技巧
创建 NSString, UIFont, UIColor, UIImage 和常见结构体的宏
您可以通过使用 Str() 宏将几乎所有内容转换为 NSString。
同样,您可以使用 Log() 宏记录变量。
Str(100);			//@"100"
Str(3.14);			//@"3.14"
Str(@0.618);			//@"0.618"
Str(view.frame);		//@"{{0, 0}, {100, 100}}"
Str(view.center);		//@"{50, 50}"
Str(_cmd);			//@"viewDidLoad"
Str(NSString.class);		//@"NSString"
Str("C-String");		//@"C-String"
Str(@"1 + 1 = %d", 1 + 1);	//@"1 + 1 = 2"

Log(100);
Log(3.14);
Log(@0.618);
Log(view.frame);
...
Log(@"1 + 1 = %d", 1 + 1);

//Appending String
@"1".a(@"2").a(3).a(nil).a(4.0f).a(@5).a(@"%d", 6);    //@"123456"
您可以使用 AttStr() 宏创建 NSAttributedString。
AttStr(@"hello, 101").match(@"[0-9]+").underline;	//mark 101 with underline
AttStr(@"A smile ", Img(@"smile"), @" !!");		//attributedString with image attachment
您可以使用 Fnt() 宏创建 UIFont。
Fnt(15);			//[UIFont systemFontOfSize:15]
Fnt(@15);			//[UIFont boldSystemFontOfSize:15]
Fnt(@"body");			//UIFontTextStyleBody
Fnt(@"Helvetica,15");		//helvetica font with size 15
您可以使用 Color() 宏创建 UIColor。
Color(@"red");			//[UIColor redColor]
Color(@"0,0,255");		//RGB color
Color(@"#0000FF");		//Hex color
Color(@"random");		//random color

//also can have an optional alpha value
Color(@"red,0.5");            	//red color with alpha 0.5
Color(@"0,0,255,0.8");        	//blue color with alpha 0.8
...

Color(Img(@"pattern"));       	//pattern image color
您可以使用 Img() 宏创建 UIImage。
Img(@"imageName");		//[UIImage imageNamed:]
Img(@"#imageName");		//prefixed with # will return an stretchable image
Img(@"red");			//1x1 square image with red color
您还可以使用 XY()、WH()、XYWH()、Range()、Insets() 宏创建 CGPoint、CGSize、CGRect、NSRange 和 UIEdgeInsets。
CGPoint		p = XY(20, 20);
CGSize	 	s = WH(50, 50);

CGRect	 	f1 = XYWH(20, 20, 50, 50);
CGRect		f2 = XYWH(f1.origin, f1.size);
CGRect		f3 = XYWH(f2.origin, 50, 50);
CGRect		f4 = XYWH(20, 20, f3.size);

NSRange		r = Range(10, 20);

UIEdgeInsets i1 = Insets(10);			//{10, 10, 10, 10}
UIEdgeInsets i2 = Insets(10, 20);		//{10, 20, 10, 20}
UIEdgeInsets i3 = Insets(10, 20, 30);		//{10, 20, 30, 20}
UIEdgeInsets i4 = Insets(10, 20, 30, 40);	//{10, 20, 30, 40}
这些宏不仅简化了创建常见类型的过程,还指示了您即将看到的新属性设置方式。
快速访问 frame 属性和屏幕大小
someView.x = 10;
someView.y = someView.x;
someView.xy = XY(10, 10);
someView.w = 50;			//width
someView.h = someView.w;		//height
someView.wh = WH(50, 50);
someView.frame = XYWH(10, 10, 50, 50);

someView.cx = 25;
someView.cy = someView.cx;
someView.center = XY(25, 25);

someView.maxX = 60;
someView.maxY = someView.maxX;
someView.maxXY = XY(60, 60);

//qucik access screen size
someView.wh = WH(Screen.width, Screen.height);
创建 UI 组件的简单方式
NerdyUI 通过使用链式语法,使创建 UI 组件和配置属性变得非常简单。
UIView *view1 = View.xywh(20, 30, 50, 50).bgColor(@"red").opacity(0.7).border(3, @"3d3d3d");
UIView *view2 = View.xy(80, 30).wh(view1.wh).bgColor(@"blue,0.7").borderRadius(25).shadow(0.8).onClick(^{
    Log(@"view2");
});
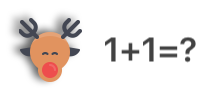
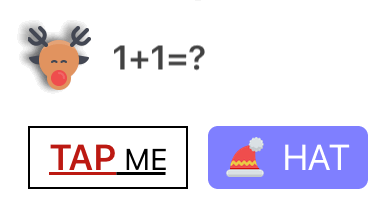
UIImageView *moose = ImageView.img(@"moose").x(20).y(100).shadow(0.6, 2, -3, -1);
UILabel *quiz = Label.str(@"%d+%d=?", 1, 1).fnt(@17).color(@"66,66,66").fitSize.x(moose.maxX + 10).cy(moose.cy);
id title = AttStr(@"TAP ME").fnt(15).underline.range(0, 3).fnt(@18).color(@"random");
UIButton *button1 = Button.str(title).insets(5, 10).fitSize.border(1).xy(20, 150).onClick(^(UIButton *btn) {
    //Exp allows you to execute codes in any position.
    quiz.text = Str(@"%d+%d=%d", 1, 1, Exp(btn.tag += 1));
    [quiz sizeToFit];
});

UIButton *button2 = Button.str(@"HAT").highColor(@"brown").img(@"hat").gap(8);
button2.xywh(button1.frame).x(button1.maxX + 10).borderRadius(5).bgImg(@"blue,0.5").highBgImg(@"orange");
//highBgImg with color string is a very useful trick to set highlighted background color for UIButton.
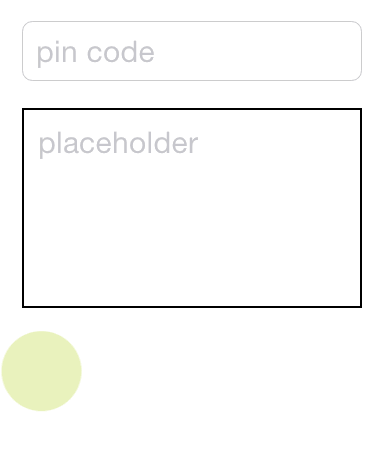
id pinField = TextField.x(button1.x).y(button1.maxY + 15).wh(170, 30).onChange(^(NSString *text) {
    //self has been weakified, no need to warry about retain cycle.
    [(id)[self.view viewWithTag:101] setText:text];
}).numberKeyboard.maxLength(4).hint(@"pin code").fnt(15).roundStyle;

id textView = TextView.xywh(20, 240, 170, 100).border(1).insets(8).hint(@"placeholder").fnt([pinField font]).tg(101);
如您所见,大多数的可链属性非常直接且易于理解。其中一些功能非常灵活,可以接受多种类型的参数。顺便说一句,View 仅是将 [UIView new] 作为宏来使用,与其他类似。
您使用 .opacity() 和
您使用 .x()、.y()、.xy()、.w()、.h()、.wh()、.xywh()、.cx()、.cy()、.cxy()、.maxX()、.maxY()、.maxXY() 来设置视图的位置和大小。
您使用 .touchEnabled、.touchDisabled 来启用或禁用触摸。
您使用 .flexibleLeft、.flexibleRight、.flexibleTop、.flexibleBottom、.flexibleLR、.flexibleTB、.flexibleLRTB、.flexibleWidth、.flexibleHeight、.flexibleWH 来设置自动调整大小掩码。
您使用 .centerAlignment、.rightAlignment 来设置对齐方式。
您使用 .fnt() 以与 Fnt() 相同的格式设置字体。
您使用 .str() 以与 Str() 相同的格式设置文本或 attributedText。
您可以使用 .img()、.highImg()、.bgImg() 和 .highBgImg() 来设置图像、高亮图像、背景图像和高亮背景图像,它们的格式与 Img() 相同。
您可以使用 .tint()、.color()、.bgColor() 和 .highColor() 来设置着色器颜色、文本颜色、背景颜色和高亮文本颜色,它们的格式与 Color() 相同。
您可以使用 .border()、.borderRadius() 和 .shadow() 来配置边框样式和阴影。
您可以使用 .fitWidth、.fitHeight 和 .fitSize 来改变边界以适应内容。
您可以使用 .onClick() 为任何 UIView 添加点击处理程序。
对于 UITextField 和 UITextView,您可以使用 .hint() 来设置占位符,使用 .maxLength() 来限制总长度,对于添加文本变更处理程序,使用 .onChange()。
对于 UIButton、UITextField 和 UITextView,您可以使用 .insets() 来为内容添加填充。
还有很多其他功能。查看相应的头文件以获取更多信息。
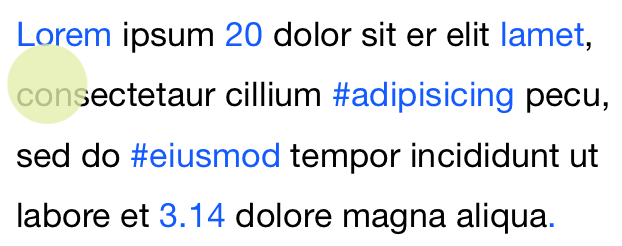
##对 UILabel 的增强功能 您可以通过简单使用 .lineGap() 向 UILabel 添加行间距。
您还可以向 UILabel 添加链接。所有您要做的就是创建一个标记为 .linkForLabel 的 NSAttributedString,然后使用 .onLink() 将链接点击处理程序添加到 UILabel。
id str = @"Lorem ipsum 20 dolor sit er elit lamet, consectetaur cillium #adipisicing pecu, sed do #eiusmod tempor incididunt ut labore et 3.14 dolore magna aliqua.";
id attStr = AttStr(str).range(0, 5).match(@"lamet").match(@"[0-9.]+").matchHashTag.linkForLabel;

Label.str(attStr).multiline.lineGap(10).xywh(self.view.bounds).onLink(^(NSString *text) {
    Log(text);
}).addTo(self.view);
##轻松设置约束 手动更新框架有时可能很麻烦。NerdyUI 提供了一些可链式属性和类似 Masonry 的方法来设置约束。
您可以使用 .fixWidth()、.fixHeight() 和 .fixWH() 来设置宽度和高度约束。
您可以使用 .embedIn() 通过边缘约束将视图添加到父视图。
您可以使用 .horHugging()、.horResistance()、.verHugging()、.verResistance()、.lowHugging、.lowResistance、.highHugging 和 .highResistance 来调整内容拉伸优先级和内容压缩阻力优先级。当视图嵌入到 StackView(如 HorStack 或 VerStack)中时,这些属性非常有用。
对于更复杂的约束,您可以使用 .makeCons()、.remakeCons() 和 .updateCons() 来开始约束设置过程。
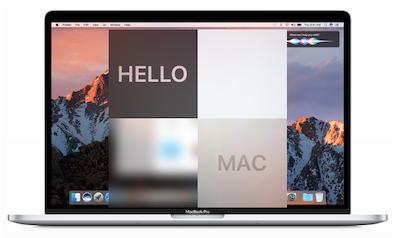
ImageView.img(@"macbook").embedIn(self.view).centerMode;

id hello = Label.str(@"HELLO").fnt(@20).wh(80, 80).centerAlignment;
id mac = Label.str(@"MAC").fnt(@20).wh(80, 80).centerAlignment;

//In order to use makeCons, the view must be in the view hierarchy.
EffectView.darkBlur.fixWH(80, 80).addTo(self.view).makeCons(^{
    //you can use 'make' directly without the need to declare it
    make.right.equal.superview.centerX.constants(0);
    make.bottom.equal.superview.centerY.constants(0);
}).addVibrancyChild(hello).tg(101);

EffectView.extraLightBlur.fixWidth(80).fixHeight(80).addTo(self.view).makeCons(^{
    make.left.bottom.equal.view(self.view).center.constants(0, 0);
});

EffectView.lightBlur.addTo(self.view).makeCons(^{
    make.size.equal.constants(80, 80).And.center.equal.constants(40, 40);
}).addVibrancyChild(mac);

id subImg = Img(@"macbook").subImg(95, 110, 80, 80).blur(10);
ImageView.img(subImg).addTo(self.view).makeCons(^{
    make.centerX.top.equal.view([self.view viewWithTag:101]).centerX.bottom.constants(0);
});
##轻松布局
手动为每个视图添加约束可能会有点繁琐。幸运的是,您可以通过简单地使用 HorStack 和 VerStack(类似于 UIStackView)来构建大多数布局,而无需创建任何显式约束。
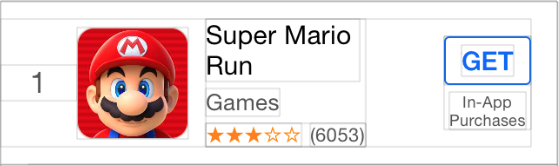
_indexLabel = Label.fnt(17).color(@"darkGray").fixWidth(44).centerAlignment;
_iconView = ImageView.fixWH(64, 64).borderRadius(10).border(Screen.onePixel, @"#CCCCCC");

//Setting preferWidth here will improve performance.
_titleLabel = Label.fnt(15).lines(2).preferWidth(Screen.width - 205);
_categoryLabel = Label.fnt(13).color(@"darkGray");

_ratingLabel = Label.fnt(11).color(@"orange");
_countLabel = Label.fnt(11).color(@"darkGray");

_actionButton = Button.fnt(@15).color(@"#0065F7").border(1, @"#0065F7").borderRadius(3);
_actionButton.highColor(@"white").highBgImg(@"#0065F7").insets(5, 10);
_iapLabel = Label.fnt(9).color(@"darkGray").lines(2).str(@"In-App\nPurchases").centerAlignment;

//.gap() will add spacing between all items.
id ratingStack = HorStack(_ratingLabel, _countLabel).gap(5);
id midStack = VerStack(_titleLabel, _categoryLabel, ratingStack).gap(4);
id actionStack = VerStack(_actionButton, _iapLabel).gap(4).centerAlignment;

HorStack(
         _indexLabel,
         _iconView,
         @10,           //Add spacing betweens two items.
         midStack,
         NERSpring,     //Using spring to ensure actionStack always stay in the right most position.
         actionStack
).embedIn(self.contentView, 10, 0, 10, 15);
在这里,我们创建了一个模仿 AppStore Top Charts 列表视图的单元。如您所见,使用 HorStack 和 VerStack 非常简单。您将 UI 划分为小块的堆栈,并连同可选的间距一起嵌入它们。您可以通过点击“调试视图层次”来查看它们如何可视化地堆叠。
创建完成后,您只需设置项的值即可。它们的外观将根据您的配置自动更新。
##轻量级样式 几乎所有的可链属性都可以设置为样式。
//global style
Style(@"h1").color(@"#333333").fnt(17);
Style(@"button").fixHeight(30).insets(0, 10).borderRadius(5);
//local style
id actionButtonStyle = Style().styles(@"button h1").bgImg(@"red").highBgImg(@"blue").highColor(@"white");
在这里,您创建两个全局样式(稍后可以通过名称全局引用)和一个局部样式。局部样式通过 .styles() 属性从两个全局样式继承。创建后,您可以通过相同的语法将样式应用到任何 UIView 或 NSAttributedString。
id foo = Label.styles(@"h1").str(@"hello world");
id bar = Button.styles(actionButtonStyle).str(@"Send Email");
##其他功能
您可以使用 PlainTV 和 GroupTV 创建静态 TableView,这在设置设置页面时可能很有用。
PlainTV(Row.str(@"Row1"), Row.str(@"Row2"), Row.str(@"Row3")).embedIn(self.view);
您还可以使用链式语法来呈现 Alert 和 ActionSheet。
Alert.title(@"Title").message(@"Message").action(@"OK",^{}), cancel(@"Cancel").show();
ActionSheet.title(@"Title").message(@"Message").action(@"OK",^{}), cancel(@"Cancel").show();
对于 NSArray,我们还提供了 .forEach()、.map()、.filter() 和 .reduce()。
id result = @[@1, @2, @3, @4].map(^(NSInteger n) {
    return n * 2;
}).filter(^(NSInteger n) {
    return n < 5;
}).reduce(^(NSInteger ac, NSInteger n) {
    return ac + n;
});
##注意事项 在 .onClick()、.onLink()、.onChange() 和 .onFinish() 中,self 已经被弱引用,因此您可以直接使用 self 而不用担心循环引用。有时您可能需要在处理程序内部对 self 进行强引用,以延长其生命周期。
NerdyUI使用了大量不带前缀的宏和类别方法。这很可能会与您的代码或第三方框架发生冲突,所以请谨慎使用。
安装
pod "NerdyUI"