Neon 0.4.0
- 作者:
- Mike Amaral
- MikeAmaral
![]()
使用 Swift 构建像老板一样的动态和美观的用户界面。
Neon 围绕用户界面自然而然和直观设计的方式构建。不再需要弹簧和支柱。不再需要奇怪的视觉格式语言。不再需要自动布局约束。我们都不是机器人,为什么我们要像机器人一样构建我们的 UI 呢?
Neon 已升级到 Swift 3.0,但仍然处于测试阶段!
手动安装
- 下载并在您的项目中放置
/Source目录。
- 恭喜!
要获得 Neonto 优化的全部功能,请 wherever folks have UIView 操作导入 Neon
import UIKit
import Neon
示例

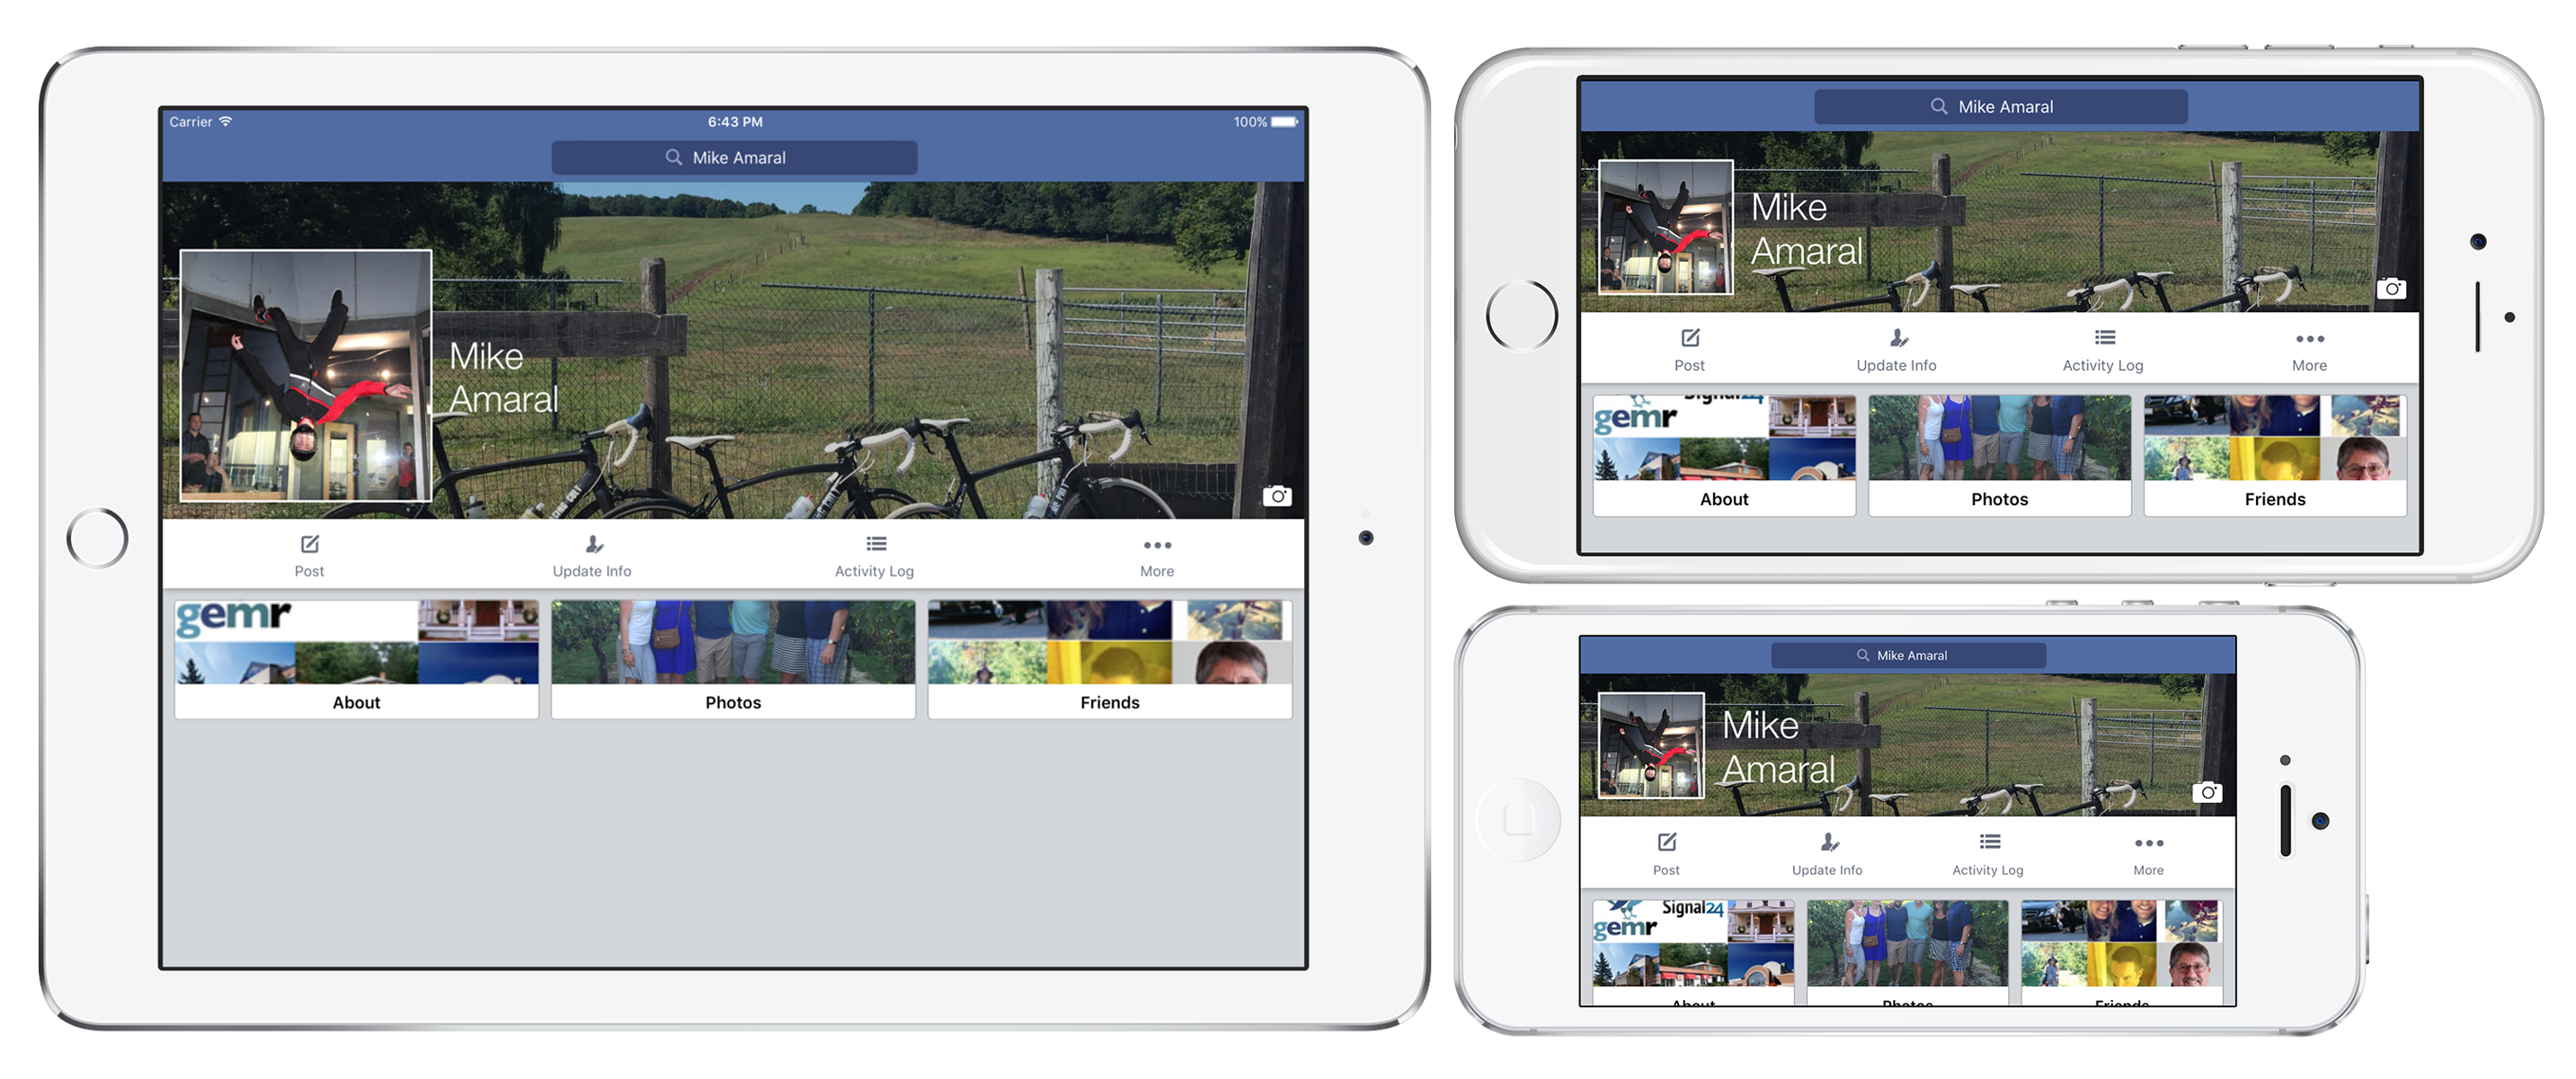
与其为展示设计一些任意的布局,我想测试 Neon 的实用性的好方法是对现有应用中的一个屏幕进行复制,一个每个人都能识别的屏幕。左侧的截图是我 Facebook 应用中的个人资料,右侧的截图来自 Neon 测试项目。
Facebook 的个人资料屏幕肯定使用了一些形式的 UITableView 或 UICollectionView 构建,但是在简单的演示中,我使用了正常的 UIViewController 来构建资料的顶部主要组件。在尽可能接近 Facebook 的设计(我尽力了)对子视图进行了自定义设置后,这是我得到的布局:
let isLandscape : Bool = UIDevice.currentDevice().orientation.isLandscape.boolValue
let bannerHeight : CGFloat = view.height() * 0.43
let avatarHeightMultipler : CGFloat = isLandscape ? 0.75 : 0.43
let avatarSize = bannerHeight * avatarHeightMultipler

searchBar.fillSuperview()
bannerImageView.anchorAndFillEdge(.Top, xPad: 0, yPad: 0, otherSize: bannerHeight)
bannerMaskView.fillSuperview()
avatarImageView.anchorInCorner(.BottomLeft, xPad: 15, yPad: 15, width: avatarSize, height: avatarSize)
nameLabel.alignAndFillWidth(align: .ToTheRightCentered, relativeTo: avatarImageView, padding: 15, height: 120)
cameraButton.anchorInCorner(.BottomRight, xPad: 10, yPad: 7, width: 28, height: 28)
buttonContainerView.alignAndFillWidth(align: .UnderCentered, relativeTo: bannerImageView, padding: 0, height: 62)
buttonContainerView.groupAndFill(group: .Horizontal, views: [postButton, updateInfoButton, activityLogButton, moreButton], padding: 10)
buttonContainerView2.alignAndFillWidth(align: .UnderCentered, relativeTo: buttonContainerView, padding: 0, height: 128)
buttonContainerView2.groupAndFill(group: .Horizontal, views: [aboutView, photosView, friendsView], padding: 10)
看起来在每种设备大小上都非常不错!请注意,您可能需要为许多这些大小/填充值定义常量,以使代码更简洁且易于维护,但我决定使用真实数字来简化示例中的代码,以便新人阅读时更易理解。现在,与 Facebook 的 iPhone 应用程序不同,用 Neon 构建的布局是 动态的。它能够处理所有尺寸设备的旋转,没有任何问题。
10 行代码不错!
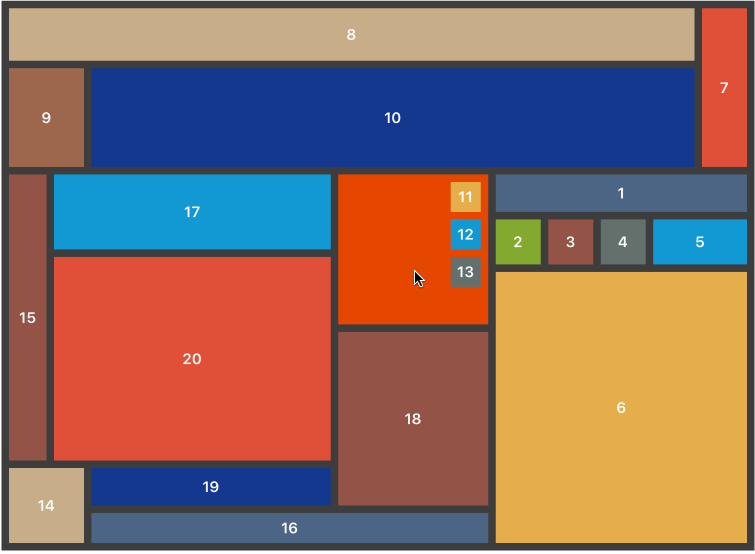
以下是一个刻意复杂的例子,以展示用 Neon 创建复杂动态布局是多么容易。以下布局仅用 20 行代码 完成,等于每视图一行代码!虽然令人印象深刻,但这种布局简直是噩梦,绝不应该在实际应用中使用……永远不会...
视图锚定
居中
您可以使用 Neon 有几种方法来锚定视图,最简单和最初的方法是将视图锚定在其父视图的中央
view1.anchorInCenter(width: size, height: size)
填充父视图
有时您想使一个视图填满其父视图的整个区域,这将非常简单。
view.fillSuperview()可选地,如果您想为视图提供一个填充父视图的填充,您可以用填充代替。
view1.fillSuperview(left: padding, right: padding, top: padding, bottom: padding)
角点
第二种锚定方法是锚定视图在其父视图的 角点。正如您可能猜到的,四个角点是 .TopLeft、.TopRight、.BottomLeft 和 .BottomRight,并且结合使用 anchorInCorner() 函数,您可以轻松地将视图锚定到任何一个角,如下所示
view1.anchorInCorner(.TopLeft, xPad: padding, yPad: padding, width: size, height: size)
view2.anchorInCorner(.TopRight, xPad: padding, yPad: padding, width: size, height: size)
view3.anchorInCorner(.BottomLeft, xPad: padding, yPad: padding, width: size, height: size)
view4.anchorInCorner(.BottomRight, xPad: padding, yPad: padding, width: size, height: size)
边缘
Edge 是另一个很明显的选择,它指定视图锚定在其父视图的哪个 边缘。有四种类型是 .Top、.Left、.Bottom 或 .Right,类似于之前的示例,您可以使用 anchorToEdge() 函数将视图锚定到边缘
view1.anchorToEdge(.Top, padding: padding, width: size, height: size)
view2.anchorToEdge(.Left, padding: padding, width: size, height: size)
view3.anchorToEdge(.Bottom, padding: padding, width: size, height: size)
view4.anchorToEdge(.Right, padding: padding, width: size, height: size)
填充边缘
有时您可能想将视图锚定到边缘并填充该边缘;想想像用户资料页面上的横幅相片。同样,这可以通过使用 anchorAndFillEdge() 函数尽可能简单来实现
view1.anchorAndFillEdge(.Top, xPad: padding, yPad: padding, otherSize: size)
view2.anchorAndFillEdge(.Bottom, xPad: padding, yPad: padding, otherSize: size)
view3.anchorAndFillEdge(.Left, xPad: padding, yPad: padding, otherSize: size)
view4.anchorAndFillEdge(.Right, xPad: padding, yPad: padding, otherSize: size)
请注意,
anchorAndFillEdge()接受一个名为otherSize的参数。该参数用于设置不是由填充边缘自动计算的 其他尺寸,这意味着如果您指定要锚定并填充顶部边缘,宽度将自动计算,但高度仍然未知,因此传入otherSize的值将用于设置高度。随后,如果您想锚定并填充左侧边缘,高度将自动计算,而otherSize将用于设置视图的宽度。
对齐
现在我们已经锚定了主要视图,我们可以通过使用(猜对了)Align值,相对于其他兄弟视图开始使我们的UI更具复杂性,来对其他视图进行对齐。以下是对齐的兄弟视图是指直接共享同一个父视图的视图。有十二种 Align 类型,它们都非常容易理解——以下是使用 align() 函数的十二个示例
view1.align(.AboveMatchingLeft, relativeTo: anchorView, padding: padding, width: size, height: size)
view2.align(.AboveCentered, relativeTo: anchorView, padding: padding, width: size, height: size)
view3.align(.AboveMatchingRight, relativeTo: anchorView, padding: padding, width: size, height: size)
view4.align(.ToTheRightMatchingTop, relativeTo: anchorView, padding: padding, width: size, height: size)
view5.align(.ToTheRightCentered, relativeTo: anchorView, padding: padding, width: size, height: size)
view6.align(.ToTheRightMatchingBottom, relativeTo: anchorView, padding: padding, width: size, height: size)
view7.align(.UnderMatchingRight, relativeTo: anchorView, padding: padding, width: size, height: size)
view8.align(.UnderCentered, relativeTo: anchorView, padding: padding, width: size, height: size)
view9.align(.UnderMatchingLeft, relativeTo: anchorView, padding: padding, width: size, height: size)
view10.align(.ToTheLeftMatchingBottom, relativeTo: anchorView, padding: padding, width: size, height: size)
view11.align(.ToTheLeftCentered, relativeTo: anchorView, padding: padding, width: size, height: size)
view12.align(.ToTheLeftMatchingTop, relativeTo: anchorView, padding: padding, width: size, height: size)
对齐和填充
您有时可能不知道或不想指定要布局的视图的大小,而只想在相对于另一个视图对齐后,填充宽度、高度或父视图的剩余部分。结合之前讨论的所有不同对齐类型,我们开始了解到如何轻松构建更复杂的布局
view2.alignAndFillWidth(align: .ToTheRightMatchingTop, relativeTo: view1, padding: padding, height: size / 2.0)
view4.alignAndFillHeight(align: .AboveCentered, relativeTo: view3, padding: padding, width: size / 2.0)
view6.alignAndFill(align: .ToTheLeftMatchingTop, relativeTo: view5, padding: padding)
对齐于之间
有时您希望一个视图位于其他视图之间,填充它们之间的空间。使用alignBetweenHorizontal()和alignBetweenVertical()方法,这样做非常简单!选择一个您想对其视图进行相对定位的兄弟视图,并将其作为primaryView传入。我们将使用指定的align参数来适当地匹配该primaryView,并自动填充它和secondaryView之间的水平和垂直空间。
view1.alignBetweenHorizontal(align: .ToTheRightMatchingTop, primaryView: anchorViewA, secondaryView: anchorViewB, padding: padding, height: size)
view2.alignBetweenVertical(align: .UnderCentered, primaryView: anchorViewB, secondaryView: anchorViewD, padding: padding, width: size)
view3.alignBetweenHorizontal(align: .ToTheLeftMatchingBottom, primaryView: anchorViewD, secondaryView: anchorViewC, padding: padding, height: size)
view4.alignBetweenVertical(align: .AboveMatchingRight, primaryView: anchorViewC, secondaryView: anchorViewA, padding: padding, width: size)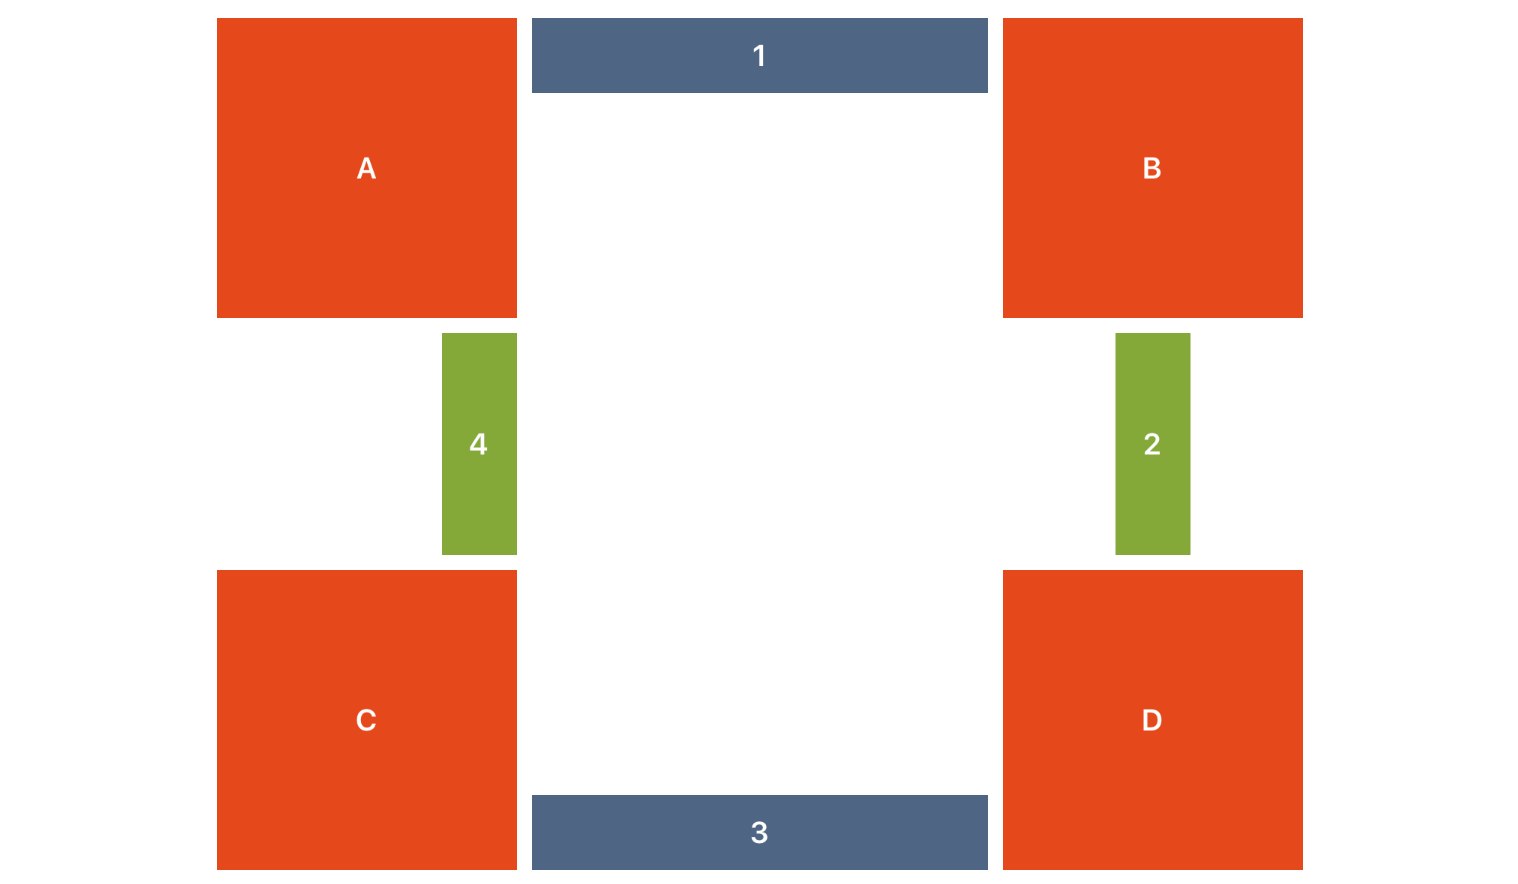
关于标签怎么办?
在处理动态布局时,比较复杂的一点是处理可能有1 -> n行标签,因此在没有引起头痛的情况下,传递特定的高度并不总是可能的。Neon通过引入AutoHeight常量使其变得简单。将此值传递到接受height参数的方法中,我们首先设置框架的宽度,告诉视图调用sizeToFit(),以便根据其内容自动设置高度,然后按适当方式对齐视图。例如
testLabel.alignBetweenHorizontal(align: .ToTheRightMatchingBottom, primaryView: anchorViewA, secondaryView: anchorViewB, padding: padding, height: AutoHeight)
注意,将文本更改为带有更多字符的内容仍会产生相同的结果

需要注意的是,使用
AutoHeight与CALayer等类似的东西,或者将其传递给任何分组方法(见下文)将产生不可接受的结果,因为这在此上下文中几乎没什么意义。与实现sizeToFit()的任何东西一起使用AutoHeight,你应该没问题。您想要使用此功能的绝大多数情况是针对UILabel对象。
如果我不想将它们完美地对齐怎么办?
有时您不希望视图与其兄弟视图完全对齐 - 您可能想将它们相对于兄弟视图对齐,但略微偏移。您可以通过向上述对齐方法之一添加可选的offset参数来实现这一点,如下所示
view1.align(.ToTheRightMatchingTop, relativeTo: anchorViewA, padding: padding, width: size, height: size, offset: offset)
view2.align(.UnderMatchingLeft, relativeTo: anchorViewA, padding: padding, width: size, height: size, offset: offset)
分组
另一个常见用例是兄弟视图的分组,这些视图排成一行或一列。使用我们已经了解到关于在中心、角落或边缘锚定视图的知识,我们也可以对视图组做同样的事情!
分组的主要区别在于,它是通过父视图或视图组的superview来实现的。例如,让我们让两个不同的视图在不同的Group配置(.Horizontal和.Vertical)中使每个组合的子视图居中。
anchorViewA.groupInCenter(group: .Horizontal, views: [view1, view2, view3], padding: padding, width: size, height: size)
anchorViewB.groupInCenter(group: .Vertical, views: [view4, view5, view6], padding: padding, width: size, height: size)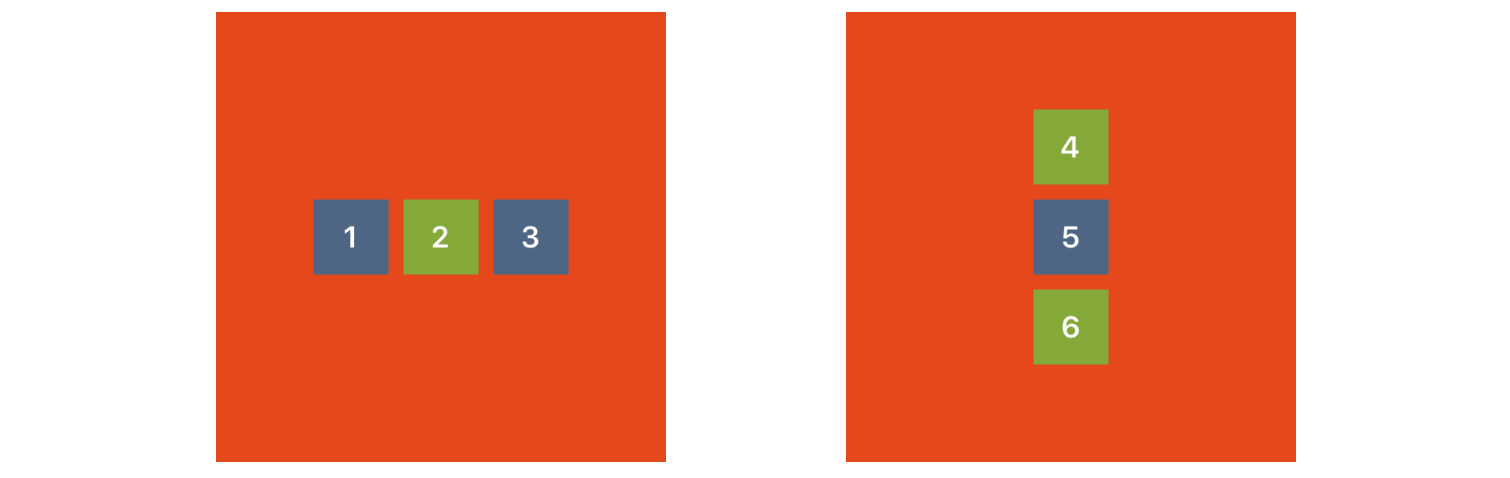
在角落中分组视图怎么样?
anchorViewA.groupInCorner(group: .Horizontal, views: [view1, view2, view3], inCorner: .TopLeft, padding: padding, width: size, height: size)
anchorViewB.groupInCorner(group: .Vertical, views: [view4, view5, view6], inCorner: .BottomRight, padding: padding, width: size, height: size)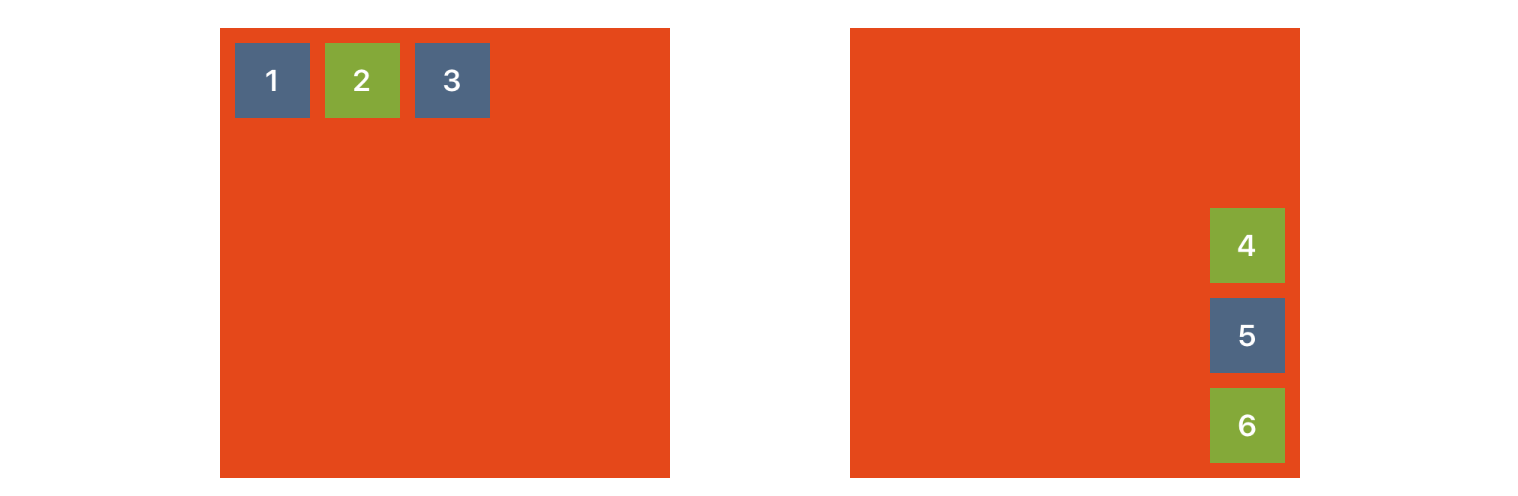
正如您可能预料的,您也可以垂直地放在任何边缘的水平或垂直分组。
anchorViewA.groupAgainstEdge(group: .Horizontal, views: [view1, view2, view3], againstEdge: .Left, padding: padding, width: size, height: size)
anchorViewB.groupAgainstEdge(group: .Vertical, views: [view4, view5, view6], againstEdge: .Bottom, padding: padding, width: size, height: size)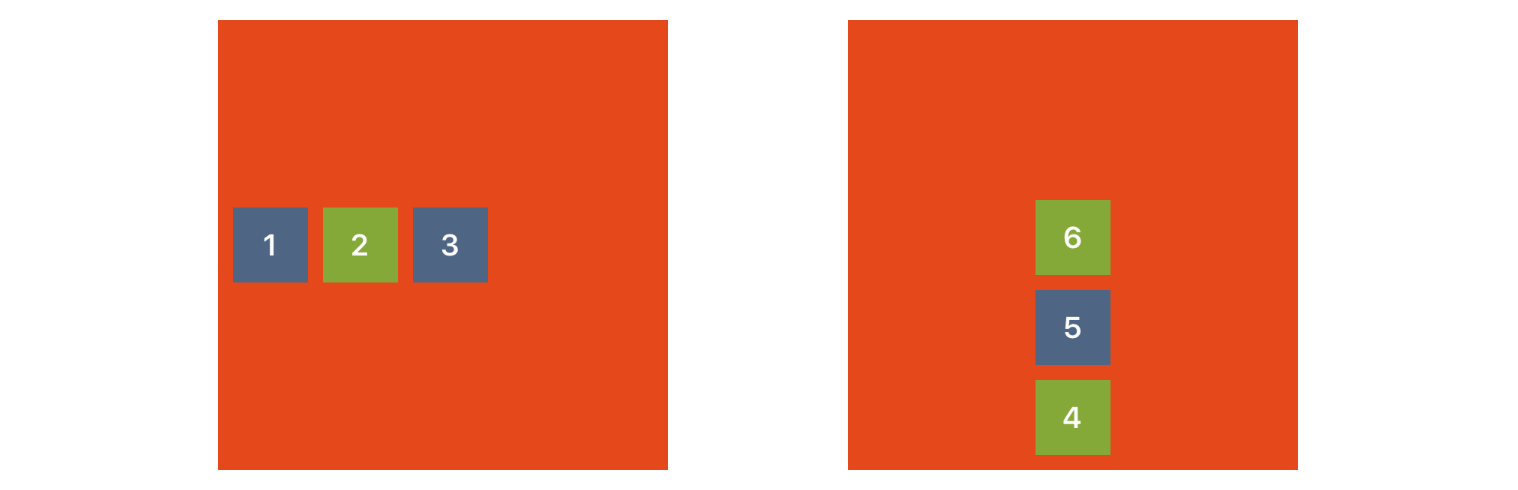
您还可以相对兄弟视图分组视图。
view.groupAndAlign(group: .Horizontal, andAlign: .ToTheRightMatchingTop, views: [view1, view2, view3], relativeTo: anchorViewA, padding: padding, width: size, height: size)
view.groupAndAlign(group: .Vertical, andAlign: .UnderCentered, views: [view4, view5, view6], relativeTo: anchorViewA, padding: padding, width: size, height: size)
您还可以指定希望子视图组填充其父视图,无论是水平还是垂直。
anchorViewA.groupAndFill(group: .Horizontal, views: [view1, view2, view3], padding: padding)
anchorViewB.groupAndFill(group: .Vertical, views: [view4, view5, view6], padding: padding)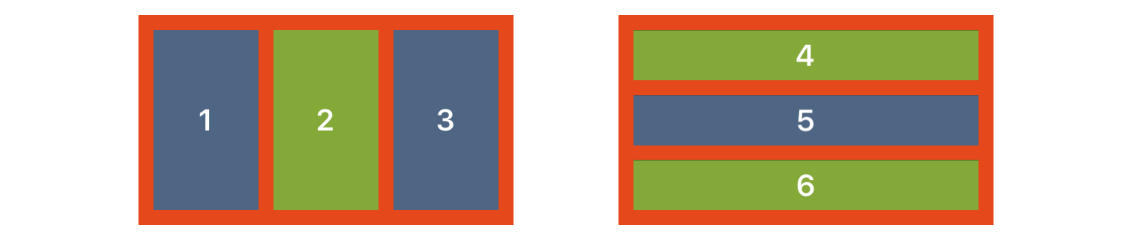
许可证
代码在MIT许可证下提供。有关详情,请参阅LICENSE.txt。