移动消息 SDK for iOS


移动消息 SDK 是设计开发和易于在您的移动应用程序中启用推送通知通道的。在几乎不花时间实现的情况下,您可以在应用程序中获得推送通知并访问 Infobip Mobile Apps Messaging 的功能。本文档描述了库集成步骤。更多信息可以在我们的 Wiki 中找到。
需求
- Xcode 13.2.1+
- Swift 4.2, Swift 5
- iOS 12.0+
快速入门指南
本指南旨在帮助您将 Mobile Messaging SDK 集成到您的 iOS 应用程序中并启动运行。
-
如果您尚未完成,请确保在 Infobip 门户上设置应用程序。
-
配置项目以支持推送通知
- 单击“功能”,然后启用推送通知。Xcode 应自动创建权限文件,并设置
aps-environment值。
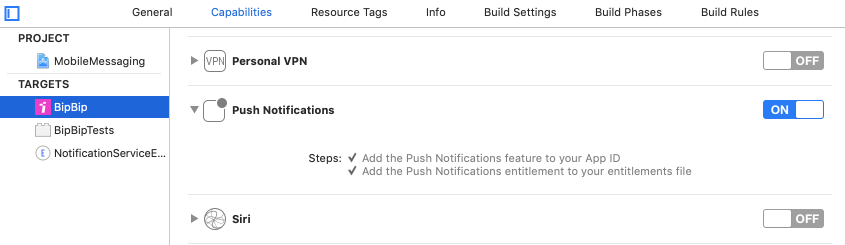
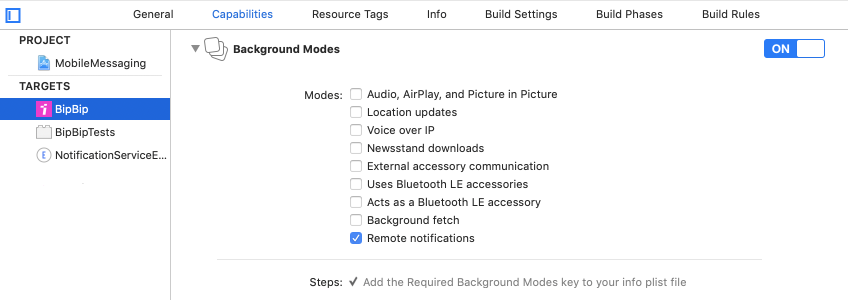
- 启用后台模式和检查远程通知复选框。
- 单击“功能”,然后启用推送通知。Xcode 应自动创建权限文件,并设置
-
使用 CocoaPods,在您的
Podfile中指定它source 'https://github.com/CocoaPods/Specs.git' platform :ios, '12.0' use_frameworks! pod 'MobileMessaging'
注意
默认使用 CocoaLumberjack 日志,为了使用其他日志或将其关闭,请遵循以下指南。
如果您使用 Carthage,请参阅通过 Carthage 集成 指南。
-
将库导入到您的 AppDelegate 文件中
// Swift
import MobileMessaging
展开以查看 Objective-C 代码
@import MobileMessaging;
-
使用您的 Infobip 应用程序代码(在步骤 1 中获得)和首选通知类型作为参数启动 MobileMessaging 服务
// Swift
func application(_ application: UIApplication, didFinishLaunchingWithOptions launchOptions: [UIApplication.LaunchOptionsKey : Any]? = nil) -> Bool {
    MobileMessaging.withApplicationCode(<#your application code#>, notificationType: <#for example MMUserNotificationType(options: [.alert, .sound])#>)?.start()
    ...
}
展开以查看 Objective-C 代码
- (BOOL)application:(UIApplication *)application didFinishLaunchingWithOptions:(NSDictionary *)launchOptions {
    MMUserNotificationType *userNotificationType = [[MMUserNotificationType alloc] initWithOptions:<#for example @[MMUserNotificationType.alert, MMUserNotificationType.sound]#>;
    [[MobileMessaging withApplicationCode: <#your application code#> notificationType: userNotificationType] start:nil];
    ...
}
如果您已使用其他推送通知供应商的 SDK,则在启动调用中添加
withoutRegisteringForRemoteNotifications()// Swift func application(_ application: UIApplication, didFinishLaunchingWithOptions launchOptions: [UIApplication.LaunchOptionsKey : Any]? = nil) -> Bool { MobileMessaging.withApplicationCode(<#your application code#>, notificationType: <#for example MMUserNotificationType(options: [.alert, .sound])#>)?.withoutRegisteringForRemoteNotifications()?.start() ... }
请注意,将您的 API 密钥(应用程序代码实际上是一个 API 密钥)硬编码并不是非常安全,所以如果安全性是关键方面,请考虑混淆应用程序代码字符串(我们可以推荐 UAObfuscatedString 用于字符串混淆)。
-
将一行代码
MobileMessaging.didRegisterForRemoteNotificationsWithDeviceToken(deviceToken)添加到您的 AppDelegate 方法application:didRegisterForRemoteNotificationsWithDeviceToken:以通知 Infobip 有新设备注册// Swift func application(_ application: UIApplication, didRegisterForRemoteNotificationsWithDeviceToken deviceToken: Data) { MobileMessaging.didRegisterForRemoteNotificationsWithDeviceToken(deviceToken) // other push vendors might have their code here and handle a Device Token as well }
展开以查看 Objective-C 代码
- (void)application:(UIApplication *)application didRegisterForRemoteNotificationsWithDeviceToken:(NSData *)deviceToken {
    [MobileMessaging didRegisterForRemoteNotificationsWithDeviceToken:deviceToken];

    // other push vendors might have their code here and handle a Device Token as well
}
-
将一行代码
MobileMessaging.didReceiveRemoteNotification(userInfo, fetchCompletionHandler: completionHandler)添加到您的 AppDelegate 方法application:didReceiveRemoteNotification:fetchCompletionHandler:以将通知的投递报告发送到 Infobip// Swift func application(_ application: UIApplication, didReceiveRemoteNotification userInfo: [AnyHashable : Any], fetchCompletionHandler completionHandler: @escaping (UIBackgroundFetchResult) -> Void) { MobileMessaging.didReceiveRemoteNotification(userInfo, fetchCompletionHandler: completionHandler) // other push vendors might have their code here and handle a remove notification as well }
展开以查看 Objective-C 代码
- (void)application:(UIApplication *)application didReceiveRemoteNotification:(NSDictionary *)userInfo fetchCompletionHandler:(void (^)(UIBackgroundFetchResult result))completionHandler {
    [MobileMessaging didReceiveRemoteNotification:userInfo fetchCompletionHandler:completionHandler];

    // other push vendors might have their code here and handle a remove notification as well
}
-
将 通知服务扩展 集成到您的应用程序中,以获得
- 更精确的消息处理和投递统计信息
- 支持锁屏上的丰富通知
如果是干净的项目,您的 AppDelegate.swift 代码应如下所示
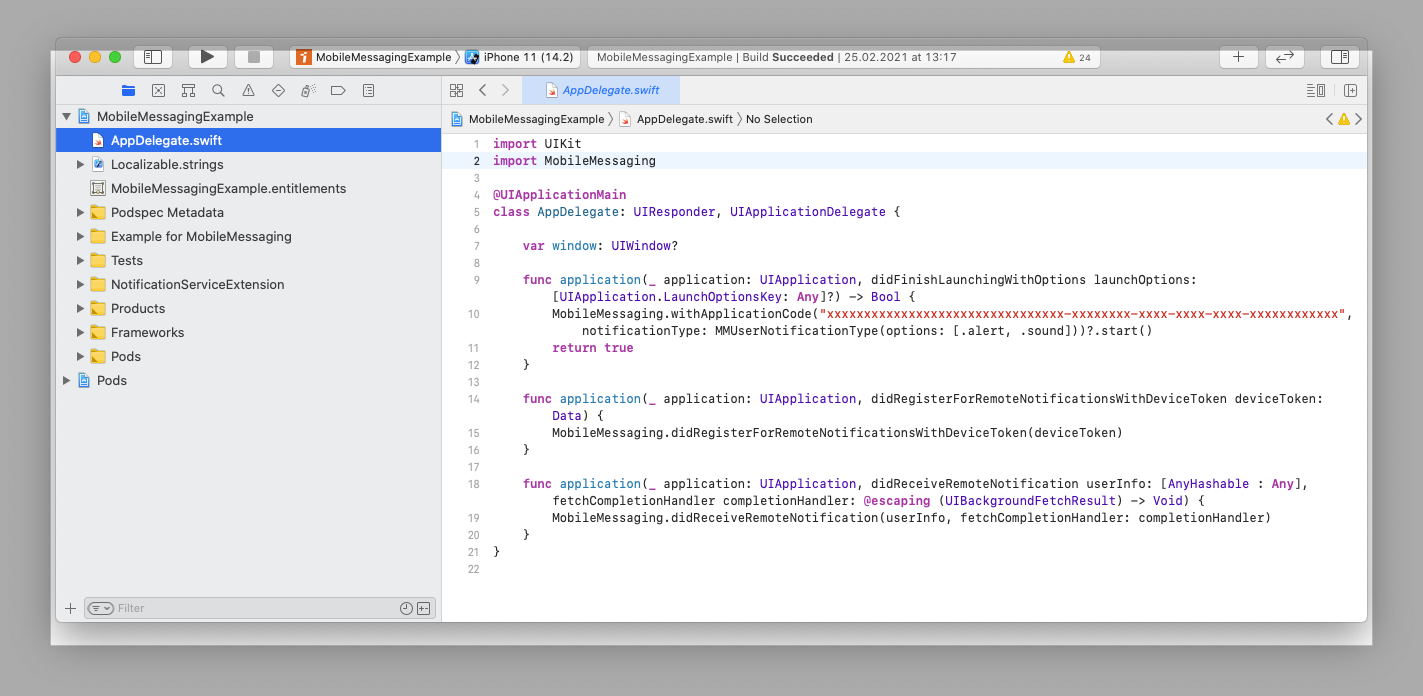
如果所有步骤都正确实现,请在实际设备上运行您的应用程序,您应该在 Xcode 控制台中看到日志,确认 MobileMessaging SDK 已成功初始化且设备已在 APNS 上注册接收推送消息
2023-01-28 18:24:16:003 [MobileMessaging] ℹ️ SDK successfully initialized!
...
2023-01-28 18:25:44:144 [MobileMessaging] ℹ️ [APNS reg manager] Application did register with device token <...>
如果您看不到任何日志,请在启动SDK之前设置默认记录器:MobileMessaging.logger = MMDefaultLogger()。请注意,只有当您的项目处于“调试”配置时,日志才会被收集。
请密切关注用于您的项目构建的配置文件。它必须匹配APNs环境!如果不匹配,我们将使设备的推送注册无效(更多信息请参阅我无法接收推送通知!)
注意
当应用程序在前台运行时,推送通知(如果不是应用内通知)不会自动显示。有关更多信息,请参阅常见问题 - 当应用在前台运行时如何显示消息?。
下一步:用户配置文件
| 如果您有任何问题或建议,请随时发送电子邮件至[email protected]或创建问题。 |
|---|