![]()
MPush iOS SDK
MPush 是一个用 Swift 编写的客户端库,可用于与 MPush API 交互。库的最低部署目标为 iOS 11.0。
MPush 使用经典的 Pub/Sub 模式,您将注册您的设备到主题,然后您将能够通过 MPush API 向这些主题发送通知,所有注册的设备都将收到通知。
主题可以代表您系统中任何您想表示的内容(例如整个应用,一个用户,具有共同特性的用户子集等),因此您可以选择通知的粒度。
最低需求
- Swift 4.0+
- Xcode - 获取 Xcode 最简单的方式是从 App Store,但如果您有一个已注册苹果开发者账户的 AppleID,也可以从 developer.apple.com 下载。
安装
Swift 包管理器
使用 Xcode 11,您可以开始使用 Swift 包管理器 将 MPushSwift 添加到项目中。遵循以下简单步骤
- 在 Xcode 中,转到 文件 > Swift Packages > 添加包依赖。
- 在“选择包仓库”对话框中输入
https://github.com/Mumble-SRL/MPushSwift.git并按下一步。 - 使用规则“至下一个主版本”指定版本,其最低版本为“0.2.13”,然后按下一步。
- Xcode 将尝试解析版本,之后您可以选择
MPushSwift库并将其添加到您的应用目标中。
CocoaPods
CocoaPods 是一个用于 iOS 的依赖管理器,它可以自动简化在项目中使用第三方库的过程。您可以使用以下命令安装 CocoaPods
$ gem install cocoapods使用 CocoaPods 将 MPush 集成到您的 Xcode 项目中,请在 Podfile 中指定它
platform :ios, '10.0'

target 'TargetName' do
	use_frameworks!

    pod 'MPushSwift'
end
然后,运行以下命令
$ pod install
CocoaPods 是安装库的首选方法。
Carthage
Carthage 是一个去中心化的依赖管理器,它构建您的依赖并提供二进制框架。要使用 Carthage 将 MPushSwift 集成到您的 Xcode 项目中,请在 Cartfile 中指定它
github "Mumble-SRL/MPushSwift"
手动安装
要手动安装库,请将文件夹 MPush 拖放到 XCode 的项目结构中。
请注意,MPush 依赖于 MBNetworking (1.0),因此您还必须安装这个库。
使用方法
首先,您需要使用《UserNotifications》框架实现推送通知。
您将逐步学习完成具有推送通知功能的项目的所有步骤,如果您已经完成,则可以跳转到本README中的集成 MPush部分。
创建密钥
使用管理员账户登录developer.apple.com,在“keys -> all”下点击右上角的加号按钮。为您的密钥指定一个名称并启用Apple推送通知服务(APNs)。
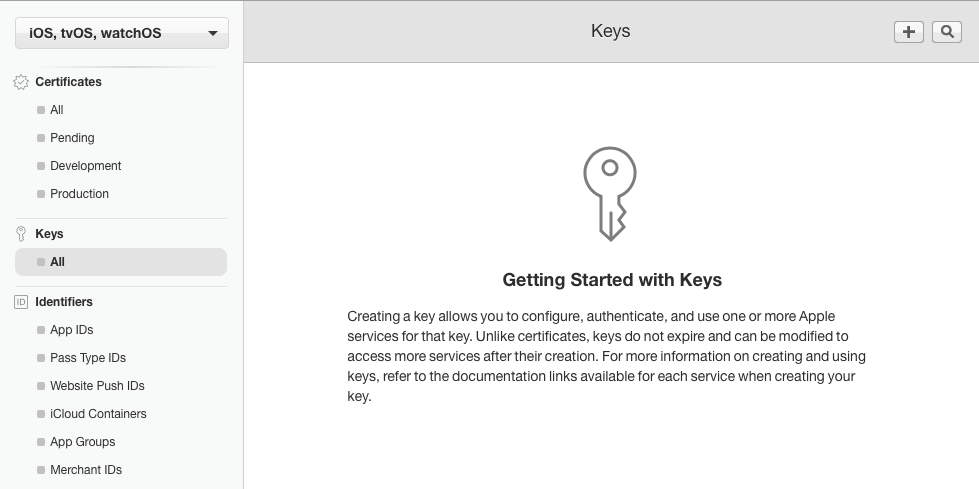
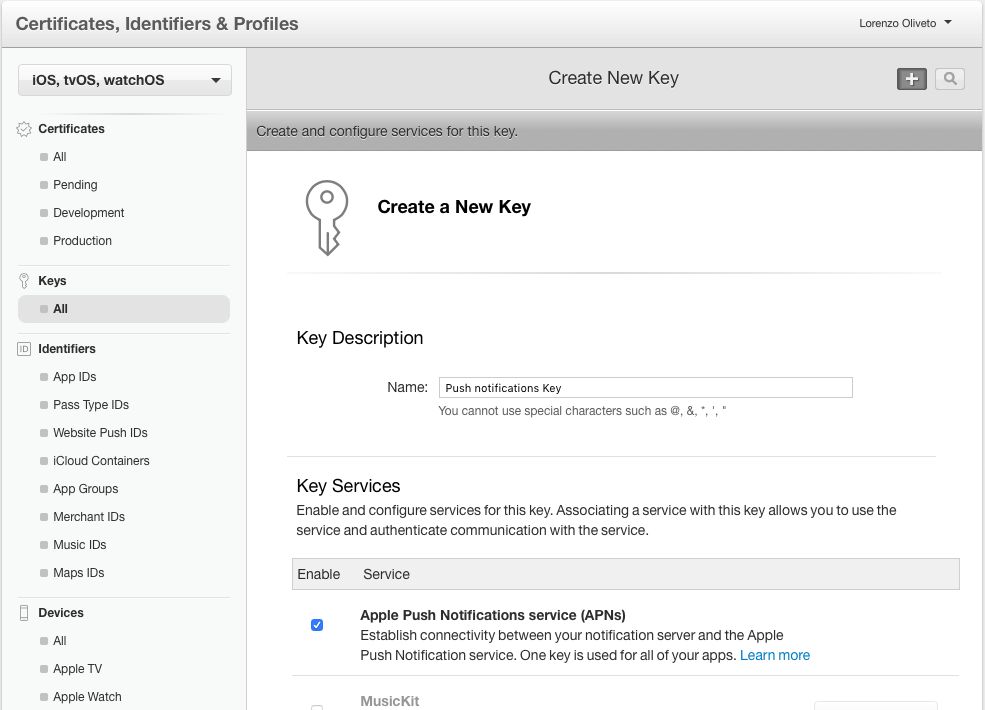
然后下载创建的.p8密钥文件,并将其上传到我们的仪表板。
请注意,创建的密钥对所有您的应用程序有效,并且无法重新下载,请将其保存在安全的地方,因为您可能需要重用。
添加通知到您的应用程序
现在转到您的应用程序设置下的“Identifier -> AppId”并根据以下步骤启用通知服务。之后,您需要更新您应用程序的配置文件(Provisioning Profile),或者创建一个新的配置文件,因为带有通配符配置文件签名的应用程序不支持推送通知。
现在,我们终于可以转到XCode了。打开您的项目,在能力选项卡中启用推送通知。

在AppDelegate.swift中添加
import UserNotifications

func application(_ application: UIApplication, didFinishLaunchingWithOptions launchOptions: [UIApplication.LaunchOptionsKey: Any]?) -> Bool {
    ...

    let userNotificationCenter = UNUserNotificationCenter.current()
    userNotificationCenter.delegate = self

    self.registerForPushNotifications()
	...
}

// MARK: - Notifications

func registerForPushNotifications() {
    UNUserNotificationCenter.current().requestAuthorization(options: [.alert, .sound, .badge]) { (granted, _) in
        guard granted else { return }
        self.getNotificationSettings()
    }
}

func getNotificationSettings() {
    UNUserNotificationCenter.current().getNotificationSettings { (settings) in
        guard settings.authorizationStatus == .authorized else { return }
        DispatchQueue.main.async {
            UIApplication.shared.registerForRemoteNotifications()
        }
    }
}

extension AppDelegate: UNUserNotificationCenterDelegate {
    func userNotificationCenter(_ center: UNUserNotificationCenter,
                                willPresent notification: UNNotification,
                                withCompletionHandler
                                completionHandler: @escaping (UNNotificationPresentationOptions) -> Void) {
        completionHandler(UNNotificationPresentationOptions.alert)
    }

    func userNotificationCenter(_ center: UNUserNotificationCenter,
                                didReceive response: UNNotificationResponse,
                                withCompletionHandler
                                completionHandler: @escaping () -> Void) {
        completionHandler()
    }
}
集成 MPush
要将MPush集成到您的实现中,您需要在AppDelegate中添加此内容
import MPushSwift

func application(_ application: UIApplication, didFinishLaunchingWithOptions launchOptions: [UIApplication.LaunchOptionsKey: Any]?) -> Bool {
    ...
    MPush.token = "YOUR_PUSH_TOKEN"
    ...
}

...

func application(_ application: UIApplication, didRegisterForRemoteNotificationsWithDeviceToken deviceToken: Data) {
    MPush.registerDevice(deviceToken: deviceToken, success: {
        MPush.register(toTopic: MPTopic("YOUR_TOPIC"))
        // OR if you have more than one topic
        // MPush.register(toTopics: [MPTopic("TOPIC1"), MPTopic("TOPIC2")])
    })
}
一切就绪
MPTopic附加参数
在创建主题时,您可以指定附加参数
标题:用于在仪表板中显示该主题的标题,如果未指定,则与主题ID的值相同单独:如果该主题标识单个用户或一组用户,则默认为false
丰富的通知
要实现丰富的通知,您必须创建一个新的通知服务目标,它将负责下载通知的媒体并将其附加到通知对象上。
在Xcode中,转到“文件”->;“新建”->;“目标”,并选择“通知服务扩展”
请记住,通知没有太多时间下载附加的媒体,如果下载没有在短时间内完成,则通知将不带媒体交付。
要处理MPush附件,将此添加到您的NotificationService
override func didReceive(_ request: UNNotificationRequest, withContentHandler contentHandler: @escaping (UNNotificationContent) -> Void) {
    self.contentHandler = contentHandler
    bestAttemptContent = (request.content.mutableCopy() as? UNMutableNotificationContent)

    if let bestAttemptContent = bestAttemptContent {
        if let mediaUrl = request.content.userInfo["media_url"] as? String, let fileUrl = URL(string: mediaUrl) {
            downloadMedia(fileUrl: fileUrl, request: request, bestAttemptContent: bestAttemptContent) {
                contentHandler(bestAttemptContent)
            }
        } else {
            contentHandler(bestAttemptContent)
        }
    }
}

func downloadMedia(fileUrl: URL, request: UNNotificationRequest, bestAttemptContent: UNMutableNotificationContent, completion: @escaping () -> Void) {
    let task = URLSession.shared.downloadTask(with: fileUrl) { (location, _, _) in
        if let location = location {
            let tmpDirectory = NSTemporaryDirectory()
            let tmpFile = "file://".appending(tmpDirectory).appending(fileUrl.lastPathComponent)
            let tmpUrl = URL(string: tmpFile)!
            do {
                try FileManager.default.moveItem(at: location, to: tmpUrl)

                var options: [String: String]? = nil
                if let type = request.content.userInfo["media_type"] as? String {
                    options = [String: String]()
                    options?[UNNotificationAttachmentOptionsTypeHintKey] = type
                }
                if let attachment = try? UNNotificationAttachment(identifier: "media." + fileUrl.pathExtension, url: tmpUrl, options: options) {
                    bestAttemptContent.attachments = [attachment]
                }
                completion()
            } catch {
                completion()
            }
        }
    }
    task.resume()
}

override func serviceExtensionTimeWillExpire() {
    // Called just before the extension will be terminated by the system.
    // Use this as an opportunity to deliver your "best attempt" at modified content, otherwise the original push payload will be used.
    if let contentHandler = contentHandler, let bestAttemptContent =  bestAttemptContent {
        contentHandler(bestAttemptContent)
    }
}
使用此代码,我们下载(如果存在)附件并将其移动到临时目录。然后我们使用此方式将其添加到我们的通知中
if let attachment = try? UNNotificationAttachment(identifier: "media." + fileUrl.pathExtension, url: tmpUrl, options: options) {
    bestAttemptContent.attachments = [attachment]
}
许可证
MPush采用MIT许可证发布。有关详细信息,请参阅LICENSE