LPIntegratedRating 1.0.0
| 测试已测试 | ✗ |
| 语言语言 | SwiftSwift |
| 执照 | MIT |
| 发布最后发布 | 2017年6月 |
| SwiftSwift 版本 | 4.0 |
| SPM支持 SPM | ✗ |
由 Luis Padron、Luis Padron 维护。
LPIntegratedRating 1.0.0
- 由
- Luis Padron
使用 Swift 4 构建的 iOS 集成评分视图
特性
- 防止用户因弹出窗口请求评分而感到烦恼。
- 可自定义以适应您的应用程序需求。
- 使用
UITableView和UICollectionViews非常容易。
安装
从源码安装
- 简单地从 此处 下载源代码,并将其添加到您的 Xcode 项目中。
使用方法
委托遵从
您必须遵守委托以自定义视图。
以下是一个示例
extension ViewController: LPRatingViewDelegate {
func ratingViewDidFinish(with status: LPRatingViewCompletionStatus) {
switch status {
case .ratingApproved:
print("Rating approved")
case .ratingDenied:
print("Rating denied")
case .feedbackApproved:
print("Feedback approved")
case .feedbackDenied:
print("Feedback denied")
}
}
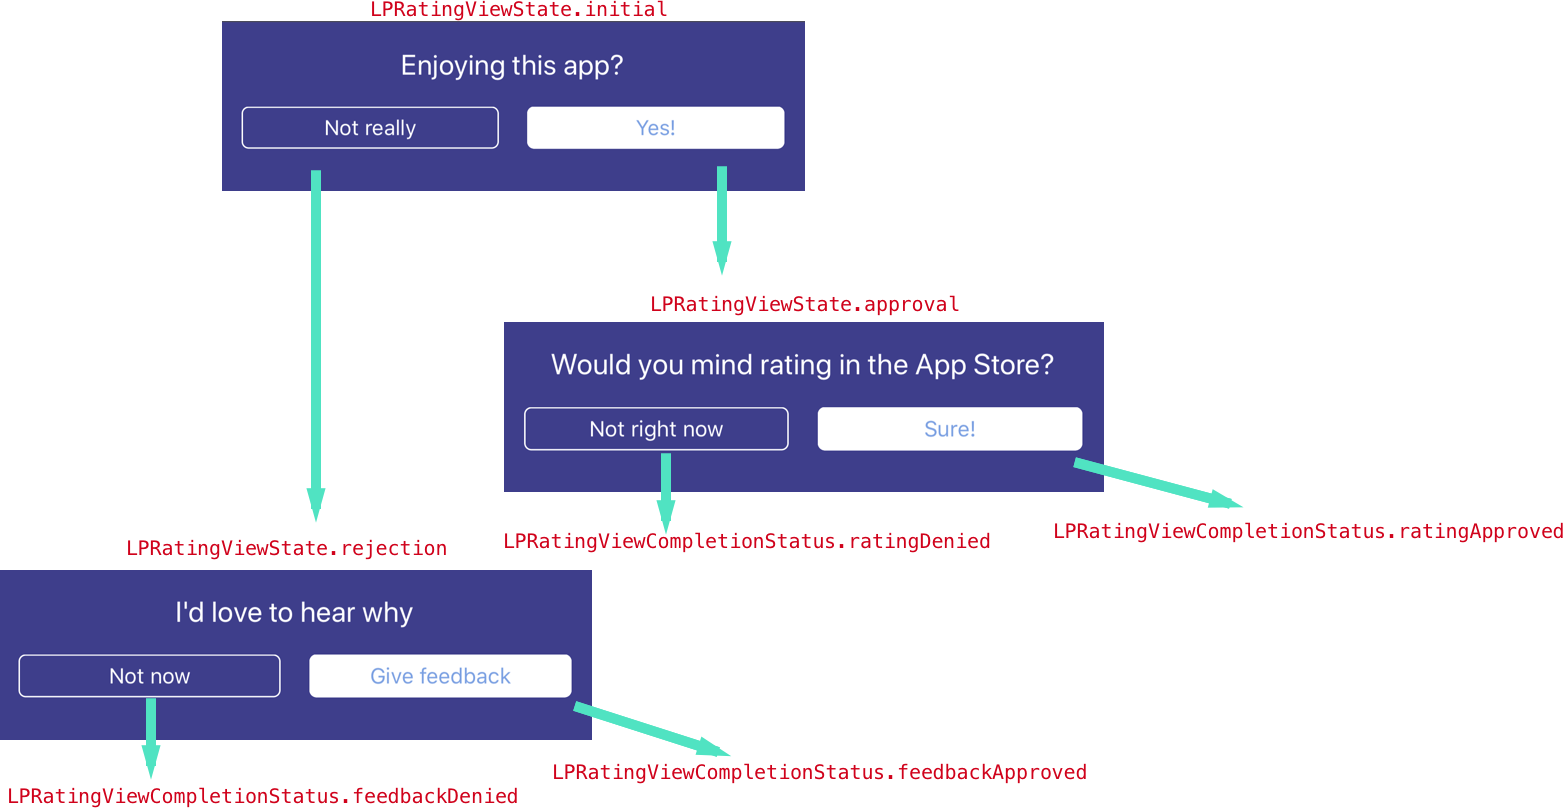
func ratingViewConfiguration(for state: LPRatingViewState) -> LPRatingViewConfiguration? {
switch state {
case .initial:
let title = NSAttributedString(string: "Enjoying this app?",
attributes: [.foregroundColor: UIColor.white])
let title2 = NSAttributedString(string: "Yes!",
attributes: [.foregroundColor: UIColor(red: 0.376, green: 0.788, blue: 0.773, alpha: 1.00)])
let title3 = NSAttributedString(string: "Not really",
attributes: [.foregroundColor: UIColor.white])
return LPRatingViewConfiguration(title: title,
approvalButtonTitle: title2,
rejectionButtonTitle: title3)
case .approval:
let title = NSAttributedString(string: "How about rating, then?",
attributes: [.foregroundColor: UIColor.white])
let title2 = NSAttributedString(string: "Ok, sure",
attributes: [.foregroundColor: UIColor(red: 0.376, green: 0.788, blue: 0.773, alpha: 1.00)])
let title3 = NSAttributedString(string: "No, thanks",
attributes: [.foregroundColor: UIColor.white])
return LPRatingViewConfiguration(title: title,
approvalButtonTitle: title2,
rejectionButtonTitle: title3)
case .rejection:
let title = NSAttributedString(string: "Would you mind giving us some feedback",
attributes: [.foregroundColor: UIColor.white])
let title2 = NSAttributedString(string: "Ok, sure",
attributes: [.foregroundColor: UIColor(red: 0.376, green: 0.788, blue: 0.773, alpha: 1.00)])
let title3 = NSAttributedString(string: "No, thanks",
attributes: [.foregroundColor: UIColor.white])
return LPRatingViewConfiguration(title: title,
approvalButtonTitle: title2,
rejectionButtonTitle: title3)
}
}
}
UITableView
简单地创建一个 LPRatingTableViewCell 的实例,分配委托并返回它!
override func tableView(_ tableView: UITableView, cellForRowAt indexPath: IndexPath) -> UITableViewCell {
	let cell = LPRatingTableViewCell(style: .default, reuseIdentifier: nil)
	cell.delegate = self

	return cell
}
UICollectionView
首先注册类
override func viewDidLoad() {
    super.viewDidLoad()
    // Register class
    collectionView?.register(LPRatingCollectionViewCell.self, forCellWithReuseIdentifier: "testCell")
}
然后简单地创建一个 LPRatingCollectionViewCell 的实例,分配委托并返回它
override func collectionView(_ collectionView: UICollectionView, cellForItemAt indexPath: IndexPath) -> UICollectionViewCell {
let cell = collectionView.dequeueReusableCell(withReuseIdentifier: "testCell", for: indexPath) as! LPRatingCollectionViewCell
cell.delegate = self
return cell
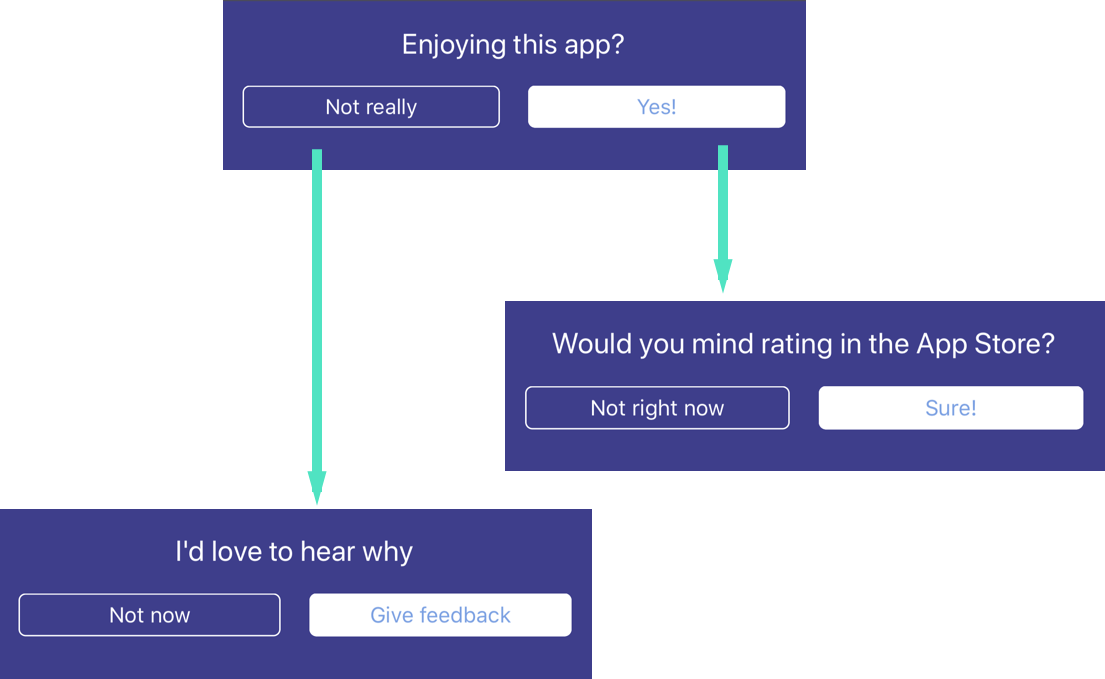
}视图流程
以下是视图的流程,以及途中将传递给委托的案例类型。
文档
请在此处阅读完整文档 这里