KOControls
KOControls是一组有用的控件。它可以帮助您在不费太多力气的情况下创造更好的用户体验。
目前它只包含了一些基本功能,但它将根据用户的需求获取新内容。
功能
- KOPresentationQueuesService - 服务管理待展示视图的队列。
- KOTextField - 支持显示和验证错误文本框。
- KOScrollOffsetProgressController - 根据滚动视图偏移量和选择的计算“模式”基于给定范围计算进度的控制器。
- KODialogViewController - 高度可定制的对话框视图,可以用来以简单的方式创建自定义对话框。
- KODatePickerViewController - 以简单方式从用户获取日期。
- KOOptionsPickerViewController - 以简单方式从用户获取选定的选项。
- KOItemsTablePickerViewController - 以简单方式从表获取用户选定的选项。
- KOItemsCollectionPickerViewController - 以简单方式从集合获取用户选定的选项。
- KODimmingTransition - 使用带有模糊视图的演示使用过渡。
- KOVisualEffectDimmingTransition - 使用带有模糊视图和视觉效果的演示使用过渡。
要求
- iOS 10+
- Xcode 10.0+
- Swift 4.2+
版本
- Swift 4.2:从 1.0 到 1.0.3
- Swift 5.0:从 1.1 到最新版
安装
KOControls 不包含任何外部依赖。如果您想保持更新,可以通过 Cocoapods 安装 KOControls。
CocoaPods
请在 Podfile 中的目标中添加以下条目
pod 'KOControls', '~> 1.2.3'
例如
source 'https://github.com/CocoaPods/Specs.git'
platform :ios, '10.0'
use_frameworks!

target 'Target Name' do
pod 'KOControls', '~> 1.2.3'
end
运行以下命令安装 pods
pod install
手动安装
您可以使用 KOControls 进行手动操作并根据需要自定义。这是一种简单的方法之一。
- 下载库。
- 将 KOControls.xcodeproj 和 Sources 文件夹复制到您的项目目录。
- 在项目资源管理器中单击“将文件添加到 '您的项目'” -> 选择 KOControls.xcodeproj。Xcode 将自动将 KOControls 添加为子项目。
- 在项目设置 -> 目标 -> 添加嵌入式库 -> 选择 '您的项目' -> KOControls.xcodeproj -> Products -> KOControls.framework。
- 这就是全部!如果您不想每次更改时都手动构建 KOControls。请转到您的目标方案设置中的构建部分并添加 KOControls 构建目标。
使用方法
您需要在文件顶部添加以下导入。
import KOControlsKOPresentationQueuesService
可以将viewController添加到presenting队列,以避免同时出现多个viewController进行展示的情况,只允许一个进行展示。向展示队列添加viewController最简单的方法是使用presenting viewController的重载函数present。
let itemIdInQueue = present(viewControllerToPresent, inQueueWithIndex: messageQueueIndex)这是最详细的一个,允许你设置展示viewController。但请注意,当前上下文中不展示的modalPresentationStyles(如自定义或全屏)将在队列外全屏上下文中进行展示。
let itemIdInQueue = KOPresentationQueuesService.shared.presentInQueue(customDialog, onViewController: presentingContainerViewController, queueIndex: messageQueueIndex, animated: true, animationCompletion: nil)要从队列中移除项,你需要队列中该项的id。
KOPresentationQueuesService.shared.removeFromQueue(withIndex: messageQueueIndex, itemWithId: itemIdInQueue)或者队列中项的索引。
KOPresentationQueuesService.shared.removeFromQueue(withIndex: messageQueueIndex, itemWithIndex: indexOfItemInQueue)其他功能允许你从队列中移除多个项。
//delete all items from queue that would be presented at 'presentingViewController'
KOPresentationQueuesService.shared.removeAllItemsFromQueue(withIndex: messageQueueIndex, forPresentingViewController: presentingViewController)

//just deletes queue with all of items
KOPresentationQueuesService.shared.deleteQueue(withIndex: messageQueueIndex)
当前展示的项不在队列中,但你可以检查队列中是否有内容正在展示,或者如果你想的话,可以删除展示的项。
if KOPresentationQueuesService.shared.itemPresentedForQueue(withIndex: messageQueueIndex) != nil{
    //do something...
}

//dismisses current presented viewController if is
KOPresentationQueuesService.shared.removeCurrentVisibleItemForQueue(withIndex: messageQueueIndex, animated: true, animationCompletion: nil)
如果你想队列更改时做某些操作(添加/移除新项,创建/删除队列),可以使用queueChangedEvent。
KOPresentationQueuesService.shared.queueChangedEvent = {
    queueIndex in
    //it will print count of queue items
    print(KOPresentationQueuesService.shared.itemsCountForQueue(withIndex: queueIndex) ?? 0)
}
KOTextField
支持显示和验证错误。
在显示之前,你总是需要设置错误描述。要手动显示错误,需要将默认的validation.mode改为手动,并将标志error.isShowing改为true。
errorField.errorInfo.description = "Error description text"
errorField.validation.mode = .manual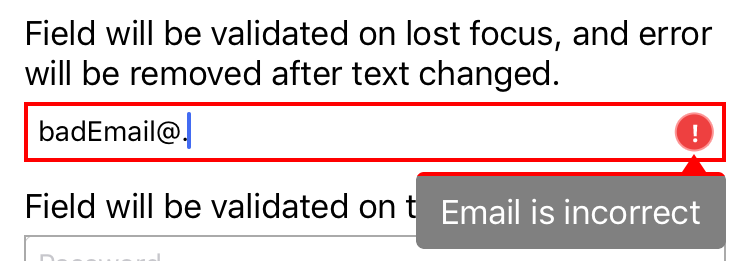
errorField.error.isShowing = true为了不手动设置标志,可以使用自动验证功能。默认验证模式是validateOnLostFocus。所以如果你想显示错误的电子邮件不正确,你只需要添加预定义的验证器。
emailField.validation.add(validator: KORegexTextValidator.mailValidator(failureText: "Email is incorrect"))你可以通过设置border.settings来调整字段边框的状态:正常、错误、聚焦。
emailField.border.settings = KOControlBorderSettings(color: UIColor.lightGray.cgColor, errorColor: UIColor.red.cgColor, focusedColor: UIColor.blue.cgColor, errorFocusedColor : UIColor.red.cgColor, width: 1, focusedWidth: 2)字段可以通过基于函数或正则表达式的多个验证器进行验证。
passwordField.border.settings = KOControlBorderSettings(color: UIColor.lightGray.cgColor, errorColor: UIColor.red.cgColor, focusedColor: UIColor.blue.cgColor, errorFocusedColor : UIColor.red.cgColor, width: 1, focusedWidth: 2)
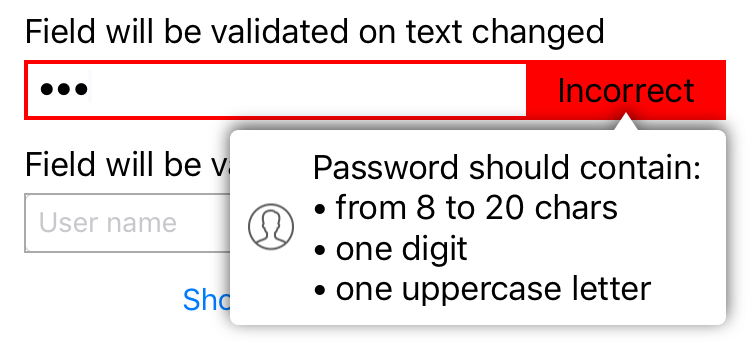
passwordField.validation.validateMode = .validateOnTextChanged
//simple function based validator
passwordField.validation.failureTextPrefix = "Password should contain:\n"
passwordField.validation.add(validator: KOFunctionTextValidator(function: { password -> Bool in
return password.count >= 8 && password.count <= 20
}, failureText: "from 8 to 20 chars"))
passwordField.validation.add(validator: KOFunctionTextValidator(function: { password -> Bool in
return password.rangeOfCharacter(from: .decimalDigits) != nil
}, failureText: "one digit"))
passwordField.validation.add(validator: KOFunctionTextValidator(function: { password -> Bool in
return password.rangeOfCharacter(from: .uppercaseLetters) != nil
}, failureText: "one uppercase letter"))基于正则表达式的验证器。
passwordField.validation.add(validator: KORegexTextValidator(regexPattern: "^(?=.*[a-z]{1,}.*)(?=.*[A-Z]{1,}.*)(?=.*[0-9]{1,}.*)(?=.*[^a-zA-Z0-9]{1,}.*).{8,20}$", failureText: "Password should contain from 8 to 20 chars, one digit, letter, uppercase letter and special char."))默认错误信息显示在字段的superview中,但你可以通过手动设置showErrorInfoInView来自定义。如果你想总是显示错误信息或在有错误时手动显示,可以通过改变showErrorInfoMode来实现。在手动模式下,你可以通过标志errorInfo.isShowing来显示或隐藏错误信息。
通过更改errorInfo.view及其显示/隐藏动画来自定义显示错误信息。
//changes animations
passwordField.errorInfo.hideAnimation = KOAnimationGroup(animations:[
    KOTranslationAnimation(toValue: CGPoint(x: -200, y: 20)),
    KOFadeOutAnimation()
])
passwordField.errorInfo.showAnimation = KOAnimationGroup(animations: [
    KOTranslationAnimation(toValue: CGPoint.zero, fromValue: CGPoint(x: -200, y: 20)),
    KOFadeInAnimation(fromValue: 0)
], dampingRatio: 0.6)

//adds additional icon
passwordField.errorInfo.view.imageWidthConst.constant = 25
passwordField.errorInfo.view.imageView.image = UIImage(named:"ico_account")
passwordField.errorInfo.view.imageViewEdgesConstraintsInsets.insets =  UIEdgeInsets(top: 8, left: 8, bottom: 8, right: 8)
passwordField.errorInfo.view.imageView.contentMode = .scaleAspectFit

//other adjustments
passwordField.errorInfo.view.descriptionLabel.textColor = UIColor.black
passwordField.errorInfo.view.contentView.backgroundColor = UIColor.white
passwordField.errorInfo.view.layer.shadowColor = UIColor.black.cgColor
passwordField.errorInfo.view.layer.shadowOffset = CGSize(width: 0, height: -2)
passwordField.errorInfo.view.layer.shadowRadius = 5
passwordField.errorInfo.view.layer.shadowOpacity = 0.7
passwordField.errorInfo.view.markerColor = UIColor.white
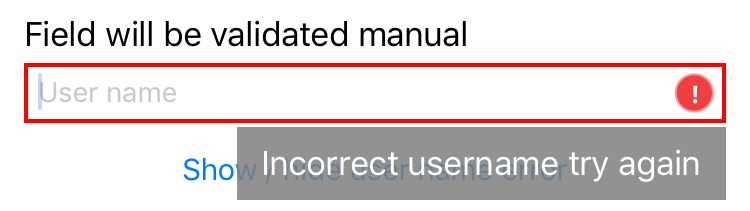
你可以通过errorInfo.customView完全替换errorInfo.view,但新的视图需要实现KOErrorInfoProtocol。
class UserNameErrorInfoView : UIView, KOErrorInfoProtocol{
    func markerCenterXEqualTo(_ constraint: NSLayoutXAxisAnchor) -> NSLayoutConstraint? {
        return nil
    }
}
...
//sets custom error info view
let userNameErrorInfoView = UserNameErrorInfoView()
userNameErrorInfoView.backgroundColor = UIColor.gray.withAlphaComponent(0.85)

let userNameErrorInfoLabel = UILabel()
userNameErrorInfoLabel.textColor = UIColor.white
userNameErrorInfoLabel.text = "Incorrect username try again"
userNameErrorInfoLabel.translatesAutoresizingMaskIntoConstraints = false
userNameErrorInfoView.addSubview(userNameErrorInfoLabel)
userNameErrorInfoView.addConstraints([
    userNameErrorInfoLabel.leftAnchor.constraint(equalTo: userNameErrorInfoView.leftAnchor, constant: 12),
    userNameErrorInfoLabel.rightAnchor.constraint(equalTo: userNameErrorInfoView.rightAnchor, constant: -12),
    userNameErrorInfoLabel.bottomAnchor.constraint(equalTo: userNameErrorInfoView.bottomAnchor, constant: -8),
    userNameErrorInfoLabel.topAnchor.constraint(equalTo: userNameErrorInfoView.topAnchor, constant: 8)
])

userNameField.errorInfo.customView = userNameErrorInfoView
显示在字段右下角的错误视图可以通过更改error.iconView或通过error.customView替换来自定义。
//sets custom error view
let passwordErrorLabel = UILabel()
passwordErrorLabel.backgroundColor = UIColor.red
passwordErrorLabel.textColor = UIColor.black
passwordErrorLabel.textAlignment = .center
passwordErrorLabel.text = "Incorrect"

passwordField.error.customView = passwordErrorLabel
passwordField.error.viewWidth = 100

//or just sets the other image
// passwordField.error.iconView.image = UIImage(named:"someImage")
KOScrollOffsetProgressController
根据滚动视图偏移量以及选定的计算“模式”来计算进度的控制器。
首先声明变量。
private var scrollOffsetProgressController: KOScrollOffsetProgressController!初始化 "KOScrollOffsetProgressController",处理进度事件或代理。基于 scrollView 和最小/最大偏移量的控制器将计算平移的进度(从0.0到1.0)。可以通过参数 scrollOffsetAxis 来更改轴。
scrollOffsetProgressController = KOScrollOffsetProgressController(scrollView: collectionView, minOffset: 0, maxOffset: 300)

//user have to scroll content by 300 points in y axis
//to change topBar's height to smallest
//and to completely show minTopBarView and hide maxTopBarView
scrollOffsetProgressController.progressChangedEvent = {
    [weak self] progress in
    guard let sSelf = self else{
        return
    }
    let entryProgress = (1.0 - progress)
    sSelf.topBarHeight.constant = entryProgress * sSelf.maxSize + progress * sSelf.minSize
    sSelf.maxTopBarView.alpha = entryProgress
    sSelf.minTopBarView.alpha = progress
    sSelf.view.layoutIfNeeded()
}
根据选定的 mode,进度可能会有所不同
contentOffsetBased:(默认)进度是从当前的内容偏移量计算的。translationOffsetBased:进度是基于上次内容偏移量和新偏移量之间的差异计算的。scrollingBlockedUntilProgressMax:进度是基于触摸之间的差异(最后一个和新的一次),直到进度达到1.0值,滚动将完全阻塞。
KODialogViewController
高度可定制的对话框视图,可以简单地用来创建你的对话框。

你可以通过继承 KODialogViewController 或其子类来创建你自己的内容。在下面的例子中,我们想创建一个带有搜索字段的条目选择器表格。首先步骤是创建一个继承自 KOItemsTablePickerViewController 的类,然后我们需要重写 createContentView 函数以将我们的搜索字段添加到内容视图中。
class SearchItemsTablePickerViewController : KOItemsTablePickerViewController{
    //our search field
    private(set) weak var searchField : KOTextField!

    override func createContentView() -> UIView {
        //new contentView
        let contentView = UIView()

        //create default contentView for KOItemsTablePickerViewController
        let itemsTable = super.createContentView()
        contentView.addSubview(itemsTable)
        itemsTable.translatesAutoresizingMaskIntoConstraints = false

        let searchField = KOTextField()
        searchField.borderStyle = .roundedRect
        searchField.border.settings = AppSettings.fieldBorder
        searchField.placeholder = "Search country"
        contentView.addSubview(searchField)
        searchField.translatesAutoresizingMaskIntoConstraints = false
        self.searchField = searchField

        contentView.addConstraints([
            searchField.leftAnchor.constraint(equalTo: contentView.leftAnchor, constant: 8),
            searchField.rightAnchor.constraint(equalTo: contentView.rightAnchor,  constant: -8),
            searchField.topAnchor.constraint(equalTo: contentView.topAnchor, constant: 4),
            itemsTable.topAnchor.constraint(equalTo: searchField.bottomAnchor, constant: 4),
            itemsTable.leftAnchor.constraint(equalTo: contentView.leftAnchor),
            itemsTable.rightAnchor.constraint(equalTo: contentView.rightAnchor),
            itemsTable.bottomAnchor.constraint(equalTo: contentView.bottomAnchor)
        ])
        return contentView
    }
}
我们可以通过更改参数来进一步自定义我们的选择器。
dialogViewController.modalPresentationCapturesStatusBarAppearance = true
dialogViewController.mainViewHorizontalAlignment = .center
dialogViewController.mainViewVerticalAlignment = .center
dialogViewController.mainView.backgroundVisualEffect = UIBlurEffect(style: .dark)
dialogViewController.mainView.layer.cornerRadius = 12
dialogViewController.mainView.clipsToBounds = true
dialogViewController.mainView.barMode = .bottom
dialogViewController.mainView.barView.backgroundColor = UIColor.black.withAlphaComponent(0.1)
dialogViewController.mainView.barView.titleLabel.textColor = UIColor.white
(dialogViewController.mainView.barView.leftView as? UIButton)?.setTitleColor(UIColor.white, for: .normal)
(dialogViewController.mainView.barView.rightView as? UIButton)?.setTitleColor(UIColor.white, for: .normal)
或者我们可以改变过渡。
//override presenting animation
let viewToAnimationDuration : TimeInterval = 0.5
let viewToAnimation = KOScaleAnimation(toValue: CGPoint(x: 1, y: 1), fromValue: CGPoint.zero)
viewToAnimation.timingParameters = UISpringTimingParameters(dampingRatio: 0.6)
let animationControllerPresenting = KOAnimatedTransitioningController(duration: viewToAnimationDuration, viewToAnimation: viewToAnimation, viewFromAnimation: nil)

//override dismissing animation
let viewFromAnimationDuration : TimeInterval = 0.5
let viewFromAnimation = KOAnimationGroup(animations: [
    KOFadeOutAnimation(),
    KOScaleAnimation(toValue: CGPoint(x: 0.5, y: 0.5))
], duration : viewFromAnimationDuration)
let animationControllerDismissing = KOAnimatedTransitioningController(duration: viewFromAnimationDuration, viewToAnimation: nil, viewFromAnimation: viewFromAnimation)

dialogViewController.customTransition = KOVisualEffectDimmingTransition(effect: UIBlurEffect(style: .dark), animationControllerPresenting: animationControllerPresenting, animationControllerDismissing: animationControllerDismissing)
KODatePickerViewController
以简单的方式从用户那里获取日期。

你可以使用预定义的函数以如下方式在屏幕上显示日期选择器。Action viewLoaded 允许你设置 barView 的标题以及接受或取消对话框结果的左/右按钮。
_ = presentDatePicker(viewLoadedAction: KODialogActionModel(title: "Select your birthday", action: {
    [weak self](dialogViewController) in
    let datePickerViewController = dialogViewController as! KODatePickerViewController
    //sets the cancel button
    datePickerViewController.leftBarButtonAction = KODialogActionModel.dismissAction(withTitle: "Cancel")
    //sets the done button
    datePickerViewController.rightBarButtonAction = KODialogActionModel.dismissAction(withTitle: "Done", action: {
        [weak self](datePickerViewController: KODatePickerViewController) in
        //get the new date from the picker
        self?.birthdayDate = datePickerViewController.datePicker.date
    })

    //additional customization of datePicker
    datePickerViewController.datePicker.datePickerMode = .date
    datePickerViewController.datePicker.maximumDate = Date()
    datePickerViewController.datePicker.minimumDate = Calendar.current.date(byAdding: .year, value: -120, to: Date())
    datePickerViewController.datePicker.date = self?.date
    }))
请参阅有关 KODialogViewController 的部分以获取更多有关自定义的信息。
KOOptionsPickerViewController
一种简单的方式获取用户选择的选项。

您可以使用预定义的函数在屏幕上展示选项选择器,如下所示。选项是用户可以选择的类别/组件的数组。Action viewLoaded 允许您设置 barView 的标题和左右按钮来接受或取消对话框的结果。
fileprivate var filmTypes: [String] = [ "Action", "Adventure", "Biographical", "Comedy", "Crime", "Drama", "Family", "Horror", "Musical", "Romance", "Spy", "Thriller", "War", "Incorrect type"]

//...

_ = presentOptionsPicker(withOptions: [filmTypes], viewLoadedAction: KODialogActionModel(title: "Select your favorite film type", action: {
    [weak self](dialogViewController) in
    let optionsPickerViewController = dialogViewController as! KOOptionsPickerViewController
    //sets the cancel button
    optionsPickerViewController.leftBarButtonAction = KODialogActionModel.dismissAction(withTitle: "Cancel")
    //sets the done button
    optionsPickerViewController.rightBarButtonAction = KODialogActionModel.dismissAction(withTitle: "Done", action: {
        [weak self](optionsPickerViewController: KOOptionsPickerViewController) in
        //get the selected option
        self?.favoriteFilmTypeIndex = optionsPickerViewController.optionsPicker.selectedRow(inComponent: 0)
    })

    //additional, sets the start value
    if let favoriteFilmTypeIndex = self?.favoriteFilmTypeIndex{
        optionsPickerViewController.optionsPicker.selectRow(favoriteFilmTypeIndex, inComponent: 0, animated: false)
    }
    }))
请参阅有关 KODialogViewController 的部分以获取更多有关自定义的信息。
KOItemsTablePickerViewController
从表中获取用户选择的选项的简单方法。

您可以使用预定义的函数在屏幕上展示项选择器,如下所示。Action viewLoaded 允许您设置 barView 的标题和左右按钮来接受或取消对话框的结果。请记住,您需要根据主视图的对齐方式设置 mainView.contentHeight 或 mainView.contentWidth,因为 UITableView 无法定义所需的大小。在默认情况下,您必须设置 mainView.contentHeight,因为 mainViewVerticalAlignment 与 .fill 不同。通过实现 UITableDataSource 设置和管理项需要由用户处理。
_ = presentItemsTablePicker(viewLoadedAction: KODialogActionModel(title: "Select your country", action: {
    [weak self](dialogViewController) in
    let itemsTablePickerViewController = dialogViewController as! KOItemsTablePickerViewController
    //sets contentHeight, because mainViewVerticalAlignment is other than .fill
    itemsTablePickerViewController.mainView.contentHeight = 300
    //sets the cancel button
    itemsTablePickerViewController.leftBarButtonAction = KODialogActionModel.dismissAction(withTitle: "Cancel")
    //sets the done button
    itemsTablePickerViewController.rightBarButtonAction = KODialogActionModel.dismissAction(withTitle: "Done", action: {
        [weak self](itemsTablePickerViewController : KOItemsTablePickerViewController) in
        if let countryIndex = itemsTablePickerViewController.itemsTable.indexPathForSelectedRow?.row{
            self?.countryIndex = countryIndex
        }
    })
    itemsTablePickerViewController.itemsTable.allowsSelection = true

    //handle UITableViewDataSource
    self?.countryCollectionsController.attach(tableView: itemsTablePickerViewController.itemsTable)
    }))
请参阅有关 KODialogViewController 的部分以获取更多有关自定义的信息。
KOItemsCollectionPickerViewController
从集合中获取用户选择的选项的简单方式。

您可以使用预定义的函数在屏幕上展示项选择器,如下所示。Action viewLoaded 允许您设置 barView 的标题和左右按钮来接受或取消对话框的结果。请记住,您需要根据主视图的对齐方式设置 mainView.contentHeight 或 mainView.contentWidth,因为 UICollectionView 无法定义所需的大小。在默认情况下,您必须设置 mainView.contentHeight,因为 mainViewVerticalAlignment 与 .fill 不同。通过实现 UICollectionViewDataSource 来设置和管理项需要由用户处理。
_ = presentItemsCollectionPicker(itemsCollectionLayout : UICollectionViewFlowLayout(), viewLoadedAction: KODialogActionModel(title: "Select your country", action: {
    [weak self](dialogViewController) in
    guard let sSelf = self else{
        return
    }

    let itemsCollectionPickerViewController = dialogViewController as! KOItemsCollectionPickerViewController
    //sets contentHeight, because mainViewVerticalAlignment is other than .fill
    itemsCollectionPickerViewController.mainView.contentHeight = 300
    //sets the cancel button
    itemsCollectionPickerViewController.leftBarButtonAction = KODialogActionModel.dismissAction(withTitle: "Cancel")
    //sets the done button
    itemsCollectionPickerViewController.rightBarButtonAction = KODialogActionModel.dismissAction(withTitle: "Done", action:{
        [weak self](itemsCollectionPickerViewController : KOItemsCollectionPickerViewController) in
        if let countryIndex = itemsCollectionPickerViewController.itemsCollection.indexPathsForSelectedItems?.first?.row{
            self?.countryIndex = countryIndex
        }
    })
    itemsCollectionPickerViewController.itemsCollection.allowsSelection = true

    //handle UICollectionViewDataSource
    sSelf.countryCollectionsController.attach(collectionView: itemsCollectionPickerViewController.itemsCollection)
    //calculate collection size
    sSelf.countryCollectionsController.calculateCollectionSize(itemsCollectionPickerViewController.itemsCollection, availableWidth: sSelf.view.bounds.width, itemMaxWidth: 120)
    }))
请参阅有关 KODialogViewController 的部分以获取更多有关自定义的信息。
KODimmingTransition
使用暗淡视图进行展示的过渡。
使用非常简单,您只需要设置 UIViewController 的 transitioningDelegate。
let dimmingTransition = KODimmingTransition()
...
viewController.transitioningDelegate = dimmingTransition
viewController.modalPresentationStyle = .customKODialogViewController有一个专门的字段,名称为customTransition。
dialogViewController.customTransition = KOVisualEffectDimmingTransition(effect: UIBlurEffect(style: .dark))可以通过处理setupPresentationControllerEvent和调整KODimmingPresentationController来更改附加设置。这必须在展示视图之前完成,例如在func present的postInit参数中。
(dialogViewController.customTransition as! KODimmingTransition).setupPresentationControllerEvent = {
    presentationController in
    //changes dimmingView color
    presentationController.dimmingView.backgroundColor = UIColor.red.withAlphaComponent(0.5)
    //changes the animations
    presentationController.dimmingShowAnimation = KOScaleAnimation(toValue: CGPoint(x: 1, y: 1), fromValue: CGPoint.zero)
    presentationController.dimmingHideAnimation = KOScaleAnimation(toValue: CGPoint.zero)
}可以通过如下的animationControllerPresenting和animationControllerDismissing参数来更改演示动画。
let viewToAnimationDuration : TimeInterval = 0.5
let viewToAnimation = KOScaleAnimation(toValue: CGPoint(x: 1, y: 1), fromValue: CGPoint.zero)
viewToAnimation.timingParameters = UISpringTimingParameters(dampingRatio: 0.6)
dialogViewController.customTransition?.animationControllerPresenting = KOAnimatedTransitioningController(duration: viewToAnimationDuration, viewToAnimation: viewToAnimation, viewFromAnimation: nil)您需要记住,在iOS中,UIModalPresentationStyle.custom具有全屏上下文,所以视图将始终具有全屏框架。您可以通过设置KODimmingPresentationController.keepFrameOfView来更改此设置。但是,直到您设置了KODimmingPresentationController.touchForwardingView.passthroughViews,外部的触摸将不会转发到下面。
KOVisualEffectDimmingTransition
过渡使用带有视觉效果减弱视图的演示。
它的工作原理与KODimmingTransition相同。但UIVisualEffect是通过参数KODimmingPresentationController.dimmingShowAnimation设置的,因此不要手动更改。
许可证
此项目采用MIT许可证,有关详情请参阅LICENSE文件。