IMYAOPTableName
无业务侵入,无逻辑侵入,业务端察觉不到 UITableView/UICollectionView 的 AOP 框架
理论上最低应该支持 iOS 5.0,但因为已经没有 iOS 7 之前的机器进行测试,所以不能保证没有问题。
这个框架自 2016 年起开始在美柚上使用,美柚总用户突破 1 亿,日活接近千万,代码的稳定性可以放心。如有需求或 bug,请提交 issues,我会尽快回复。

要求
- iOS 7+
- 仅 ARC
集成
如果您正在使用 CocoaPods,请只需将该行添加到您的 Podfile 中:
pod 'IMYAOPTableView'用法
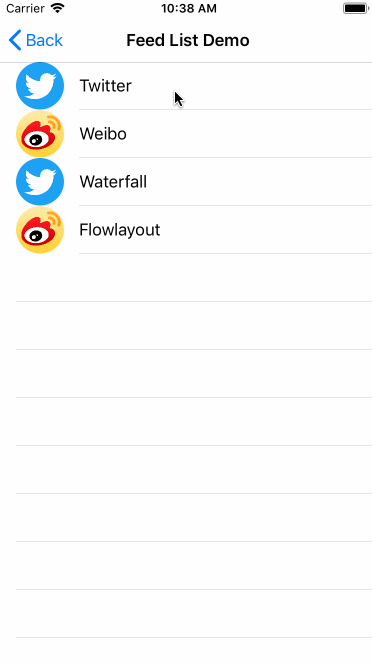
Demo: ./AOPTableViewDemo
《如何优雅的插入广告》
当应用发展到一定阶段,一般都会在内容流中插入广告来进行广告变现,这是每个应用都必须进行的过程。例如微信朋友圈、微博、QQ空间等等,就不一一列举了,一般有内容流的地方都会插入广告。

当您的应用也需要在现有业务中插入广告时,您会如何做?您可能会直接调用接口将广告与业务数据合并,然后下发给您。接下来在业务层进行各种判断。
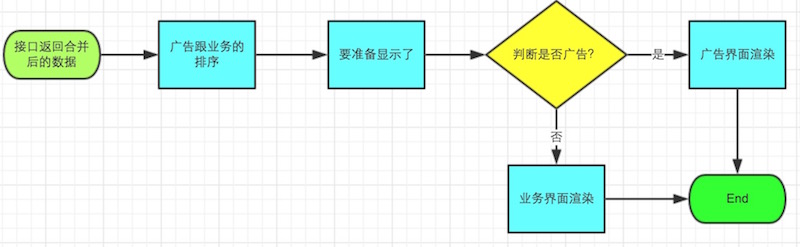
曾经这样做过的程序员应该很多,这很累吧?这样的插入方式需要修改各种代码,还可能在一个微小的角落直接调用了- (nullable __kindof UITableViewCell *)cellForRowAtIndexPath:(NSIndexPath *)indexPath;,然后返回的类型不正确,应用直接崩溃了。
出栏
现在这个框架就是为了解决这个问题而生的!该框架可能是首个开源的解决方案,我个人认为没有比这套更好的解决方案了。
要解决的问题有以下几点:
- 尽量减少对旧代码的修改,或者不修改。
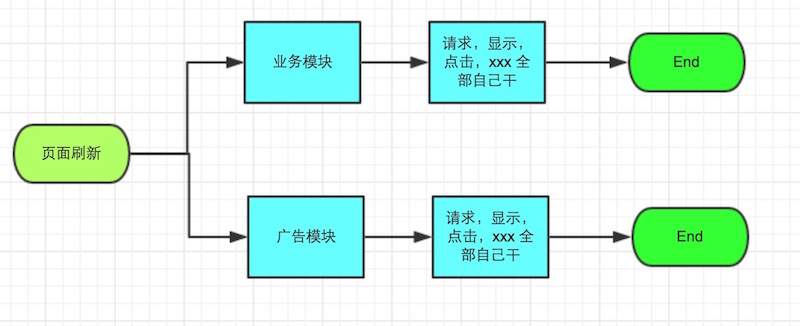
- 业务模块与广告模块分离。
- 广告模块可以获取真实的数据源。
- 易于上手。
用法:
我先下载了YYKit,YYKit的作者对代码的极致追求也是我喜欢的。主要原因是因为它里面包括了Feed(Twitter、微博)的demo,就像我们以前的业务代码一样,复杂且逻辑繁多。
开始
我对demo的具体代码并不了解,但是有了IMYAOPTableView,我就可以不需要了解其内部实现,就可以进行广告的插入。
首先找到了初始化Twitter、微博的ViewController的地方,并获取TableView的AopUtils,只需要3行代码,还有一个声明。
	///只是声明,防止提前释放
	@property (nonatomic, strong) IMYAOPDemo* aopDemo;

	///插入3行代码的地方
- (void)tableView:(UITableView *)tableView didSelectRowAtIndexPath:(NSIndexPath *)indexPath {
    NSString *className = self.classNames[indexPath.row];
    Class class = NSClassFromString(className);
    if (class) {
        UIViewController *ctrl = class.new;

        ///begin 插入3行代码
        self.aopDemo = [IMYAOPDemo new];
        UITableView* feedsTableView = [ctrl valueForKey:@"tableView"];
        self.aopDemo.aopUtils = feedsTableView.aop_utils;
        ///end

        ctrl.title = _titles[indexPath.row];
        self.title = @" ";
        [self.navigationController pushViewController:ctrl animated:YES];
    }
    [self.tableView deselectRowAtIndexPath:indexPath animated:YES];
}
这时候需要新建一个负责广告逻辑的类,简单地创建了一个IMYAOPDemo文件,核心代码是设置数据回调和选择插入的位置。
- (void)injectTableView {
    [self.aopUtils.tableView registerClass:[UITableViewCell class]  forCellReuseIdentifier:@"AD"];

    ///广告回调,跟TableView的Delegate,DataSource 一样。
    self.aopUtils.delegate = self;
    self.aopUtils.dataSource = self;

    dispatch_async(dispatch_get_main_queue(), ^{
        [self insertRows];
    });
}
///简单的rows插入
- (void)insertRows {
    NSMutableArray<IMYAOPTableViewInsertBody*>* insertBodys = [NSMutableArray array];
    ///随机生成了5个要插入的位置
    for (int i = 0 ; i< 5; i++) {
        NSIndexPath* indexPath = [NSIndexPath indexPathForRow:arc4random()%10 inSection:0];
        [insertBodys addObject:[IMYAOPTableViewInsertBody insertBodyWithIndexPath:indexPath]];
    }
    ///清空 旧数据
    [self.aopUtils insertWithSections:nil];
    [self.aopUtils insertWithIndexPaths:nil];

    ///插入 新数据, 同一个 row 会按数组的顺序 row 进行 递增
    [self.aopUtils insertWithIndexPaths:insertBodys];

    ///调用tableView的reloadData,进行页面刷新
    [self.aopUtils.tableView reloadData];
}
广告的回调实际上继承了TableView Delegate和DataSource,以保持与TableView回调的一致性,方便将旧的广告代码迁移过来。
	@protocol IMYAOPTableViewDelegate <UITableViewDelegate>;
	@protocol IMYAOPTableViewDataSource <UITableViewDataSource>
接下来是实现TableView的广告回调,实际上下面两个回调是不会调用的,因为是返回数据源数量的回调,这个是由业务模块决定的。但是为了xcode不警告,可以顺便写上。
	- (NSInteger)numberOfSectionsInTableView:(UITableView *)tableView;
	- (NSInteger)tableView:(UITableView *)tableView numberOfRowsInSection:(NSInteger)section;
-(UITableViewCell *)tableView:(UITableView *)tableView cellForRowAtIndexPath:(NSIndexPath *)indexPath {
    UITableViewCell* cell = [tableView dequeueReusableCellWithIdentifier:@"AD"];
    if(cell.contentView.subviews.count == 0) {
        CGFloat screenWidth = [UIScreen mainScreen].bounds.size.width;
        CGFloat imageHeight = 162 * (screenWidth/320.0f);
        UIImageView* imageView = [[UIImageView alloc] initWithFrame:CGRectMake(0, 0, screenWidth, imageHeight)];
        imageView.image = [UIImage imageNamed:@"aop_ad_image.jpeg"];
        imageView.layer.borderColor = [UIColor blackColor].CGColor;
        imageView.layer.borderWidth = 1;
        [cell.contentView addSubview:imageView];

        UILabel* label = [[UILabel alloc] initWithFrame:CGRectMake(200, 100, 200, 50)];
        label.text = @"不要脸的广告!";
        [cell.contentView addSubview:label];
    }
    return cell;
}

-(void)tableView:(UITableView *)tableView willDisplayCell:(UITableViewCell *)cell forRowAtIndexPath:(NSIndexPath *)indexPath {
    NSLog(@"插入的cell要显示啦");
}

- (void)tableView:(UITableView *)tableView didSelectRowAtIndexPath:(NSIndexPath *)indexPath {
    UIAlertView* alertView = [[UIAlertView alloc] initWithTitle:@"被点击了> <" message:[NSString stringWithFormat:@"我的位置: %@",indexPath] delegate:nil cancelButtonTitle:@"哦~滚" otherButtonTitles:nil];
    [alertView show];
}
UICollectionView 的用法类似,不再赘述
效果图(GIF,如果无法播放,可点击到新页面尝试)