Watson Developer Cloud Swift SDK

概述
Watson Developer Cloud Swift SDK 使移动开发者能够轻松构建 Watson 供电的应用程序。使用 Swift SDK,您可以利用 Watson 先进的人工智能、机器学习和深度学习技术来理解非结构化数据,并以新的方式与移动用户互动。
有许多资源可以帮助您使用 Swift SDK 构建您的第一个认知应用
服务
此 SDK 提供类和方法来访问以下 Watson 服务。
- 助理
- 比较和合规 *已被 Discovery 取代
- 发现
- 语言翻译 V3
- 自然语言分类器
- 自然语言理解
- 个性洞察力 *已被自然语言理解取代
- 语音转文本
- 文本转语音
- 语调分析器
- 视觉识别 *已被 Maximo Visual Inspection 取代
公告
自然语言分类器弃用
2021 年 8 月 9 日,IBM 宣布弃用自然语言分类器服务。从 2022 年 8 月 8 日起,该服务将不再可用。从 2021 年 9 月 9 日起,您将无法创建新的实例。现有的实例将支持到 2022 年 8 月 8 日。在此日期之前尚存在的任何实例将被删除。
作为替代方案,我们鼓励您考虑迁移到 IBM Cloud 上的自然语言理解服务,该服务利用深度学习从文本中提取数据和建议,例如关键词、类别、情感、情绪和语法,以及高级多标签文本分类功能,为您的业务或行业提供更丰富的洞见。更多信息,请参阅迁移到自然语言理解。
从 watsonplatform.net 更新端点 URL
在 watsonplatform.net 的 Watson API 端点 URL 将会更改,并将在 2021 年 5 月 26 日后停止工作。请更新您的调用以使用新的端点 URL。更多信息,请参阅https://cloud.ibm.com/docs/watson?topic=watson-endpoint-change。
个性洞察弃用
IBM Watson™ 个性洞察现已停止使用。从 2020 年 12 月 1 日起至一年内,您仍可使用 Watson 个性洞察。但从 2021 年 12 月 1 日起,该服务将不再可用。
作为替代方案,我们鼓励您考虑迁移到 IBM Watson™ 自然语言理解,这是一项在 IBM Cloud® 上使用深度学习从文本中提取数据和洞见的服务,包括关键词、类别、情感、情绪和语法等,为您的业务或行业提供洞见。更多信息,请参阅关于自然语言理解。
视觉识别已被弃用
IBM Watson™视觉识别服务已被终止。现有实例将支持到2021年12月1日,但自2021年1月7日起,您不能再创建实例。2021年12月1日创建的任何实例将被删除。
比较与合规已被弃用
IBM Watson™比较与合规服务已被终止。现有实例将支持到2021年11月30日,但自2020年12月1日起,您不能再创建实例。任何在2021年11月30日存在的实例将被删除。请考虑将比较与合规用例迁移到IBM Cloud上的Watson Discovery Premium。要开始迁移过程,请访问https://ibm.biz/contact-wdc-premium。
开始之前
- 您需要一个IBM Cloud账户。
要求
- Xcode 10.2+
- Swift 5.0+
- iOS 10.0+
安装
可以使用Swift Package Manager、CocoaPods或Carthage安装IBM Watson Swift SDK。
Swift 包管理器
从版本 4.0.2 开始,Watson 开发者云 Swift SDK 现在支持通过 Swift 包管理器使用所有服务。
在您屏幕顶部的 XCode 菜单栏中点击 文件 -> Swift 包 -> 添加包依赖关系,按照提示粘贴 github 网址 https://github.com/watson-developer-cloud/swift-sdk(如果适用,请使用最新主要版本),并确保只单击您计划使用的服务,否则您可能会遇到较长的构建时间。
要将服务导入到您的项目中
import AssistantV2
import DiscoveryV2
.
.
.(仅限语音转文本和文本转语音)使用 libogg 和 opus 库需要在该包安装之前采取额外的步骤。
-
您需要安装 Homebrew
-
安装
libogg和opus$ brew install libogg opus
-
必须根据当前库版本移除打包的动态库。
libogg 版本(截至撰写):1.3.4。
opus 版本(截至撰写):1.3.1
$ rm -f /usr/local/Cellar/libogg/1.3.4/lib/*.dylib$ rm -f /usr/local/Cellar/opus/1.3.1/lib/*.dylib -
替换当前安装的
libogg和libopus库rm -f /usr/local/Cellar/libogg/1.3.4/lib/libogg.a && cp ~/Downloads/libogg.a /usr/local/Cellar/libogg/1.3.4/lib
rm -f /usr/local/Cellar/opus/1.3.1/lib/libopus.a && cp ~/Downloads/libopus.a /usr/local/Cellar/opus/1.3.1/lib
-
如果您在执行上述步骤之前已导入包或遇到构建错误,则可能需要重新索引项目。从 XCode 项目文件中的
Swift 包下删除WatsonDeveloperCloud包;然后,从屏幕顶部的 XCode 菜单栏单击产品 -> 清除构建文件夹,最后重新安装包。 -
准备就绪!
CocoaPods
您可以使用 RubyGems 安装 Cocoapods
$ sudo gem install cocoapods如果您项目的根目录中尚无 Podfile,请使用 pod init 命令。要将 Swift SDK 通过 Cocoapods 安装,请将您将要使用的服务添加到 Podfile 中(以下示例将“MyApp”替换为您的应用程序名称)。以下示例显示了当前所有可用的服务;您的 Podfile 应仅包含您的应用程序将使用的服务。
use_frameworks!

target 'MyApp' do
    pod 'IBMWatsonAssistantV1', '~> 4.3.0'
    pod 'IBMWatsonAssistantV2', '~> 4.3.0'
    pod 'IBMWatsonCompareComplyV1', '~> 4.3.0'
    pod 'IBMWatsonDiscoveryV1', '~> 4.3.0'
    pod 'IBMWatsonLanguageTranslatorV3', '~> 4.3.0'
    pod 'IBMWatsonNaturalLanguageClassifierV1', '~> 4.3.0'
    pod 'IBMWatsonNaturalLanguageUnderstandingV1', '~> 4.3.0'
    pod 'IBMWatsonPersonalityInsightsV3', '~> 4.3.0'
    pod 'IBMWatsonSpeechToTextV1', '~> 4.3.0'
    pod 'IBMWatsonTextToSpeechV1', '~> 4.3.0'
    pod 'IBMWatsonToneAnalyzerV3', '~> 4.3.0'
    pod 'IBMWatsonVisualRecognitionV3', '~> 4.3.0'
end
运行 pod install 命令,并打开生成的 .xcworkspace 文件。要更新到新版本,请使用 pod update。
在将框架导入到源文件时,排除 IBMWatson 前缀和版本后缀。例如,在安装 IBMWatsonAssistantV1 后,在源文件中导入它作为 import Assistant。
有关使用 Cocoapods 的更多信息,请参阅 Cocoapods 指南。
Carthage
注意:苹果公司发布的新款M1芯片导致Carthage在XCode 11及以上版本中出现问题。在可预见的未来,我们无法通过Carthage支持XCode 11。我们建议您通过Swift Package Manager(优先推荐)或升级到XCode 12(其中有一个解决方案)进行安装。
注意:我们的框架当前无法通过Carthage在新的苹果Silicon Macs上运行。再次建议使用Swift Package Manager。
您可以使用Homebrew安装Carthage。
$ brew update
$ brew install carthage如果您的项目还没有Cartfile,请在使用项目的根目录下使用touch Cartfile命令。要使用Carthage安装IBM Watson Swift SDK,请将以下内容添加到您的Cartfile中。
github "watson-developer-cloud/swift-sdk" ~> 4.3.0
请根据此处提供的Carthage安装说明进行XCode 12解决方案的操作在此处。然后运行以下命令以构建依赖项和框架:
$ carthage.sh bootstrap --platform iOS注意,上述命令将下载并构建IBM Watson Swift SDK中所有的服务,需要一些时间。
按照以下步骤将框架链接到您的XCode项目
-
确保将构建的框架(仅适用于您的应用程序所需的那些服务)拖放到您的应用程序目标下的
General -> Frameworks, Libraries, and Embedded Content(XCode <= 10.x:General -> Linked Frameworks and Libraries)中,并在需要它们的源文件中导入。您可以从源目录下的./Carthage/Build/iOS找到这些.framework文件。 -
以下框架需要添加到您的应用程序中:
IBMSwiftSDKCore.framework您的应用程序将使用以下服务(
AssistantV1.framework,DiscoveryV1.framework等。)(仅语音转文本)
Starscream.framework。请确保将此框架添加到您的input.xcfilelist和output.xcfilelist中,以下将详细说明。 -
仅限XCode 12:在
Embed列确保每个框架都设置为Do Not Embed -
在您的应用程序目标的“构建阶段”设置选项卡的“+”图标上,点击并选择“New Run Script Phase”。创建一个运行脚本,在下面指定您的shell(如:/bin/sh),将以下内容添加到脚本区域
/usr/local/bin/carthage copy-frameworks -
创建名为
input.xcfilelist和output.xcfilelist的文件 -
将您要使用的框架的路径添加到
input.xcfilelist中。例如$(SRCROOT)/Carthage/Build/iOS/IBMSwiftSDKCore.framework $(SRCROOT)/Carthage/Build/iOS/DiscoveryV1.framework -
将已复制框架的路径添加到
output.xcfilelist中。例如$(BUILT_PRODUCTS_DIR)/$(FRAMEWORKS_FOLDER_PATH)/IBMSwiftSDKCore.framework $(BUILT_PRODUCTS_DIR)/$(FRAMEWORKS_FOLDER_PATH)/DiscoveryV1.framework指定了输出文件与输入文件的路径后,XCode只有在输入文件已更改或输出文件缺失时才需要运行脚本。这意味着如果您没有使用Carthage重构建框架,则干净的构建将更快。
-
将
input.xcfilelist的路径添加到Carthage运行脚本阶段的“输入文件列表”部分。这通常是$(SRCROOT)/input.xcfilelist -
将
output.xcfilelist的路径添加到Carthage运行脚本阶段的“输出文件列表”部分。这通常是$(SRCROOT)/output.xcfilelist
如果您的应用程序无法构建,因为它使用了与下载的SDK不同的Swift版本,请使用带有--no-use-binaries标志重新运行carthage.sh bootstrap命令。
认证
为了在Swift应用程序中使用IBM Watson服务,您需要进行认证。以下描述了您通常需要遵循的步骤。
步骤 1:获取凭证
使用IBM Watson服务的凭证通过IBM Cloud获取。您需要在认证您的Swift应用程序之前,创建一个有效的账户和服务实例。
您可以通过以下步骤访问您的实例的服务凭证
在此页面上,您将看到SDK访问您的服务实例所需的凭证。
步骤 2:在代码中进行认证
Watson Swift SDK使用Authenticator类来管理认证。根据您的偏好方法,有多个认证器的类型。
WatsonIAMAuthenticator(最常用)
WatsonIAMAuthenticator允许您使用IAM API密钥进行认证。这是在IBM Cloud中最常见的认证方式。《WatsonIAMAuthenticator》在初始化方法中需要一个apikey字符串。
示例
let authenticator = WatsonIAMAuthenticator(apiKey: "{apikey}")
let assistant = Assistant(version: "{version}", authenticator: authenticator)

...
WatsonBearerTokenAuthenticator
您可能需要提供令牌以用于服务的身份验证。在IBM Cloud上,您可以通过使用IAM服务并基于服务凭据生成令牌来实现此操作。在Cloud Pak for Data中,这将在单个服务实例中可用。
要在Swift应用程序中使用访问令牌进行身份验证,您可以使用 WatsonBearerTokenAuthenticator 并提供令牌。
示例
let authenticator = WatsonBearerTokenAuthenticator(bearerToken: "{token}")
let assistant = Assistant(version: "{version}", authenticator: authenticator)

...
WatsonCloudPakForDataAuthenticator
如果您正在使用IBM Cloud Pak for Data(CP4D)而不是公共IBM Cloud,则可以使用 WatsonCloudPakForDataAuthenticator 对您的CP4D集群进行身份验证。与接受Bearer令牌的WatsonBearerTokenAuthenticator不同,WatsonCloudPakForDataAuthenticator接受CP4D集群的用户名和密码。
示例
let authenticator = WatsonCloudPakForDataAuthenticator(username: "{username}", password: "{password}", url: "https://{cpd_cluster_host}{:port}")
let assistant = Assistant(version: "{version}", authenticator: authenticator)

...
Detecting authentication from environment variables
SDK可以从环境变量中提取服务凭据,例如VCAP_SERVICES环境变量或本地凭据文件。
要使用本地文件存储的凭据,请转到IBM Cloud上服务实例的管理选项卡,然后点击下载凭据的按钮。文件将被命名为ibm-credentials.env。将此文件添加到项目可访问的位置。对于iOS应用程序,请确保将其添加到应用程序目标中。
let assistant = Assistant(version: "your-version") // by calling the init method without an authenticator, the SDK will search for environment variables

...如果您的项目正在使用多个Watson服务,则可以将ibm-credentials.env文件的内容合并到单个文件中。文件中的行可以添加、删除或重新排序,但每行内容的原始内容不得更改。
Further info on authentication methods
要了解更多详细信息以及较少使用的身份验证方法,请参阅IBM Swift SDK Core代码中的Authenticator实现。
Custom Service URLs
您可以通过修改serviceURL属性来设置自定义服务URL。当在特定区域运行实例或通过代理连接时,可能需要自定义服务URL。
例如,以下是连接到位于德国的 Watson Assistant 实例的方法
let authenticator = WatsonIAMAuthenticator(apiKey: "{apikey}")
let assistant = Assistant(version: "{version}", authenticator: authenticator)

assistant.serviceURL = "https://api.eu-de.assistant.watson.cloud.ibm.com"
禁用 SSL 证书验证
对于 Watson Cloud Pak for Data (CP4D),如果您使用的是自签名证书,则可能需要禁用 SSL 主机名验证。每个服务类都有一个 disableSSLVerification 方法,允许您这样做。
let authenticator = WatsonCloudPakForDataAuthenticator(username: "{username}", password: "{password}", url: "https://{cpd_cluster_host}{:port}")
let assistant = Assistant(version: "{version}", authenticator: authenticator)

assistant.disableSSLVerification()注意:disableSSLVerification() 目前在 Linux 上不受支持。
获取事务 ID
在调试与 IBM 支持相关的问题时,您可能需要提供 事务 ID 以帮助 IBM 确定需要调试的 API 调用。
每个 SDK 调用都会返回一个包含 X-Global-Transaction-Id 报头的事务 ID 的响应。连同服务实例区域,此 ID 帮助支持团队从相关的日志中解决问题。
您可以通过以下模式访问报头
import AssistantV1

let authenticator = WatsonIAMAuthenticator(apiKey: "{apikey}")
let assistant = Assistant(version: "2020-04-01", authenticator: authenticator)
assistant.serviceURL = "{url}"

let input = MessageInput(text: "Hello")

// let's say this request isn't working and you need the transaction ID
assistant.message(workspaceID: "{workspace_id}", input: input) {
  response, error in

  print(response?.headers["X-Global-Transaction-Id"]!)

  ...
}
然而,当 API 因某些原因没有返回响应时,事务 ID 不可用。在这种情况下,您可以在请求中设置自己的事务 ID。例如,在以下示例中将 <my-unique-transaction-id> 替换为唯一的事务 ID。
let authenticator = WatsonIAMAuthenticator(apiKey: "{apikey}")
let assistant = Assistant(version: "2020-04-01", authenticator: authenticator)
assistant.serviceURL = "{url}"

let input = MessageInput(text: "Hello")

assistant.message(workspaceID: "{workspace_id}", input: input, headers: ["X-Global-Transaction-Id": "<my-unique-transaction-id>"]) {
  response, error in

  print(response?.headers["X-Global-Transaction-Id"]!)

  ...
}
自定义报头
可以向 Watson 服务发送不同的报头。例如,Watson 服务会记录请求及其结果以改进服务,但您可以通过包括 X-Watson-Learning-Opt-Out 报头来退出此功能。
我们在每个类中公开了一个 defaultHeaders 公共属性,以便用户可以轻松自定义他们的报头
let authenticator = WatsonIAMAuthenticator(apiKey: "{apikey}")
let assistant = Assistant(version: "{version}", authenticator: authenticator)

assistant.defaultHeaders = ["X-Watson-Learning-Opt-Out": "true"]
每个服务方法还接受一个可选的 headers 参数,它是一个字典,包含将与请求一起发送的请求报头。
问答
如果您的 API 存在问题或有关于 Watson 服务的疑问,请参阅 Stack Overflow。
推荐项目
我们喜欢突出使用此SDK的酷炫开源项目!如果您想让您项目被加入列表,请随意创建一个链接到该项目的issue。
同步执行
默认情况下,SDK以异步方式执行所有网络操作。如果您的应用程序需要同步执行,您可以使用一个DispatchGroup。例如:
let dispatchGroup = DispatchGroup()
dispatchGroup.enter()
assistant.message(workspaceID: workspaceID) { response, error in
	if let error = error {
        print(error)
    }
    if let message = response?.result else {
        print(message.output.text)
    }
    dispatchGroup.leave()
}
dispatchGroup.wait(timeout: .distantFuture)
在XCode中处理PNG和CgBI文件
当处理iOS项目时,您可能需要将PNG图像添加到XCode的资源包中。默认情况下,XCode在优化步骤中将PNG文件转换为苹果的CgBI文件格式。
接受PNG图像作为输入文件的Watson服务(视觉识别、比较和遵守)无法处理CgBI文件。在某些情况下,传递已编码为CgBI的PNG将导致HTTP错误,在另一些情况下(视觉识别)将导致没有结果的200 成功。
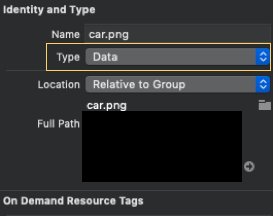
如何绕过资源文件的CgBI编码
为了绕过CgBI编码并保持PNG文件以与Watson服务良好兼容的格式,请选择XCode中的PNG文件,并在文件检查器中将类型属性修改为数据。
例如
CgBI处理计划
未来,我们将在Swift SDK内探索处理CgBI和PNG之间转换的选项,但目前这尚不可用。
Objective-C 兼容性
请参阅这篇教程获取更多关于在 Objective-C 应用程序中消耗 Watson Developer Cloud Swift SDK 的信息。
Linux 兼容性
要使用 Watson SDK 于您的 Linux 项目中,请按照Swift 包管理器说明操作。请注意,语音识别和语音合成不支持,因为它们依赖于 Linux 上不可用的框架。
贡献
我们欢迎任何形式和所有的帮助!如果您想贡献,请阅读我们的CONTRIBUTING文档,了解如何开始。
许可
此库根据 Apache 2.0 许可。完整许可文本可在LICENSE中找到。
此 SDK 旨在与 Apple iOS 产品一起使用,并旨在与官方授权的 Apple 开发工具一起使用。