HealthKitSampleGenerator 1.0.4
| 测试已测试 | ✓ |
| 语言语言 | SwiftSwift |
| 许可证 | MIT |
| 发布上次发布 | 2015年11月 |
| SPM支持 Swift Package Manager (SPM) | ✗ |
由 Michael Seemann 维护。
HealthKitSampleGenerator 1.0.4
- 由
- Michael Seemann
HealthKitSampleGenerator
健康数据导出/导入/ Sample 生成器(Swift + UI)
用于健康数据的简单易用生成器,可用于代码和模拟器中。它可以通过将当前健康数据导出到 json 配置文件、从 json 文件重新创建配置文件以及随机创建完整健康数据配置文件来支持您。因此,您有可重复测试数据来测试您的代码和令人惊叹的 Health-App 的 UI。当然,您还可以导出真实设备的健康数据。
状态
- 健康数据导出 100%
- 健康数据导入 100%
- 健康数据生成 0%(-> 版本 2.0.0)
下一步
- 健康数据生成器
导出/导入健康数据
示例应用程序
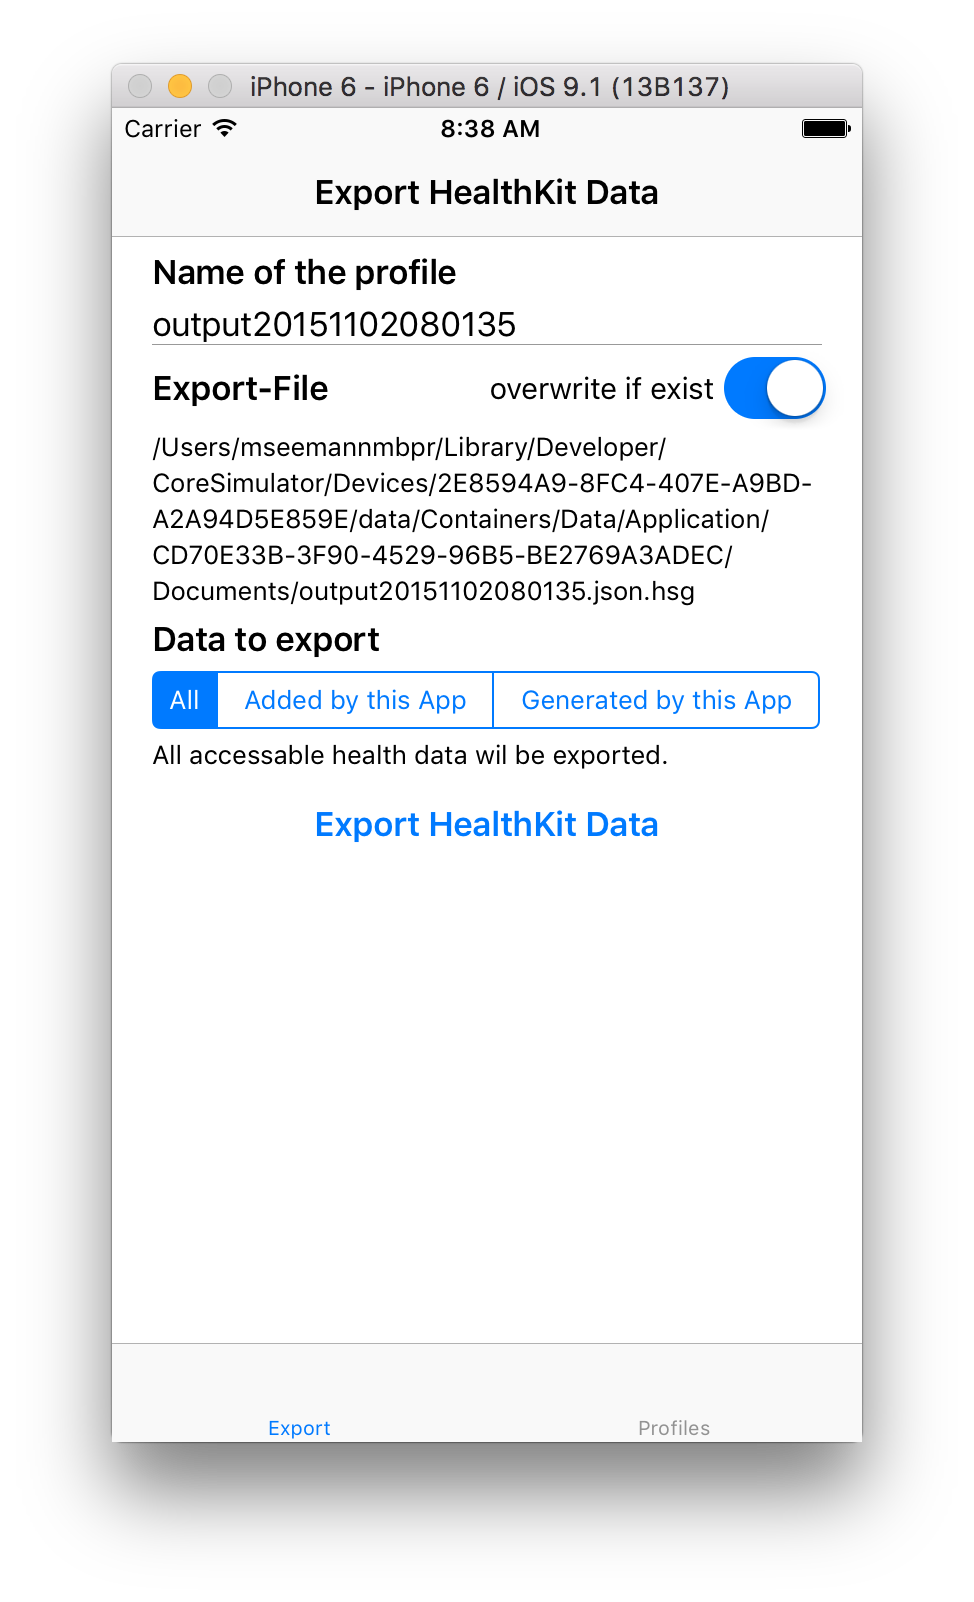
只需构建并运行应用程序。点击“导出 HealthKit 数据”按钮。这将在应用程序文档文件夹中创建一个 JSON 文件。如果您使用的是模拟器,您可以在 mac 上访问导出文件 - 文件的路径在应用程序 UI 中可见。要在真实设备上访问导出的数据,您需要打开 iTunes,转到设备的应用程序部分,并在共享文档部分查看。从那里,您可以在 mac 上保存文件。
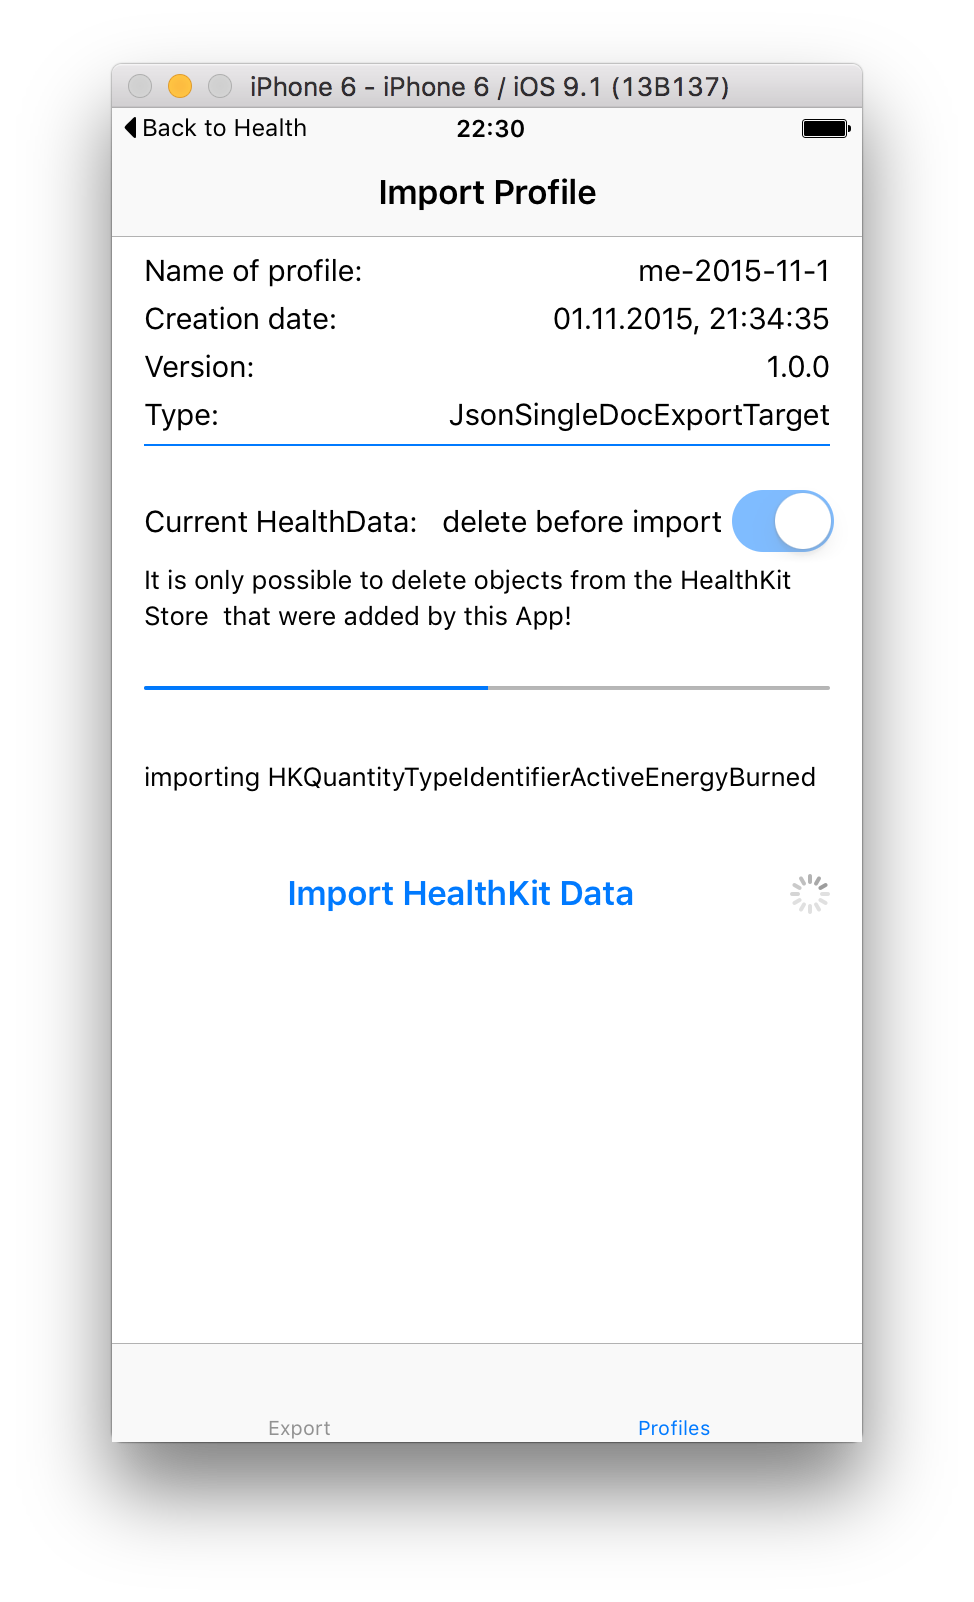
要导入数据,转到应用程序的配置文件标签。在那里,您将看到存储在应用程序文档文件夹中的所有配置文件。选择一个,然后点击“导入 HealthKit 数据”按钮。如果需要,您可以从健康数据存储中删除之前导入的所有数据。请注意,应用程序只能删除存储在应用程序中的数据。
显然,HealthKit Store 不是一个设计用来处理/写入大量数据的工具。您将注意到,在导入数据时,应用程序将占用大量内存。此外,您还会在导入后看到处理器负载非常高。看起来 HealthKit 在为图表创建摘要时处理所有数据。
使用 API 导出
如果您不想使用示例应用程序或需要在您自己的应用程序中集成导出和导入,您可以使用导出/导入 API。
import Foundation
import HealthKit
import HealthKitSampleGenerator


// setup an output file name
let fm              = NSFileManager.defaultManager()
let documentsUrl    = fm.URLsForDirectory(.DocumentDirectory, inDomains: .UserDomainMask)[0]
let outputFileName  = documentsUrl.URLByAppendingPathComponent("export.json").path!

// create a target for the export - all goes in a single json file
let target          = JsonSingleDocAsFileExportTarget(outputFileName: outputFileName, overwriteIfExist:true)

// configure the export
var configuration   = HealthDataFullExportConfiguration(profileName: "Profilname", exportType: HealthDataToExportType.ALL)
configuration.exportUuids = false //false is default - if true, all uuids will be exported too

// create your instance of HKHeakthStore
let healthStore     = HKHealthStore()
// and pass it to the HealthKitDataExporter
let exporter        = HealthKitDataExporter(healthStore: healthStore)

// now start the import.
exporter.export(

    exportTargets: [target],

    exportConfiguration: configuration,

    onProgress: {
        (message: String, progressInPercent: NSNumber?) -> Void in
        // output progress messages
        dispatch_async(dispatch_get_main_queue(), {
            print(message)
        })
    },

    onCompletion: {
        (error: ErrorType?)-> Void in
        // output the result - if error is nil. everything went well
        dispatch_async(dispatch_get_main_queue(), {
            if let exportError = error {
                print(exportError)
            }
        })
    }
)
使用 API 导入
// create a profile from an output file
let profile = HealthKitProfile(fileAtPath:outputUrl)

// or read the profiles from disk
let profiles = HealthKitProfileReader.readProfilesFromDisk(documentsUrl)

if profiles.count > 0 {

    let importer = HealthKitProfileImporter(healthStore: healthStore)

    importer.importProfile(
        profiles[0],
        deleteExistingData: true,
        onProgress: {
            (message: String, progressInPercent: NSNumber?)->Void in
            NSOperationQueue.mainQueue().addOperationWithBlock(){
                // output progress information
            }
        },
        onCompletion: {
            (error: ErrorType?)-> Void in
            NSOperationQueue.mainQueue().addOperationWithBlock(){
                if let exportError = error {
                    print(exportError)
                } else {
                    //everything went well
                }
            }
        }
    )
}
两种情况下的输出格式都是 json。请参见以下示例
{
    "metaData": {
        "creationDate": 1446486924969.1,
        "profileName": "output20151102185522",
        "version": "1.0.0",
        "type": "JsonSingleDocExportTarget"
    },
    "userData": {
        "bloodType": 1,
        "fitzpatrickSkinType": 1,
        "biologicalSex": 2,
        "dateOfBirth": 341967600000
    },
    "HKQuantityTypeIdentifierStepCount": [
        {
            "unit": "count",
            "sdate": 1446486720000,
            "value": 200
        }
    ],
    "HKQuantityTypeIdentifierHeartRate": [
        {
            "unit": "count/min",
            "sdate": 1446486720000,
            "value": 62
        }
    ],
    "HKQuantityTypeIdentifierFlightsClimbed": [
        {
            "unit": "count",
            "sdate": 1446486600000,
            "value": 1
        }
    ],
    "HKQuantityTypeIdentifierBodyMass": [
        {
            "unit": "kg",
            "sdate": 1446486600000,
            "value": 80
        }
    ],
    "HKWorkoutTypeIdentifier": [
        {
            "workoutActivityType": 37,
            "totalEnergyBurned": 90,
            "edate": 1446486660000,
            "duration": 840,
            "workoutEvents": [],
            "totalDistance": 3218.688,
            "sdate": 1446485820000
        }
    ]
}
有关导出/导入格式的说明
- HealthKit中的每个HKSample都有一个开始日期和结束日期。如果结束日期与开始日期不同,才会导出结束日期。
- 您可以将导出配置为包括每个HKSample的唯一uuid。这将增加导出文件的大小!
- 如果样本是相关关系的一部分,则不会以它们自己的类型导出,因为它们属于相关关系。例如:HKCorrelationTypeIdentifierBloodPressure类型是HKQuantityTypeIdentifierBloodPressureSystolic类型和HKQuantityTypeIdentifierBloodPressureDiastolic类型的相关性。这就是为什么它们不以数量类型导出,而是以HKCorrelationTypeIdentifierBloodPressure下的子对象导出。以同样的方式处理HKCorrelationTypeIdentifierFood。
- 请注意,在HealthKit存储中写入或删除数据有一些限制。无法写入特性数据(例如,出生日期、血型等)。此外,您无法写入HKCategoryTypeIdentifierAppleStandHour和HKQuantityTypeIdentifierNikeFuel样本。
- 如果要从导出中排除某些数据,只需不允许示例应用程序访问这些数据即可。
要求
iOS 9.0, XCode 7
安装
HealthKitSampleGenerator通过CocoaPods提供。要安装它,只需在Podfile中添加以下行:
pod "HealthKitSampleGenerator"作者
Michael Seemann,[email protected]
许可证
HealthKitSampleGenerator可在MIT许可证下使用。有关更多信息,请参阅LICENSE文件。