FlipConnectSDK 0.4.1
| 测试已测试 | ✗ |
| 语言语言 | SwiftSwift |
| 许可 | MIT |
| 发布最新发布 | 2017年8月 |
| SwiftSwift 版本 | 3.0 |
| SPM支持 SPM | ✗ |
由 Munir Wanis 维护。
FlipConnectSDK 0.4.1
- 由
- Munir Wanis
FlipConnectSDK

更多信息请参考:[FlipConnectSDK 参考文档](http://cocoadocs.org/docsets/FlipConnectSDK/)
如何工作
FlipConnectSDK 通过接收 ClientId 和 ClientSecret 来打开一个登录页面,其登录方式就像 Facebook 和 Google 的认证一样。用户会在我们的环境中登录,如果成功后,用户将被重定向到预先配置的 RedirectURI 应用程序。
当应用程序打开时,SDK 将在 URI 中查找有效的参数,然后可以发出请求以检索 accesToken、refreshToken 和 userKey。
有了这些信息,您将能够访问用户信息!
安装
手动安装
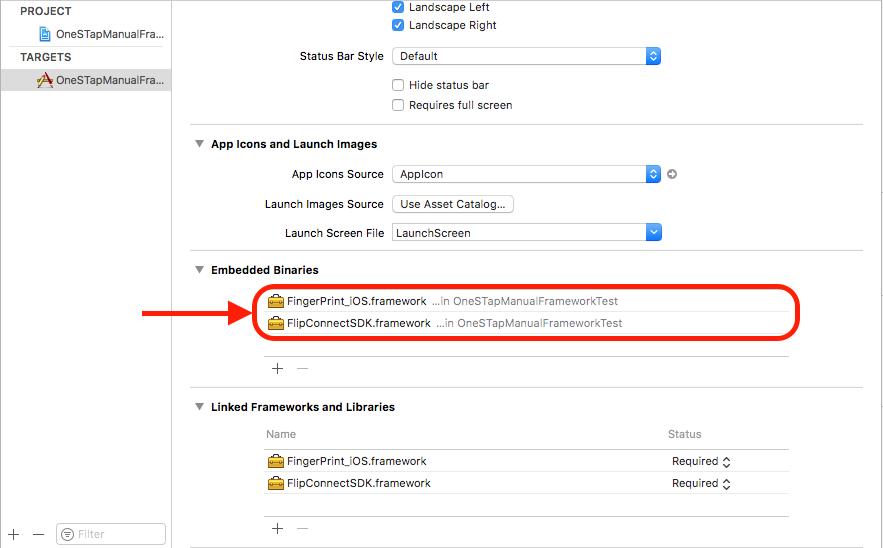
为了手动安装 SDK,需要下载 .zip FlipConnectSDK_Manual.framework.zip 并将其放入 Embeded Binaries 中,如下图中所示
然后,需要下载脚本 remove_unused_archs.sh 并将其添加到 Build Phases > Run Script 的以下命令中:bash "${SRCROOT}/remove_unused_archs.sh"(请记住,在此情况下,脚本位于项目根目录中,如果您的脚本位于其他文件夹中,则需要指定该路径),如下图中所示
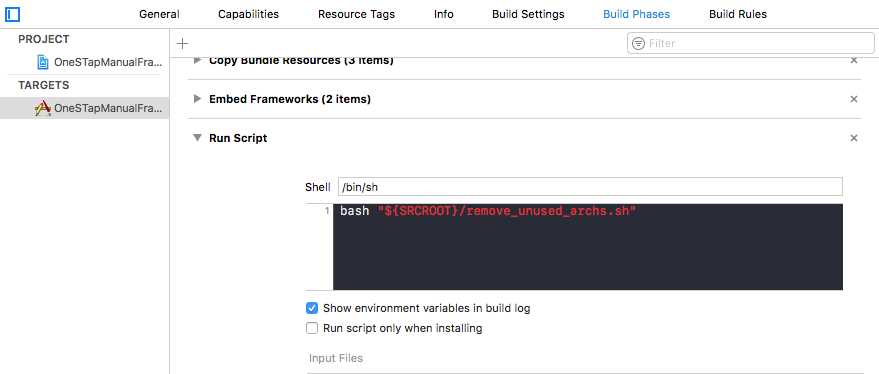
这些步骤是必需的,因为这两个框架都包含了所有的架构,但是苹果商店不允许发布带有模拟器架构的应用程序,因此这个后置脚本确保在发布时移除了这些架构,以确保发布没有问题。
可用性
配置
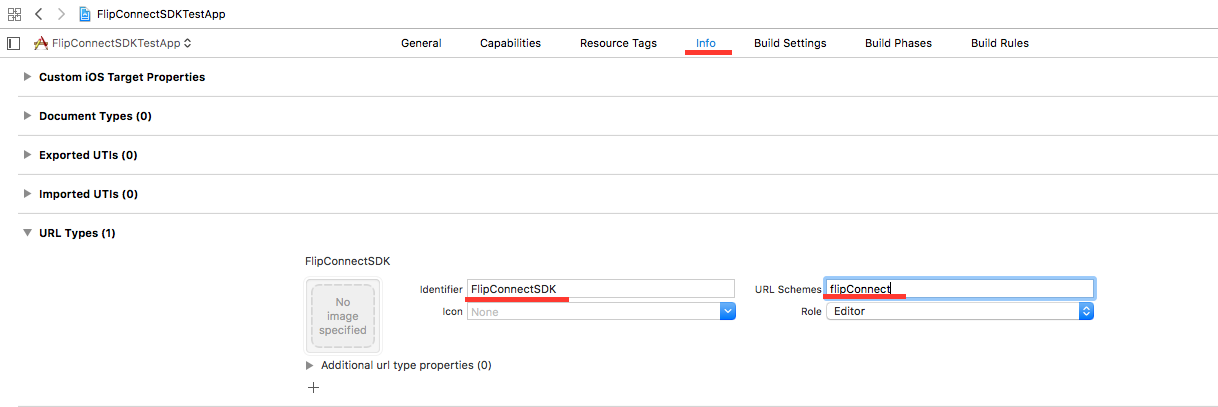
在您的项目中,点击“信息”标签页并选择Url Types。在 identifier 字段中,名称必须是 FlipConnectSDK,在 URL Schemes 中,您应该放入为您的 Merchant URI 设置的方案,例如
如果已注册的商户URI是 flipConnect://application,则您的Url Schemes应该为 flipConnect;换句话说,所有 在 :// 之前 的内容都是您的Url Scheme。
初始化
在app启动时需要在 AppDelegate.swift 中初始化登录类,并粘贴以下代码。参数factgerPrintID是可选的,只有当您想使用反欺诈功能时才需要传递。
func application(_ application: UIApplication, didFinishLaunchingWithOptions launchOptions: [UIApplicationLaunchOptionsKey: Any]?) -> Bool {
        let config = FCConfiguration(
            environment: .sandbox,
            clientID: "{SEU_CLIENT_ID}",
            clientSecret: "{SEU_CLIENT_SECRET}",
            redirectURI: "{SUA_REDIRECT_URI}", // EX: flipconnect://application
            fingerPrintID: "{SEU_FINGERPRINT_ID}"
        )
        do {
            _ = try FCLogin.shared()
        } catch {
            print(error)
        }
        return true
}初始化之后,如果传递了factgerPrintID,factgerPrintSessionID将被设为,您可以通过调用以下代码来访问它,如下面示例所示
if let fingerPrintSessionID = UserDefaults.standard.fingerPrintSessionID {
    print(fingerPrintSessionID)
}
ViewController
在这里开始登录。某些动作会激活登录页面;如果一切工作正常,网页将重定向回应用程序。
您可以使用自己的按钮或使用我们的按钮。
在您的ViewController中导入SDK
import FlipConnectSDK使用按钮登录
class ViewController: UIViewController {
var fcLogin: FCLogin!
override func viewDidLoad() {
super.viewDidLoad()
do {
fcLogin = try FCLogin.shared()
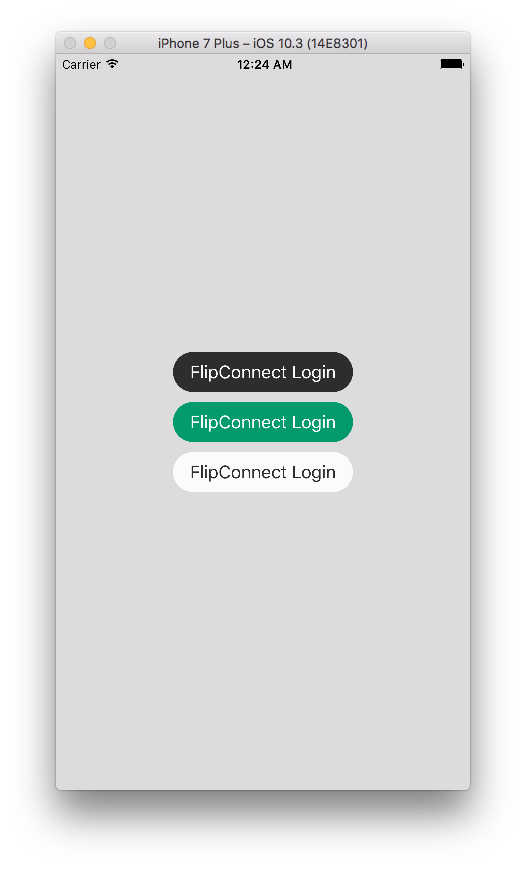
let loginBtn = fcLogin.loginWithButton(center: view.center, frame: CGRect(x: 0, y: 0, width: 180, height: 40), color: .darkGray, title: "FlipConnect Login")
view.addSubview(loginBtn)
} catch {
print(error)
}
}
}按钮看起来可能像这些其中一个
使用openLoginURL登录
class ViewController: UIViewController {

    var fcLogin: FCLogin!

    override func viewDidLoad() {
        super.viewDidLoad()

        do {
            fcLogin = try FCLogin.shared()
        } catch {
            print(error)
        }
    }

    @IBAction func loginAction(_ sender: UIButton) {
        self.fcLogin.loginButtonClicked()
    }
}
向反欺诈发送FingerPrint数据(可选)
由于FingerPrintID在初始化类FCLogin时被发送,向反欺诈发送数据非常简单,只需在您的app中添加权限,让用户释放对联系人以及位置的访问权限。
注意:请记住,如果您的app请求了用户不必要的权限,苹果可能会对此提出异议,不要请求您app将不会用到的用户数据权限,比如用户联系人的数据,好吗?
要请求用户访问权限,只需将这些行添加到Info.plist中

将数据传输到临时配置文件
如果您想将已经在您的数据库中的注册数据传输,以方便用户注册并过渡到我们的系统,您可以使用变量temporaryProfile来填写用户的注册信息。
要使用它,只需将一个TemporaryProfile类型的值分配给类FCLogin中的变量temporaryProfile。
class ViewController: UIViewController {

    var fcLogin: FCLogin!

    override func viewDidLoad() {
        super.viewDidLoad()

        do {
            fcLogin = try FCLogin.shared()

        let formatter = DateFormatter()
            formatter.dateFormat = "yyyy/MM/dd"
            let birthdate = formatter.date(from: "1997/12/17")

            let personalData = PersonalData(birthdate: birthdate, genderType: .masculine, country: "br", dependentCount: 3)!
            let vehicle = Vehicle(licensePlate: "LNY-4266", licensePlateCity: "Rio de Janeiro", licensePlateState: "RJ", licensePlateCountry: "br")!
            let vehicle2 = Vehicle(licensePlate: "LNY-4266", licensePlateCity: "Rio de Janeiro", licensePlateState: "RJ", licensePlateCountry: "br")!
            let document = Document(documentType: .cpf, documentNumber: "12345678901")!
            let phone = Phone(phoneType: .mobile, fullNumber: "26113328")!
            let phone2 = Phone(phoneType: .home, fullNumber: "26113328")!
            let address = Address(street: "Conde de Bonfim", number: "800", addressType: .work, city: "Rio de Janeiro", state: "RJ", country: "br")!
            let address2 = Address(street: "Conde de Bonfim", number: "800", addressType: .work, city: "Rio de Janeiro", state: "RJ", country: "br")!

            let temporaryProfile = TemporaryProfile()
            temporaryProfile.addresses = [address, address2]
            temporaryProfile.documents = [document]
            temporaryProfile.personalData = personalData
            temporaryProfile.phones = [phone, phone2]
            temporaryProfile.vehicles = [vehicle, vehicle2]

        fcLogin.temporaryProfile = temporaryProfile
        } catch {
            print(error)
        }
    }

    @IBAction func loginAction(_ sender: UIButton) {
        self.fcLogin.loginButtonClicked()
    }
}或在调用方法loginWithButton()时进行赋值
class ViewController: UIViewController {

    var fcLogin: FCLogin!

    override func viewDidLoad() {
        super.viewDidLoad()

        do {
            fcLogin = try FCLogin.shared()

        let formatter = DateFormatter()
            formatter.dateFormat = "yyyy/MM/dd"
            let birthdate = formatter.date(from: "1997/12/17")

            let personalData = PersonalData(birthdate: birthdate, genderType: .masculine, country: "br", dependentCount: 3)!
            let vehicle = Vehicle(licensePlate: "LNY-4266", licensePlateCity: "Rio de Janeiro", licensePlateState: "RJ", licensePlateCountry: "br")!
            let vehicle2 = Vehicle(licensePlate: "LNY-4266", licensePlateCity: "Rio de Janeiro", licensePlateState: "RJ", licensePlateCountry: "br")!
            let document = Document(documentType: .cpf, documentNumber: "12345678901")!
            let phone = Phone(phoneType: .mobile, fullNumber: "26113328")!
            let phone2 = Phone(phoneType: .home, fullNumber: "26113328")!
            let address = Address(street: "Conde de Bonfim", number: "800", addressType: .work, city: "Rio de Janeiro", state: "RJ", country: "br")!
            let address2 = Address(street: "Conde de Bonfim", number: "800", addressType: .work, city: "Rio de Janeiro", state: "RJ", country: "br")!

            let temporaryProfile = TemporaryProfile()
            temporaryProfile.addresses = [address, address2]
            temporaryProfile.documents = [document]
            temporaryProfile.personalData = personalData
            temporaryProfile.phones = [phone, phone2]
            temporaryProfile.vehicles = [vehicle, vehicle2]

        let btn = fcLogin.loginWithButton(center: view.center, temporaryProfile: temporaryProfile)

        view.addSubview(btn)
        } catch {
            print(error)
        }
    }

    @IBAction func loginAction(_ sender: UIButton) {
        self.fcLogin.loginButtonClicked()
    }
}
这样,当用户注册时,注册页面就会打开并填写已有的数据。
AppDelegate
成功登录后,将通过这里进行重定向并携带一些登录信息;但只有当方法 handleRedirect(fromURL: URL) 无错误执行后,我们才能恢复到Token Data。
class AppDelegate: UIResponder, UIApplicationDelegate {
    func application(_ app: UIApplication, open url: URL, options: [UIApplicationOpenURLOptionsKey : Any] = [:]) -> Bool {
        do {
            let fcLogin = try FCLogin.shared()
            fcLogin.handleRedirect(fromURL: url) { tokenResponse, error in

                guard error == nil else {
                    print(error!)
                    return
                }

                if tokenResponse.success {
                    // DO SOMETHING
                    print(tokenResponse.accessToken!)
                    print(tokenResponse.userKey!)
                    print(tokenResponse.refreshToken!)
                }
            }
        } catch {
            print(error)
        }

        return true
    }
}如果您输入以下内容,您应该能够使用accessToken,refreshToken和userKey
let accessToken: String? = UserDefaults.standard.accessToken
let userKey: String? = UserDefaults.standard.userKey
let refreshToken: String? = UserDefaults.standard.refreshToken
刷新令牌
如果令牌过期,只需执行以下操作。如果发生错误或tokenResponse的成功值是false,则表示请求失败。
do {
    let fcLogin = try FCLogin.shared()

    FCApi.requestTokenRefresh() { tokenResponse, error in
        guard error == nil else {
            print("Refresh with NO success")
            print(err!)
            return
        }

            if tokenResponse.success {
                // DO SOMETHING
                print("Tokens Refreshed")
                print(tokenResponse.accessToken!)
                print(tokenResponse.userKey!)
                print(tokenResponse.refreshToken!)
            } else {
                // ERROR HANDLING
                var message = ""
                for report in tokenResponse.operationReport {
                    message.append("\(report.field) - \(report.message)")
                }
            }
    }

} catch {
    print(error)
}
验证令牌
如果返回错误或 tokenResponse 成功结果为 false,则是因为请求失败或验证的令牌无效。
do {
    let fcLogin = try FCLogin.shared()

    FCApi.requestTokenVerification() { tokenResponse, error in
            guard error == nil else {
                print("Verify with NO success")
        print(err!)
                return
            }

            if tokenResponse.success {
                // DO SOMETHING
                print(tokenResponse.accessToken!)
                print(tokenResponse.userKey!)
            } else {
                // ERROR HANDLING
                var message = ""
                for report in tokenResponse.operationReport {
                    message.append("\(report.field) - \(report.message)")
                }
                print(message)
            }
    }

} catch {
    print(error)
}
吊销令牌
要吊销用户的令牌,只需像以下示例一样调用 requestTokenRevocation 方法。
do {
    let fcLogin = try FCLogin.shared()

        FCApi.requestTokenRevocation() { tokenResponse, error in
            guard error == nil else {
                self.showErrorDialog("\(error!)")
                return
            }

            if tokenResponse.success {
                // DO SOMETHING
                print("Logged out")
            } else {
                // ERROR HANDLING
                var message = ""
                for report in tokenResponse.operationReport {
                    message.append("\(report.field) - \(report.message)")
                }
                print(message)
            }

} catch {
    print(error)
}
贡献
Pull Requests 欢迎提交!
问题
有任何问题、疑惑或建议?打开 issue!