FKTableView
简化UITableView的使用与RAC相结合
安装方法:
pod 'FKTableView'
使用
对于iOS开发人员来说,编写UI过程中最熟悉、使用最多的无疑是UITableView,相信大家对它的使用也已经是得心应手:
- 分配一个实例
- 将其放入视图中
- 指定数据源
- 实现数据源的协议方法,返回cell
- 定义一个名为MyTableViewCell的类,它继承自UITableViewCell
因此,您为您编写了以下代码:
- (UITableView *)tableView {
    if (!_tableView) {
        _tableView = [[UITableView alloc]initWithFrame:CGRectZero style:UITableViewStylePlain];
        _tableView.dataSource = self;
    }
    return _tableView;
}

- (void)viewDidLoad {
    [super viewDidLoad];

    [self.view addSubview:self.tableView];
    [self.tableView mas_makeConstraints:^(MASConstraintMaker *make) {
        make.edges.mas_equalTo(UIEdgeInsetsZero);
    }];
}

- (NSInteger)tableView:(UITableView *)tableView numberOfRowsInSection:(NSInteger)section
{
    return self.dataArr.count;
}

- (UITableViewCell *)tableView:(UITableView *)tableView cellForRowAtIndexPath:(NSIndexPath *)indexPath
{
    static NSString *identifier = @"mycell";
    MyTableViewCell *cell = [tableView dequeueReusableCellWithIdentifier:identifier];

    if (!cell) {
        cell = [[MyTableViewCell alloc] initWithStyle:UITableViewCellStyleSubtitle reuseIdentifier:identifier];
    }

    [cell bindData:self.dataArr[indexPath.row]];

    return cell;
}
由于篇幅有限,此处未展示MyTableViewCell的代码,请自行脑补。
经过以上几个步骤,一个UITableView就会在手机上显示出来,真是牛气。
那么,让我们进一步探讨,如果产品经理要求表格的一行可以点击以触发一个子业务。您肯定会想:嗯,这不是难事,我可是老手。于是,您写下了以下代码:
- 首先,您为表格指定了一个代理:
- (UITableView *)tableView {
    if (!_tableView) {
        _tableView = [[UITableView alloc]initWithFrame:CGRectZero style:UITableViewStylePlain];
        _tableView.dataSource = self;
        _tableView.delegate = self;
    }
    return _tableView;
}
- 然后,下面是代理类的实现方法:
- (void)tableView:(UITableView *)tableView didSelectRowAtIndexPath:(NSIndexPath *)indexPath
{
    //巴拉巴拉
}
完美,大功告成。
但是产品经理仍然不满意,大中午的,您刚打开王者荣耀,游戏还在检测更新,他又来烦您了,这次他要在表格的每一行都加一个按钮,然后点击这个按钮可以处理相应的业务(比如订单的支付按钮?)。这时,您虽然有点不高兴,但您还是能搞定,这难不倒您。于是,您关闭王者荣耀,整理了一下思路:
- 在MyTableViewCell中添加一个button
- 为这个button添加一个addTarget,并指定action
- 在button的action中进行相关操作
- 第3步提到的事情需要通过block回调到ViewController中执行,以保证cell的业务无关性
- 在ViewController中实现cell的block,执行相关业务
嗯,就是这样,虽然稍微有点麻烦,尤其是写那个block,但是您还是编写了以下代码:
- 首先,在您的MyTableViewCell中定义了一个属性:
@property (nonatomic, copy) void(^payBlock)(void);
- 然后,在您的ViewController的cellFor函数中添加了一行代码:
cell.payBlock = ^{
    //布拉布拉
};
由于篇幅限制,此处省略了cell内部代码的修改。
这时,您松了一口气,认为事情应该完美无缺了吧,一看小米手环4彩屏版,靠,午休只剩半小时了,赶紧睡觉。
然而,意料之外的是,产品经理又来了,他说,这些订单要分块,每一块都有一个标题,标题颜色还不一样,标题旁边还有一个操作按钮,点击后可以对这块订单进行批量支付。
你以为这就结束了?当然没有,他还要求订单列表的上方展示一个活动横幅,用于公司爆款产品的推荐,横幅里面也有一个按钮,点击后可以跳转到相应产品页面。
相信到了这里,您心中已经有一两只草泥马在奔跑(注意文明用语),但您还是强忍着怒气,又开始了整理思路:
- 首先,要把表格改为分组模式
- 要实现numberOfSectionsInTableView和- (nullable UIView *)tableView:(UITableView *)tableView viewForHeaderInSection:(NSInteger)section这两个方法,然后使用dequeueReusableHeaderFooterViewWithIdentifier方法等
- 要创建一个MySectionView,用作viewForHeaderInSection的返回值
- 在MySectionView中编写button,然后就是block回调到ViewController
这还没完,您还需要整理横幅的思路,要写类似于self.tableHeaderView = [MyBanner new];的代码,处理这个视图的高度,里面的按钮操作,还需要写block回调外部。
您甚至能想到,也许产品经理还会提出在某个cell后面随机插入一条广告的cell等等变态需求,您的情绪为此低落到谷底。
想到这里,尽管思路仍很清晰,但您有没有感觉,您已经不太想写这些代码了,总感觉有点烦恼,但又说不上为什么。
那么,我们来总结一下所遇到的问题。
以上是常规写法,相信许多开发者也是这样做的。但这里有几个问题:
- 需要手动指定数据源和代理
- ViewController需要遵循UITableViewDataSource和UITableViewDelegate这两个协议
- 需要实现TableViewDataSource和TableViewDelegate的大量协议方法,而且为每个列表页面都编写这些方法非常冗余,烦不烦?
- cell、sectionview、headerView中的操作需要使用block回调,问问喜欢写block的人数有几个?
- 如果是数据源不同的表格,需要临时删除某个cell或添加一个新的cell,或调整两个cell的显示顺序,您至少需要修改以下两个方法之一:
- (NSInteger)tableView:(UITableView *)tableView numberOfRowsInSection:(NSInteger)section和- (UITableViewCell *)tableView:(UITableView *)tableView cellForRowAtIndexPath:(NSIndexPath *)indexPath,如果是分组类型的表,您还需要修改- (NSInteger)numberOfSectionsInTableView:(UITableView *)tableView,如果每个cell都有点击操作,您还需要修改- (void)tableView:(UITableView *)tableView didSelectRowAtIndexPath:(NSIndexPath *)indexPath,哦,这么多,改错了就可能出现错误。 - 逻辑分层非常模糊,有些人直接在cell中将业务逻辑写入,你说是对是错,我认为这因人而异。还有些人在cell中直接定义一个类方法,直接返回cell,像这样:
+ (instancetype) cellForTableView:(UITableView*) tableView model:(MyOrderModel*)model - 如果要添加tableview的header,需要自己考虑它的高度,因为它看起来总不那么听话。
- 一旦业务逻辑发生变化,我上面提到的3~7都可能会发生变化。
那么,如何解决这些问题呢?
答案:https://github.com/wochen85/FKTableView
前置条件:
- 对RAC稍有了解,不了解也没关系~~
- 没了
Round 1 核心函数
所有这些函数都在UITableView+FKExtension.h这个头文件里:
@interface UITableView (FKExtension)
-(void) fk_configRowModels:(NSArray<FKCellModel*>*) rowModels;
-(void) fk_configSectionModels:(NSArray<FKSectionModel*>*) sectionModels;
-(void) fk_configHeader:(nullable FKViewModel*) headerModel height:(CGFloat) height;
-(void) fk_configFooter:(FKViewModel*) footerModel height:(CGFloat) height;
@end
以上函数暂时不加解释,后面会一步步用到。
Round 2 简单示例
假设我们要做一个设置页面,它的样子是这样的:
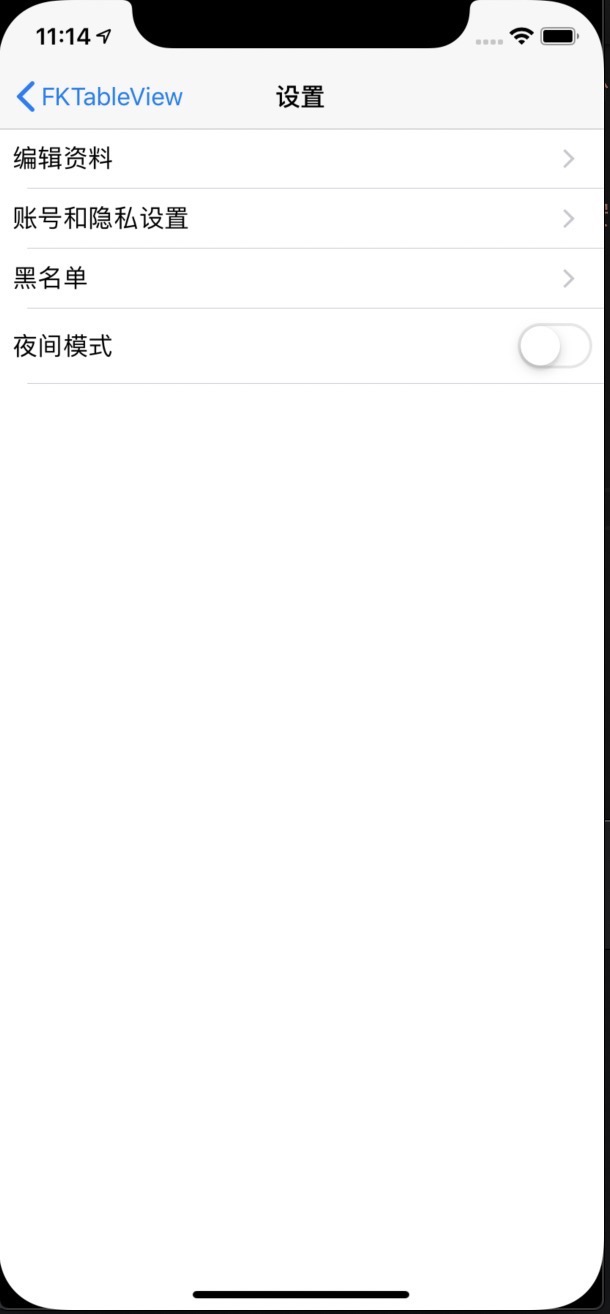
按照以下步骤操作:
- 创建tablewview
@interface SettingViewController ()
@property (nonatomic, strong) UITableView* tablewView;
@end

- (UITableView *)tablewView
{
    if (!_tablewView)
    {
        _tablewView = [[UITableView alloc] initWithFrame:CGRectZero style:UITableViewStylePlain];
        _tablewView.tableFooterView = [UIView new];
    }
    return _tablewView;
}
注意,此处SettingViewController不需要遵守UITableViewDataSource和UITableViewDelegate这两个协议
- 将tablewView添加到view中,进行布局
- (void)viewDidLoad {
    [super viewDidLoad];
    self.title = @"设置";
    [self configTableView];
}

- (void) configTableView
{
    [self.view addSubview:self.tablewView];
    [self.tablewView mas_makeConstraints:^(MASConstraintMaker *make) {
        make.edges.mas_equalTo(UIEdgeInsetsZero);
    }];
}
到此,操作步骤与你以前应该相差不大。
- 由于列表前3项的布局相同,所以可以使用同一个cell:
@interface TextSettingCell()
@property (nonatomic, strong) UILabel* txtLabel;
@end

@implementation TextSettingCell
- (UILabel *)txtLabel
{
    if (!_txtLabel)
    {
        _txtLabel = [UILabel new];
    }
    return _txtLabel;
}

- (instancetype)initWithStyle:(UITableViewCellStyle)style reuseIdentifier:(NSString *)reuseIdentifier
{
    self = [super initWithStyle:style reuseIdentifier:reuseIdentifier];
    if (self)
    {
        [self initSubViews];
        self.accessoryType = UITableViewCellAccessoryDisclosureIndicator;
    }
    return self;
}

-(void) initSubViews
{
    [self.contentView addSubview:self.txtLabel];
    [self.txtLabel mas_makeConstraints:^(MASConstraintMaker *make) {
        make.left.mas_equalTo(10);
        make.top.mas_equalTo(10);
        make.bottom.mas_equalTo(-10);
        make.right.mas_equalTo(-10);
    }];
}
- 类似地,创建一个switch的cell,用于夜间模式切换
@interface SwitchSettingCell()
@property (nonatomic, strong) UILabel* txtLabel;
@property (nonatomic, strong) UISwitch* switcher;
@end

@implementation SwitchSettingCell

- (UILabel *)txtLabel
{
    if (!_txtLabel)
    {
        _txtLabel = [UILabel new];
    }
    return _txtLabel;
}

- (UISwitch *)switcher
{
    if (!_switcher)
    {
        _switcher = [UISwitch new];
    }
    return _switcher;
}

- (instancetype)initWithStyle:(UITableViewCellStyle)style reuseIdentifier:(NSString *)reuseIdentifier
{
    self = [super initWithStyle:style reuseIdentifier:reuseIdentifier];
    if (self)
    {
        [self initSubViews];
    }
    return self;
}

-(void) initSubViews
{
    [self.contentView addSubview:self.txtLabel];
    [self.contentView addSubview:self.switcher];
    [self.txtLabel mas_makeConstraints:^(MASConstraintMaker *make) {
        make.left.mas_equalTo(10);
        make.top.mas_equalTo(10);
        make.bottom.mas_equalTo(-10);
        make.right.mas_equalTo(self.switcher.mas_left);
    }];

    [self.switcher mas_makeConstraints:^(MASConstraintMaker *make) {
        make.right.mas_equalTo(-10);
        make.top.mas_equalTo(10);
        make.bottom.mas_equalTo(-10);
    }];
}
到这一步,你可能忍不住想在ViewController中实现UITableViewDataSource的协议方法,但你要记住,我们在第一步并没有设置tableView的数据源。
- BOSS登场,定义TextSettingCellModel类
@interface TextSettingCellModel : FKCellModel
@property (nonatomic, copy) NSString* txt;
- (instancetype)initWithText:(NSString*) txt;
@end

@implementation TextSettingCellModel
- (instancetype)initWithText:(NSString*) txt
{
    self = [super init];
    if (self) {
        _txt = txt;
    }
    return self;
}
@end
注意这个命名,它只是在TextSettingCell类名后面加上“Model”字样。这是FKTableView的默认命名约定,当然,你也可以不这样写,后面会说。
- 同理,定义SwitchSettingCellModel类
@interface SwitchSettingCellModel : FKCellModel
@property (nonatomic, copy) NSString* txt;
@property (nonatomic) BOOL switchOn;
- (instancetype)initWithText:(NSString*) txt switchOn:(BOOL)switchOn;
@end

@implementation SwitchSettingCellModel
- (instancetype)initWithText:(NSString*) txt switchOn:(BOOL)switchOn
{
    self = [super init];
    if (self) {
        _txt = txt;
        _switchOn = switchOn;
    }
    return self;
}
@end
- 在TextSettingCell中处理数据绑定
- 包含
#import <FKTableView.h>和#import "TextSettingCellModel.h"头文件 - 包含
FKTableView.h头文件后,敲击“FK”字样,则会弹出父类的(void)fk_bindModel:(id)model函数 - 修改函数参数类型为
TextSettingCellModel,并完成绑定数据的代码:
- (void)fk_bindModel:(TextSettingCellModel*)model
{
    self.txtLabel.text = model.txt;
}
- 同理,
SwitchSettingCell也进行数据绑定
- (void)fk_bindModel:(SwitchSettingCellModel*)model
{
    self.txtLabel.text = model.txt;
    self.switcher.on = model.switchOn;
}
- 现在可以处理ViewController了,先包含头文件
#import <FKTableView.h>,然后在原来的configTableView函数中,加入以下代码
    //编辑资料
    TextSettingCellModel* editProfileCellModel = [[TextSettingCellModel alloc] initWithText:@"编辑资料"];
    //账号和隐私设置
    TextSettingCellModel* accountCellModel = [[TextSettingCellModel alloc] initWithText:@"账号和隐私设置"];
    //黑名单
    TextSettingCellModel* blackListCellModel = [[TextSettingCellModel alloc] initWithText:@"黑名单"];
    //夜间模式
    SwitchSettingCellModel* nightModeCellModel = [[SwitchSettingCellModel alloc] initWithText:@"夜间模式" switchOn:NO];

    [self.tablewView fk_configRowModels:@[editProfileCellModel, accountCellModel, blackListCellModel, nightModeCellModel]];
至此,这个页面就算完成了。由于力求讲解详细,所以步骤列得有点多,实际上总结起来只有以下几步:
- 创建cell
- 创建cellModel
- cell绑定cellModel
- viewcontroller中进行
fk_configRowModels
下面,让我们再来看看这么做的好处在哪里。
- 不需要指定viewcontroller遵守
UITableViewDataSource和UITableViewDelegate协议 - 不需要手动指定tableView的
dataSource和delegate - 不需要实现UITableViewDataSource和UITableViewDelegate的一堆协议方法
那么dataSource和delegate到底是谁呢?没有这两者,tableView自己玩不转啊。没错,就是要让它自己玩转,自己的事情自己做。具体可以查看下
UITableView+FKExtension.m文件。
Round 3 处理cell的点击事件
你不会又忍不住想要实现- (void)tableView:(UITableView *)tableView didSelectRowAtIndexPath:(NSIndexPath *)indexPath这个方法了?
现在只需要修改cellModel,来订阅它的selectedSignal信号:
    //编辑资料
    TextSettingCellModel* editProfileCellModel = [[TextSettingCellModel alloc] initWithText:@"编辑资料"];
    [editProfileCellModel.selectedSignal subscribeNext:^(FKCellModel * _Nullable x) {
        [SVProgressHUD showInfoWithStatus:@"你点击了\"编辑资料\""];
    }];
    //账号和隐私设置
    TextSettingCellModel* accountCellModel = [[TextSettingCellModel alloc] initWithText:@"账号和隐私设置"];
    [accountCellModel.selectedSignal subscribeNext:^(FKCellModel * _Nullable x) {
        [SVProgressHUD showInfoWithStatus:@"你点击了\"账号和隐私设置\""];
    }];
    //黑名单
    TextSettingCellModel* blackListCellModel = [[TextSettingCellModel alloc] initWithText:@"黑名单"];
    [blackListCellModel.selectedSignal subscribeNext:^(FKCellModel * _Nullable x) {
        [SVProgressHUD showInfoWithStatus:@"你点击了\"黑名单\""];
    }];
有没有这种感觉,cell的数据存储和操作存储都放到了cellModel里去。其实我们的tableView要做的事情无非也就是这两样:展示数据(固定的或从网络获取的)、对用户的操作作出响应。
优点:
- 不用再实现
- (void)tableView:(UITableView *)tableView didSelectRowAtIndexPath:(NSIndexPath *)indexPath这个方法
第4轮:处理cell内部的控件事件
这里我们以“夜间模式”这个cell的UISwitch控件的切换作为演示。
- 不可避免地要加入
_switcher的事件监听
- (UISwitch *)switcher
{
    if (!_switcher)
    {
        _switcher = [UISwitch new];
        [_switcher addTarget:self action:@selector(switchChanged:) forControlEvents:UIControlEventValueChanged];
    }
    return _switcher;
}

-(void) switchChanged:(UISwitch*) sender
{

}
你是不是想在
switchChanged这个函数里写block?现在不要这么做,因为定义block是非常麻烦的,所以你可以像下面这样做。
- 在
SwitchSettingCellModel中定义一个RACSubject
@property (nonatomic, strong) RACSubject<NSNumber*>* switchChangeSignal;

- (RACSubject<NSNumber*>*)switchChangeSignal
{
    if (!_switchChangeSignal)
    {
        _switchChangeSignal = [RACSubject subject];
    }
    return _switchChangeSignal;
}
有没有发现和前面用到的
selectedSignal很像,确实是一样的用法,只不过selectedSignal这个属性每个cellModel都可能需要支持(毕竟大部分的cell都可能需要支持列表项点击),所以我把它放在了基类FKCellModel中。
- 通过上面定义的
switchChangeSignal信号将cell中UISwitch的点击事件发送出去
-(void) switchChanged:(UISwitch*) sender
{
    SwitchSettingCellModel* cellModel = (SwitchSettingCellModel*)self.fk_viewModel;
    [cellModel.switchChangeSignal sendNext:@(sender.isOn)];
}
fk_viewModel是每个UIView+FKExtension扩展的一个属性,它的类型就是你之前在编写fk_bindModel函数时所指定的。
- 在ViewController中监听cellModel的这个
switchChangeSignal信号
    //夜间模式
    SwitchSettingCellModel* nightModeCellModel = [[SwitchSettingCellModel alloc] initWithText:@"夜间模式" switchOn:NO];
    [nightModeCellModel.switchChangeSignal subscribeNext:^(NSNumber * _Nullable x) {
        [SVProgressHUD showInfoWithStatus:x.boolValue?@"夜间模式 打开":@"夜间模式 关闭"];
    }];
下面列举一下这种方法的优点:
- 不需要在cell中定义block,而是将cell内部事件处理交由cellModel处理,cellModel再通过信号传递给ViewController。
第5轮:应对业务改变
- cell顺序的改变
例如,“黑名单”和“编辑资料”需要调换位置,我们先来看看传统写法需要做什么
首先,需要修改- (UITableViewCell *)tableView:(UITableView *)tableView cellForRowAtIndexPath:(NSIndexPath *)indexPath这个方法,然后通过indexPath来判断哪一行显示哪一个,容易出错。
其次,因为点击事件是在- (void)tableView:(UITableView *)tableView didSelectRowAtIndexPath:(NSIndexPath *)indexPath这个方法中处理的,所以这里也需要修改,还是通过indexPath来判断哪一行被点击了,一不小心就出错了。
那么,FKTableView怎么做呢?你只需要更改fk_configRowModels这个方法参数数组的顺序即可。
[self.tablewView fk_configRowModels:@[blackListCellModel, accountCellModel, editProfileCellModel, nightModeCellModel]];
真是太爽了!不会出错,你不用考虑点击事件,因为它已经被封装在了cellModel中,无论它被放到tableview的哪个位置,它的点击事件都会跟随。
- 删除某个cell
你可能已经想到了,这和cell顺序改变没有太大区别,你只需要把要删除的cell对应的cellModel从数组中删除即可,比如要删除“夜间模式”。
[self.tablewView fk_configRowModels:@[editProfileCellModel, accountCellModel, blackListCellModel]
- 新增一个cell
不再赘述,直接给fk_configRowModels的参数增加一个cellModel即可。
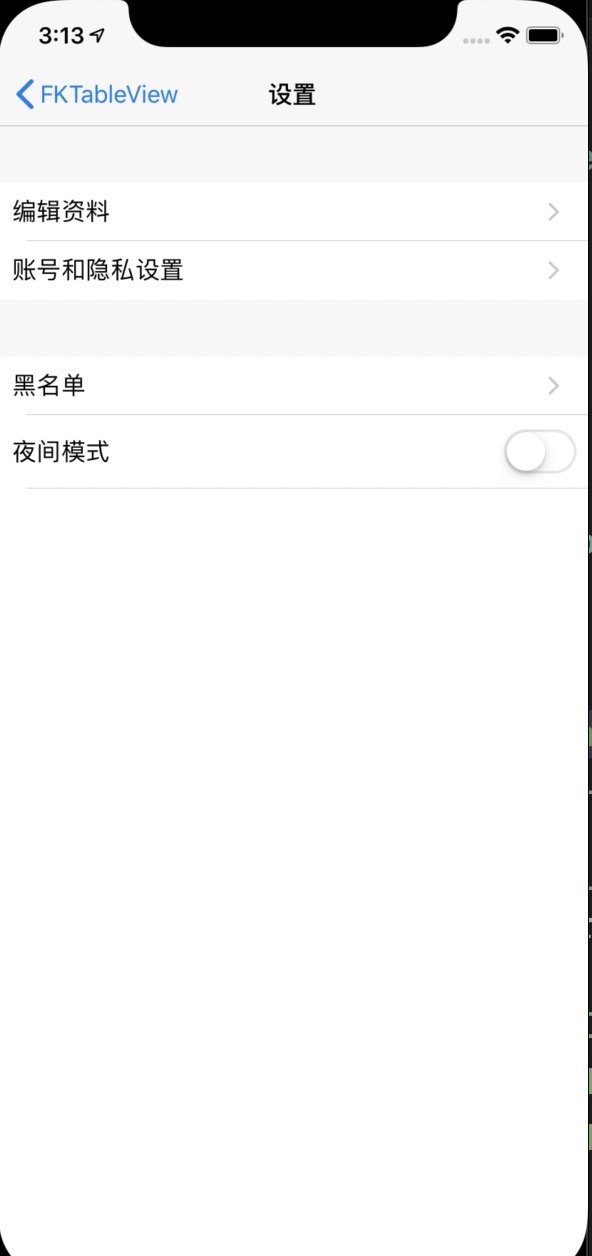
第6轮:设置section的header和footer
例如,需要将“编辑资料”和“账号和隐私设置”放入一个section,而“黑名单”和“夜间模式”放入另一个section,如下所示:
你只需在ViewController中,将原来的
[self.tablewView fk_configRowModels:@[editProfileCellModel, accountCellModel, blackListCellModel, nightModeCellModel]];
替换为:
    FKSectionHeaderFooterConfig* basicSectionHeadConfig = [[FKSectionHeaderFooterConfig alloc] initWithHeight:40 headFooterModel:nil];
    FKSectionModel* basicSectionModel = [[FKSectionModel alloc] initWithRowModels:@[editProfileCellModel, accountCellModel] headConfig:basicSectionHeadConfig footConfig:nil];
    FKSectionHeaderFooterConfig* otherSectionHeadConfig = [[FKSectionHeaderFooterConfig alloc] initWithHeight:40 headFooterModel:nil];
    FKSectionModel* otherSectionModel = [[FKSectionModel alloc] initWithRowModels:@[blackListCellModel, nightModeCellModel] headConfig:otherSectionHeadConfig footConfig:nil];
    [self.tablewView fk_configSectionModels:@[basicSectionModel, otherSectionModel]];
搞定!产品说,要给第一个section加个标题“基本设置”,第二个section加个标题“其他设置”,如下所示:
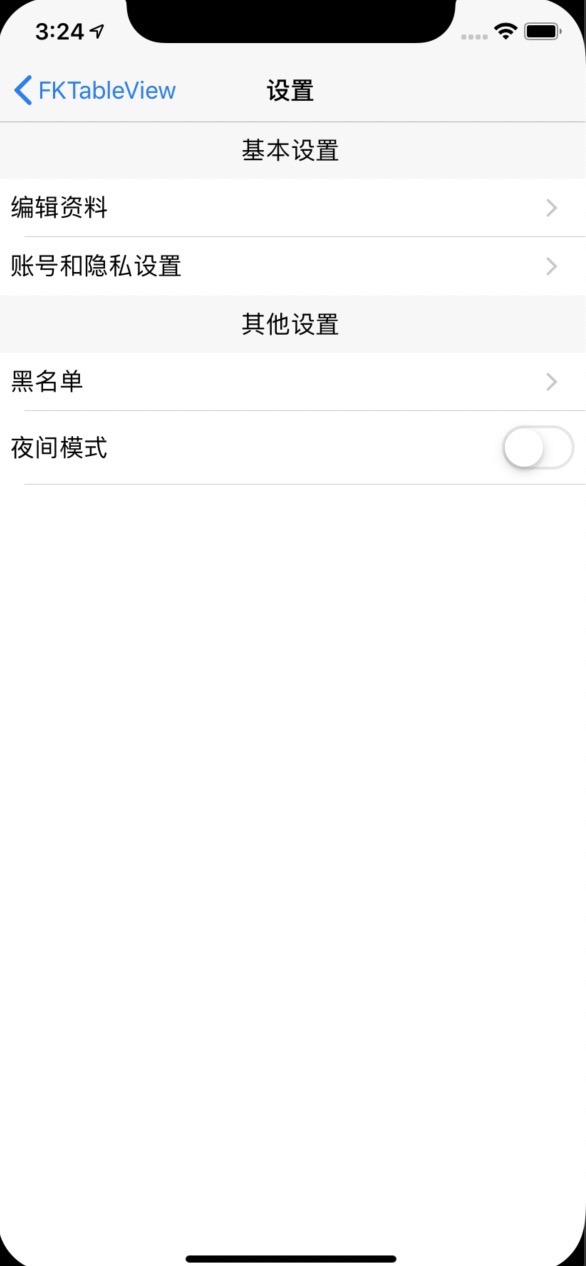
那么你只需要给FKSectionHeaderFooterConfig指定一下headFooterModel参数,具体如下:
    FKHeaderFooterCommonModel* basicSectionHeaderModel = [[FKHeaderFooterCommonModel alloc] initWithText:[[NSAttributedString alloc] initWithString:@"基本设置"] bgColor:[UIColor clearColor] textAlignment:NSTextAlignmentCenter];
    FKSectionHeaderFooterConfig* basicSectionHeadConfig = [[FKSectionHeaderFooterConfig alloc] initWithHeight:40 headFooterModel:basicSectionHeaderModel];
    FKSectionModel* basicSectionModel = [[FKSectionModel alloc] initWithRowModels:@[editProfileCellModel, accountCellModel] headConfig:basicSectionHeadConfig footConfig:nil];

    FKHeaderFooterCommonModel* otherSectionHeaderModel = [[FKHeaderFooterCommonModel alloc] initWithText:[[NSAttributedString alloc] initWithString:@"其他设置"] bgColor:[UIColor clearColor] textAlignment:NSTextAlignmentCenter];
    FKSectionHeaderFooterConfig* otherSectionHeadConfig = [[FKSectionHeaderFooterConfig alloc] initWithHeight:40 headFooterModel:otherSectionHeaderModel];
    FKSectionModel* otherSectionModel = [[FKSectionModel alloc] initWithRowModels:@[blackListCellModel, nightModeCellModel] headConfig:otherSectionHeadConfig footConfig:nil];

    [self.tablewView fk_configSectionModels:@[basicSectionModel, otherSectionModel]];
FKHeaderFooterCommonModel是为了考虑到tableview经常会用到这种只带有一个背景色和一串文本的sectionheader和sectionfooter而内置到框架中的。至于其他类型的sectionheader和sectionfooter,可以参考FKHeaderFooterCommonModel和FKHeaderFooterCommon的写法,自己进行自定义。GitHub上的工程代码也有提供的样例(如MyBookSectionHeadFootModel类和BookSectionHeadFoot类),这里不再赘述。
此外,FKHeaderFooterCommonModel这个类还提供了一个clickSignal,可以用来发送section的点击事件。你可以这样使用:
[basicSectionHeaderModel.clickSignal subscribeNext:^(id  _Nullable x) {
        [SVProgressHUD showInfoWithStatus:@"你点击了基本设置"];
    }];
第7轮:cellModel和cell不遵守类命名约定
前面提到过,cell与cellModel需要遵守命名约定,具体来说就是cell如果是xxx,那么对应的model就应该是xxxModel(注意M大写)。但是存在这么一种情况,你可能不想这么做,或者粗心大意写错了,那么你可以在cellModel中重写一下- (NSString *)nibOrClassName这个方法,返回cell对应的nib或者class的名称。
例如,你的cell是SettingCell,而你的cellModel不小心写成了MySettingCellModel,那么只需在MySettingCellModel.m中:
- (NSString *)nibOrClassName
{
    return NSStringFromClass([SettingCell class]);
}
第8轮 - 设置tablewview的header和footer
使用以下两个方法:UITableView+FKExtension
-(void) fk_configHeader:(nullable FKViewModel*) headerModel height:(CGFloat) height;
-(void) fk_configFooter:(FKViewModel*) footerModel height:(CGFloat) height;
这里的
FKViewModel您应该很熟悉,前面一直使用的是FKCellModel,它是继承自FKViewModel的。使用方式基本类似,此处不再赘述。
总结:
FKTableView依赖于FKTableCollectionExtensionBase,这是FKTableView和FKCollectionView公共功能的提取(如果我有时间,我会单独写一篇文章介绍FKCollectionView),FKTableCollectionExtensionBase中有一个类FKViewModel,它是FKTableView生存的基础。前面我们已经看到,我们的ViewController只与Model打交道(CellModel、SectionHeadFootModel、TableHeadFootModel等),尽管我们也创建了对应的Cell、SectionHeadFoot、TableHeadFoot等UIView的子类,但是我们并没有直接创建这些类的实例。这是基于FKViewModel类的nibOrClassName属性。
附注:
细心的人可能注意到了,前面一直没有提到关于cell高度的介绍,这是因为我们基于iOS自带的自动布局来计算cell的高度,也就是说在xib、storyboard或Masonry中布局cell时,需要有一条从上到下的连贯约束,通过这条垂直的连贯约束,cell会被自动“撑高”到合适的高度。
此外,FKTableView同时支持使用xib和纯代码来编写Cell和View。本文仅提供了纯代码的方式,xib的方式请参考工程代码。遇到问题的朋友可以提出issue,如果您喜欢的话,请给小星标,谢谢。