Euromsg


示例
要运行示例项目,请克隆仓库,然后从根目录打开 Euromsg.xcworkspace 文件。
要求
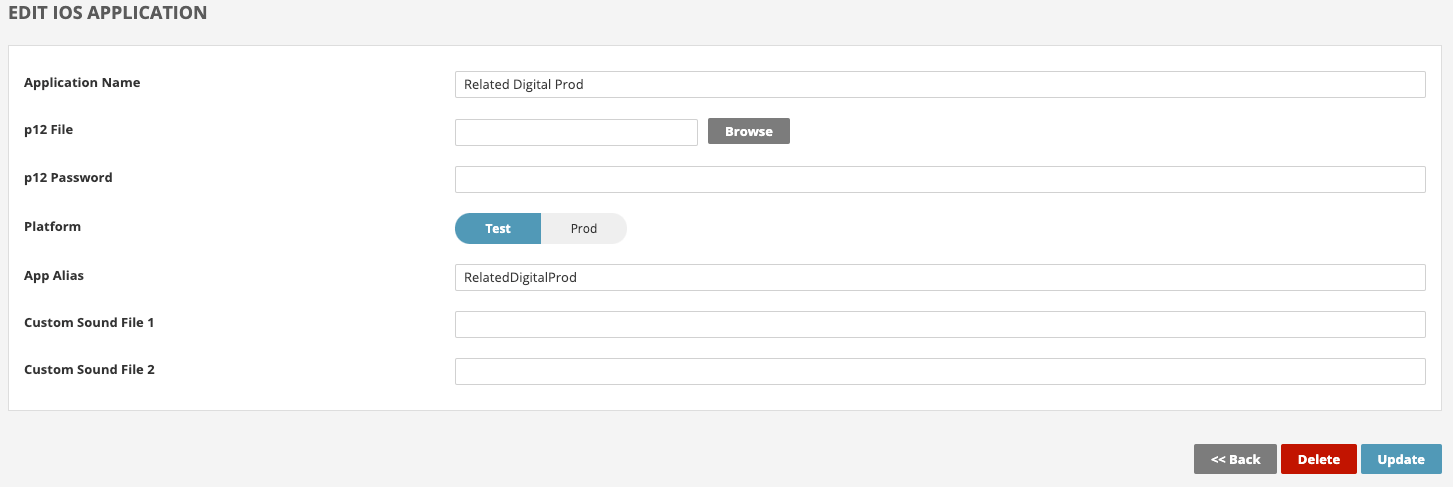
您只需要 App Alias,您可以通过 RMC Panel 获取。
安装
Euromsg可以通过CocoaPods获得。要安装它,只需将以下行添加到您的Podfile中
pod 'Euromsg'将应用程序添加到RMC面板
首先,从RMC面板创建您的应用程序。App Alias部分应该是您独有的。RMC基于此值进行区分。
使用方法
添加通知服务扩展
NotificationServiceExtension可以让您的iOS应用程序接收包含图片、按钮和徽章的丰富通知。对于Euromessage的分析功能也是必需的。
-
在Xcode菜单中选择文件 > 新建 > 目标...
-
选择通知服务扩展,然后按下一步。
-
将产品名称输入为NotificationService,然后按完成。
-
在选择完成之后不要在选择对话框中选择激活。
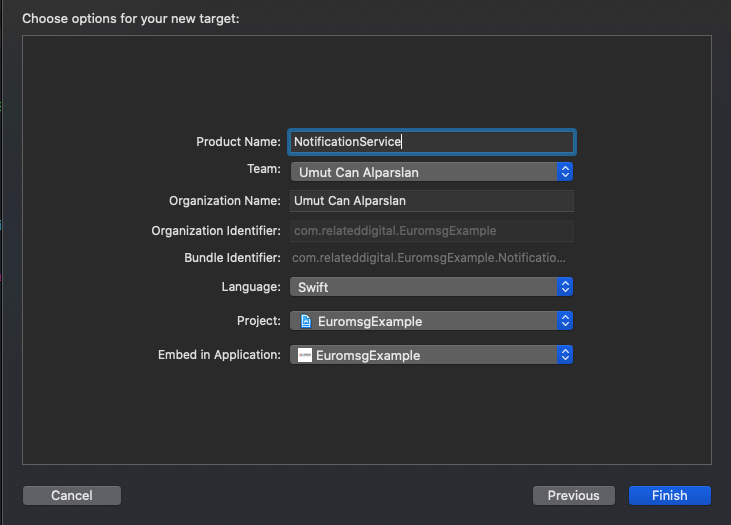
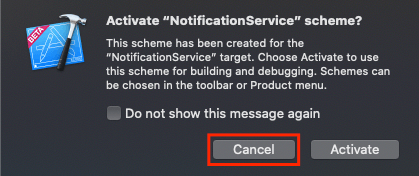
通过取消选择,您将保持Xcode调试您的应用程序,而不是刚刚创建的扩展。
如果您意外激活,可以在Xcode中切换回调试您的应用程序(在播放按钮旁边)。
- 在项目导航器中,选择顶级项目目录,然后在项目目标和列表中选择NotificationService目标。除非您有特定的理由不要,您应该设置部署目标为iOS 11。

- 打开 NotificationService.swift 文件,并将整个文件的代码替换为以下内容。
import UserNotifications
import Euromsg

class NotificationService: UNNotificationServiceExtension {

    var contentHandler: ((UNNotificationContent) -> Void)?
    var bestAttemptContent: UNMutableNotificationContent?

    override func didReceive(_ request: UNNotificationRequest, withContentHandler contentHandler: @escaping (UNNotificationContent) -> Void) {
        self.contentHandler = contentHandler
        bestAttemptContent = (request.content.mutableCopy() as? UNMutableNotificationContent)
        Euromsg.configure(appAlias: "YOUR_APP_ALIAS", enableLog: true)
        Euromsg.didReceive(bestAttemptContent, withContentHandler: contentHandler)
    }

    override func serviceExtensionTimeWillExpire() {
        guard let contentHandler = self.contentHandler else {
            return;
        }
        guard let bestAttemptContent = self.bestAttemptContent else {
            return;
        }
        contentHandler(bestAttemptContent)
    }

}
在这一步,忽略任何构建错误,第 2 步将导入 Euromessage,将解决任何错误。
如果您已经将 Euromessage 库添加到您的项目中,只需添加 NotificationServiceExtension 部分。
添加通知内容扩展
注意:如果您要使用轮播推送,则需要添加此内容。
-
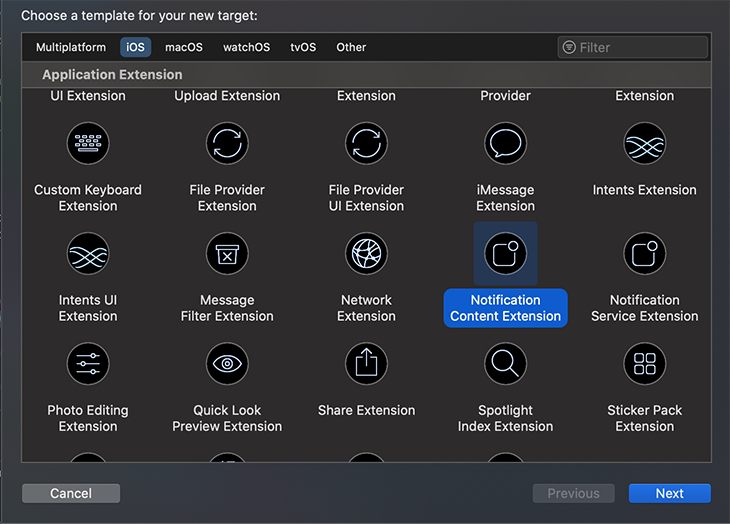
在Xcode菜单中选择文件 > 新建 > 目标...
-
选择通知内容扩展,然后按下一步。
-
将产品名称输入为 NotificationContent 并按完成。
-
在选择完成之后不要在选择对话框中选择激活。
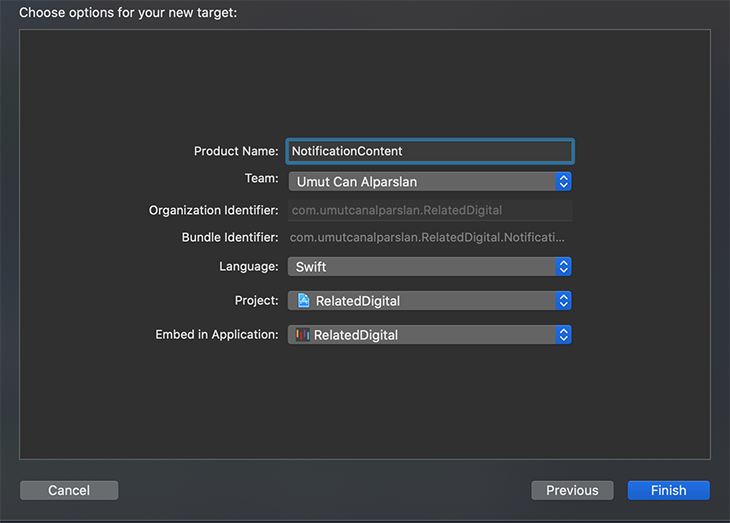
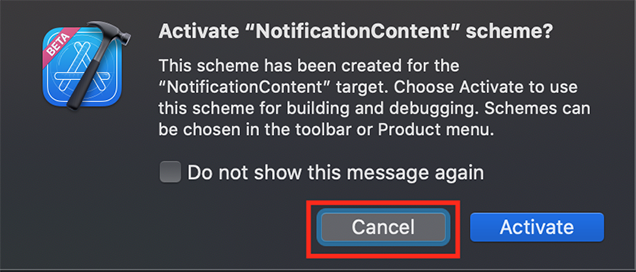
通过取消选择,您将保持Xcode调试您的应用程序,而不是刚刚创建的扩展。
如果您意外激活,可以在Xcode中切换回调试您的应用程序(在播放按钮旁边)。
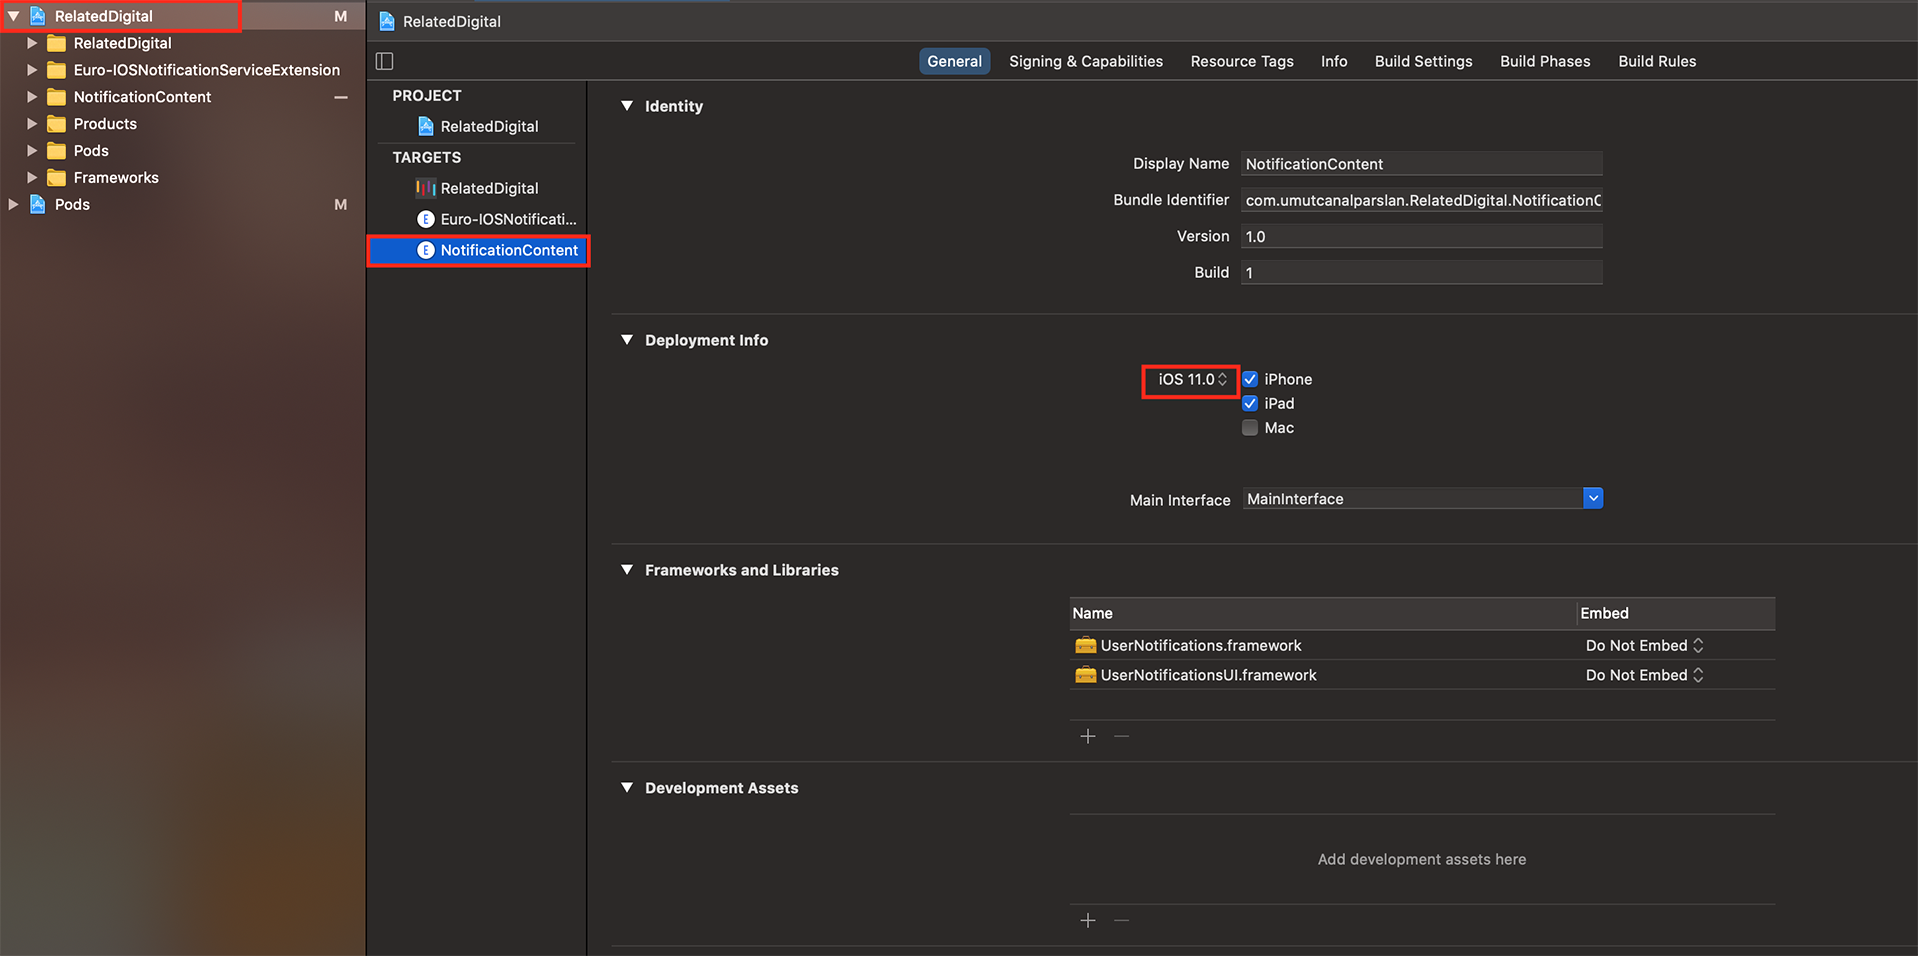
- 在项目导航器中,选择顶级项目目录,并在项目目标和列表中选中 NotificationContent 目标。除非您有特殊原因不这样做,否则您应该将部署目标设置为 iOS 11。
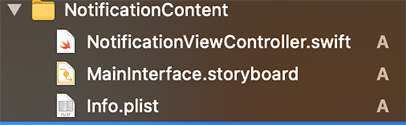
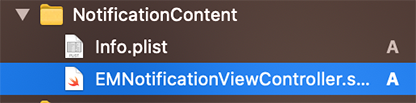
- 删除 MainInterface.storyboard 和 NotificationContent.swift 文件。然后在 NotificationContent 文件夹下创建一个名为 EMNotificationViewController 的 swift 文件。
不要创建 Objective-C 桥接头
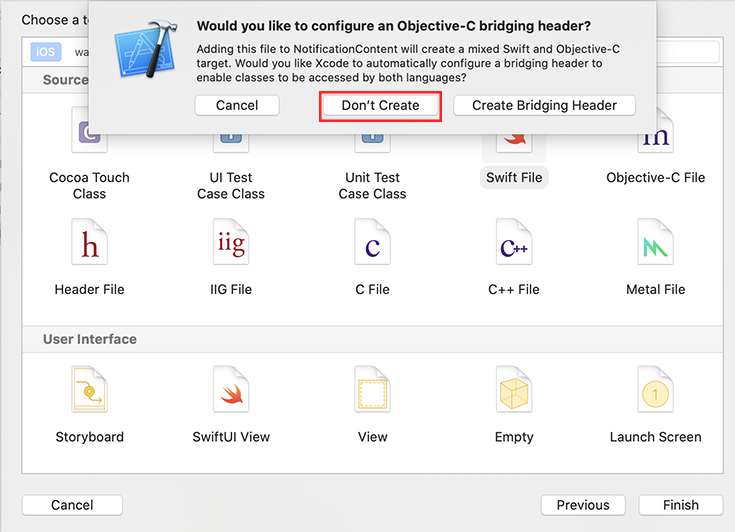
- 打开 EMNotificationViewController.swift 文件,并将整个文件的代码替换为以下内容。
import UIKit
import UserNotifications
import UserNotificationsUI
import Euromsg

@objc(EMNotificationViewController)
class EMNotificationViewController: UIViewController, UNNotificationContentExtension {

    let carouselView = EMNotificationCarousel.initView()
    var completion: ((_ url: URL?, _ bestAttemptContent: UNMutableNotificationContent?) -> Void)?

    var notificationRequestIdentifier = ""

    func didReceive(_ notification: UNNotification) {
        notificationRequestIdentifier = notification.request.identifier
        Euromsg.configure(appAlias: "EuromsgIOSTest", launchOptions: nil, enableLog: true)
        carouselView.didReceive(notification)
    }
    func didReceive(_ response: UNNotificationResponse, completionHandler completion: @escaping (UNNotificationContentExtensionResponseOption) -> Void) {
        carouselView.didReceive(response, completionHandler: completion)

    }
    override func loadView() {
        completion = { [weak self] url, bestAttemptContent in
            if let identifier = self?.notificationRequestIdentifier {
                UNUserNotificationCenter.current().removeDeliveredNotifications(withIdentifiers: [identifier])
                UNUserNotificationCenter.current().getDeliveredNotifications(completionHandler: { notifications in
                    bestAttemptContent?.badge =  NSNumber(value: notifications.count)
                })
            }
            if let url = url {
                if #available(iOSApplicationExtension 12.0, *) {
                    self?.extensionContext?.dismissNotificationContentExtension()
                }
                self?.extensionContext?.open(url)
            } else {
                if #available(iOSApplicationExtension 12.0, *) {
                    self?.extensionContext?.performNotificationDefaultAction()
                }
            }
        }
        carouselView.completion = completion
        carouselView.delegate = self
        self.view = carouselView
    }
}

/**
 Add if you want to track which carousel element has been selected
 */
extension EMNotificationViewController: CarouselDelegate {

    func selectedItem(_ element: EMMessage.Element) {
        // Add your work...
        print("Selected element is => \(element)")
    }

}
更新 NotificationContent 和 NotificationService 的 podfile 如下,并在终端中再次输入 pod install 并按回车键。
target 'project_name' do
  #only add below line
  pod 'Euromsg'
end

target 'NotificationService' do
  #only add below line
  pod 'Euromsg'
end

target 'NotificationContent' do
  #only add below line
  pod 'Euromsg'
end
应用组
为您的目标启用 App Groups 功能。App Groups 允许应用程序在接收到通知时执行代码,即使应用程序不是活动的。这是Required Digital的分析功能以及存储和访问过去30天的通知有效载荷所必需的。
- 在主应用程序目标中,转到
签名与功能 > 所有。 - 如果您应用中还没有App Groups,请点击
+ 功能。 - 选择App Groups。
- 在App Groups下点击
+按钮。 - 将
App Groups容器设置为group.BUNDLE_ID.relateddigital,其中BUNDLE_ID与Bundle Identifier中设置的相同。 - 点击确定。
- 在NotificationServiceExtension目标中
- 转到
签名与功能 > 所有 - 如果您应用中还没有App Groups,请点击
+ 功能。 - 选择App Groups
- 在NotificationContentExtension目标下,转到
签名与功能 > 所有。 - 点击
+ 功能。 - 选择App Groups
- 在App Groups下点击
+按钮。 - 将
App Groups容器设置为group.BUNDLE_ID.relateddigital,其中BUNDLE_ID与主应用程序目标的Bundle Identifier相同。不要包括NotificationServiceExtension和NotificationContentExtension。 - 点击确定


AppDelegate.swift
首先导入Euromsg和UserNotifications
import Euromsg
import UserNotifications
在AppDelegate类部分添加UNUserNotificationCenterDelegate。
class AppDelegate: UIResponder, UIApplicationDelegate, UNUserNotificationCenterDelegate
在didFinishLaunchingWithOptions下添加所需的代码。
临时推送
要使用临时推送获取权限,请在didFinishLaunchingWithOptions下添加以下代码。只有iOS 12或更高版本兼容临时推送。使用较低版本的人,请使用askForNotificationPermissionProvisional函数作为askForNotificationPermission。
func application(_ application: UIApplication, didFinishLaunchingWithOptions launchOptions: [UIApplication.LaunchOptionsKey: Any]?) -> Bool {

        UNUserNotificationCenter.current().delegate = self

        Euromsg.configure(appAlias: "YOUR_APP_ALIAS", launchOptions: launchOptions, enableLog: true, appGroupsKey: "group.YOUR_BUNDLE_ID.relateddigital", deliveredBadge: false)
        Euromsg.registerForPushNotifications()
        Euromsg.askForNotificationPermissionProvisional()
        if #available(iOS 13, *) {
            // handle push for iOS 13 and later in sceneDelegate
        }
        else if let userInfo = launchOptions?[UIApplication.LaunchOptionsKey.remoteNotification] as? [String: Any] {
            Euromsg.handlePush(pushDictionary: userInfo)
        }
        return true
    }
如果您不想使用临时推送,请在didFinishLaunchingWithOptions下添加以下代码。
func application(_ application: UIApplication, didFinishLaunchingWithOptions launchOptions: [UIApplication.LaunchOptionsKey: Any]?) -> Bool {

        UNUserNotificationCenter.current().delegate = self

        Euromsg.configure(appAlias: "YOUR_APP_ALIAS", launchOptions: launchOptions, enableLog: true, appGroupsKey: "group.YOUR_BUNDLE_ID.relateddigital", deliveredBadge: false)
        Euromsg.registerForPushNotifications()
        Euromsg.askForNotificationPermission()
        if #available(iOS 13, *) {
            // handle push for iOS 13 and later in sceneDelegate
        }
        else if let userInfo = launchOptions?[UIApplication.LaunchOptionsKey.remoteNotification] as? [String: Any] {
            Euromsg.handlePush(pushDictionary: userInfo)
        }
        return true
    }
用户必须同意接收推送消息。如果用户接受且设备已成功注册到APNS,则AppDelegate中会调用以下方法
func application(_ application: UIApplication, didRegisterForRemoteNotificationsWithDeviceToken deviceToken: Data) {
        Euromsg.registerToken(tokenData: deviceToken)
    }
为了使推送报告反映在RMC上,您需要添加以下功能。
 func application(_ application: UIApplication,
                     didReceiveRemoteNotification userInfo: [AnyHashable : Any]) {
        Euromsg.handlePush(pushDictionary: userInfo)
    }

    func application(_ application: UIApplication,
                     didReceiveRemoteNotification userInfo: [AnyHashable : Any],
                     fetchCompletionHandler completionHandler: @escaping (UIBackgroundFetchResult) -> Void) {
        Euromsg.handlePush(pushDictionary: userInfo)
    }

    func userNotificationCenter(_ center: UNUserNotificationCenter,
                                willPresent notification: UNNotification,
                                withCompletionHandler completionHandler: @escaping (UNNotificationPresentationOptions) -> Void) {
        completionHandler([.alert, .badge, .sound])
    }

    func userNotificationCenter(_ center: UNUserNotificationCenter,
                                didReceive response: UNNotificationResponse,
                                withCompletionHandler completionHandler: @escaping () -> Void) {
        Euromsg.handlePush(pushDictionary: response.notification.request.content.userInfo)
        completionHandler()
    }
SceneDelegate.swift
func scene(_ scene: UIScene, willConnectTo session: UISceneSession, options connectionOptions: UIScene.ConnectionOptions) {
        // Use this method to optionally configure and attach the UIWindow `window` to the provided UIWindowScene `scene`.
        // If using a storyboard, the `window` property will automatically be initialized and attached to the scene.
        // This delegate does not imply the connecting scene or session are new (see `application:configurationForConnectingSceneSession` instead).
        guard let _ = (scene as? UIWindowScene) else { return }

        if #available(iOS 13, *),
            let userInfo = connectionOptions.notificationResponse?.notification.request.content.userInfo {
            Euromsg.handlePush(pushDictionary: userInfo)
        }
    }
向RMC发送信息
当用户成功登录、注册以及应用程序首次打开时,运行以下代码。
提示:根据账户的参考,需要使用setEuroUserId或setEmail函数之一。
Euromsg.setEmail(email: "[email protected]", permission: true)
Euromsg.setEuroUserId(userKey: "1234567890")
Euromsg.sync()
可选参数
setUserProperty: 填充用户人口统计字段
setAppVersion: 您可以根据用户使用的版本进行分段。
checkConfiguration: 您可以检查用户的权限状态
setPushNotification, setEmail, setPhoneNumber: 您可以设置用户的权限状态。
Euromsg.setUserProperty(key: "Key", value: "Value")
Euromsg.setAppVersion(appVersion: "1.0.0")
let conf = Euromsg.checkConfiguration()
conf.properties?.pushPermit
conf.properties?.emailPermit
conf.properties?.gsmPermit
Euromsg.setPushNotification(permission: true)
Euromsg.setEmail(permission: true)
Euromsg.setPhoneNumber(permission: true)
通过IYS注册电子邮件
要注册IYS电子邮件;
Euromsg.registerEmail(email: "[email protected]", permission: true)
//You can also call TICARI account as following
Euromsg.registerEmail(email: "[email protected], permission: True, isCommercial: true)要更新用户的同意,调用此方法。如果请求由于任何原因失败,可以在didFailRegister处处理。
作者
[email protected], [email protected], [email protected], [email protected]
许可协议
Euromsg 可以在 MIT 许可协议 之下使用。更多信息请查看 LICENSE 文件。