Euro-IOS


示例
要运行示例项目,请克隆仓库,然后在 Example 目录中首先运行 `pod install`
需求
安装
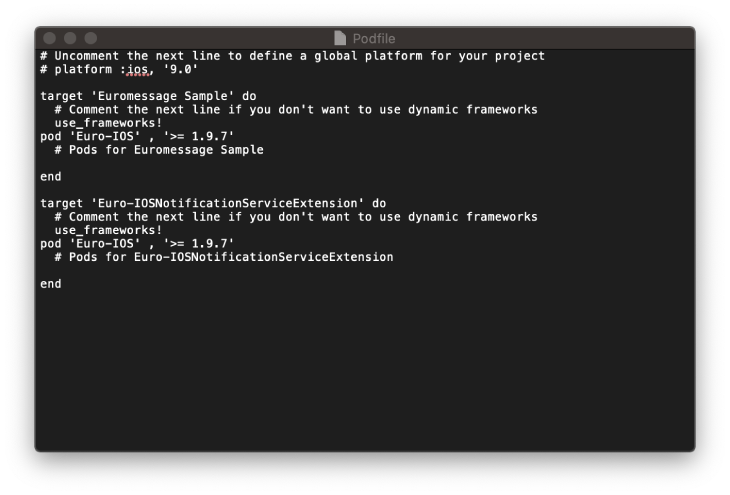
Euro-IOS 可通过 CocoaPods 获取。要安装它,只需将以下行添加到您的 Podfile 中
pod 'Euro-IOS', '>= 1.9.12'添加通知服务扩展
欧式-IOSNotificationServiceExtension 允许您的iOS应用接收带有图像、按钮和徽章的丰富通知。它也是Euromessage分析特性的必需品。
-
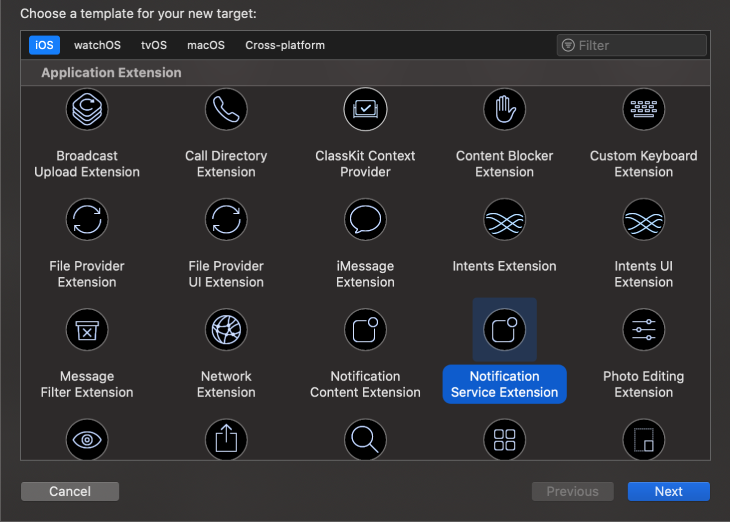
在 Xcode 文件 > 新建 > 目标...
-
选择通知服务扩展然后按下一步。
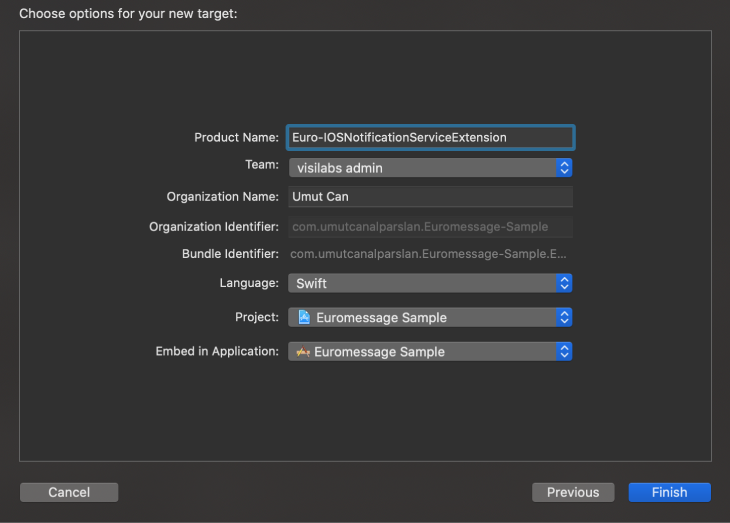
- 将产品名称输入为 Euro-IOSNotificationServiceExtension 并按完成。
在选择完成后,不要选择激活。
- 在激活方案提示中按取消。
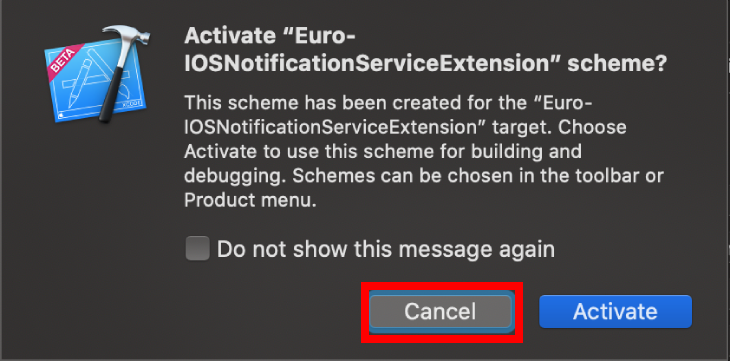
通过取消,您让Xcode继续调试您的应用,而不是您刚刚创建的扩展。
如果您不小心激活了,可以在Xcode中切换回调试您的应用(在播放按钮旁边)。
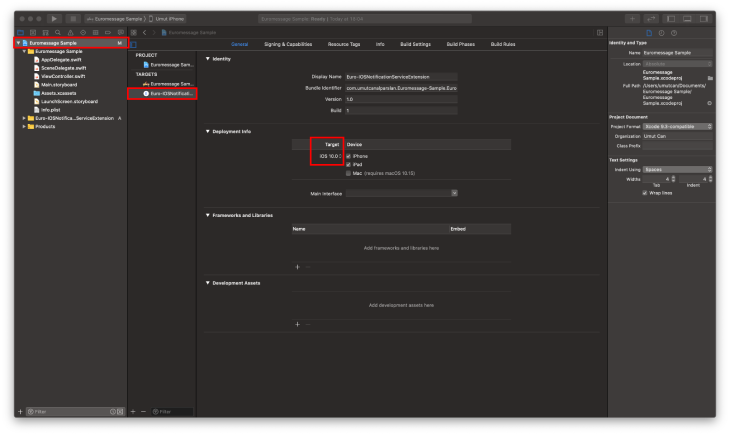
- 在项目导航器中,选择顶级项目目录,然后选中项目中的“Euro-IOSNotificationServiceExtension”目标。
除非您有特定原因不这样做,您应该将部署目标设置为iOS 10。
- 打开 NotificationService.swift 并将整个文件的内容替换为以下代码。
import UserNotifications
import Euro_IOS

class NotificationService: UNNotificationServiceExtension {
    var contentHandler: ((UNNotificationContent) -> Void)?
    var bestAttemptContent: UNMutableNotificationContent?

    override func didReceive(_ request: UNNotificationRequest, withContentHandler contentHandler: @escaping (UNNotificationContent) -> Void) {
        self.contentHandler = contentHandler
        bestAttemptContent = (request.content.mutableCopy() as? UNMutableNotificationContent)
        EuroManager.didReceive(bestAttemptContent, withContentHandler: contentHandler)
    }

    override func serviceExtensionTimeWillExpire() {
        // Called just before the extension will be terminated by the system.
        // Use this as an opportunity to deliver your "best attempt" at modified content, otherwise the original push payload will be used.
        if let contentHandler = contentHandler, let bestAttemptContent = bestAttemptContent {
            EuroManager.didReceive(bestAttemptContent, withContentHandler: contentHandler)
        }
    }
}
暂时忽略任何构建错误,步骤2将导入Euromessage,这将解决任何错误。
如果您已经将Euromessage库添加到您的项目中,只需添加Euro-IOSNotificationServiceExtension节。
将此代码添加到 didFinishLaunchingWithOptions 之下。
func application(_ application: UIApplication, didRegisterForRemoteNotificationsWithDeviceToken deviceToken: Data) {
    EuroManager.sharedManager("EuromsgTest")?.registerForPush()
   }
用户必须接受接收推送消息。如果用户接受,并且设备成功注册到APNS,则在AppDelegate中调用以下方法
func application(_ application: UIApplication, didRegisterForRemoteNotificationsWithDeviceToken deviceToken: Data) {
        EuroManager.sharedManager("EuromsgTest").registerToken(deviceToken)
    }
在 APPLICATION:DIDREGISTERFORREMOTENOTIFICATIONSWITHDEVICETOKEN: 方法中,deviceToken变量是APNS生成的令牌。在收到此令牌后,在EuroManager中调用 registerToken 方法。此令牌值必须在RMC系统中记录,以便发送消息。在示例中,EuromsgTest 值是由RMC为您的应用提供的代码。
提示:根据您账户的参考资料,需要一个setUserKey或setUserEmail函数。您还必须在登录和注册期间调用以下代码。
func application(_ application: UIApplication, didRegisterForRemoteNotificationsWithDeviceToken deviceToken: Data) {
        EuroManager.sharedManager("EuromsgTest").registerToken(deviceToken)
        EuroManager.sharedManager("EuromsgTest")?.setUserKey("1234567890")
EuroManager.sharedManager("EuromsgTest")?.setUserEmail("[email protected]")
EuroManager.sharedManager("EuromsgTest")?.synchronize()
    }
如果收到推送通知,将调用 application:didReceiveRemoteNotification 方法。传入的消息内容应提供给EuroManager实例中的 handlePush 方法。这可以用于发送推送打开信息。
func application(_ application: UIApplication, didReceiveRemoteNotification userInfo: [AnyHashable : Any], fetchCompletionHandler completionHandler: @escaping (UIBackgroundFetchResult) -> Void) {
        EuroManager.sharedManager("EuromsgTest")?.handlePush(userInfo)
    }
IYS 电子邮件注册
注册IYS电子邮件
let success: (() -> Void)? = {
    print("registerEmail sucess")
}

let failure: ((String?) -> Void)? = { message in
    print("registerEmail failure")
    print("\(message ?? "")")
}

EuroManager.sharedManager("EuromsgTest")?.registerEmail("[email protected]", emailPermit: trur, isCommercial: false, success: success, failure: failure)
作者
[email protected], [email protected], [email protected]
许可证
Euro-IOS 基于 MIT 许可证提供。有关更多信息,请参阅 LICENSE 文件。