

Align为Auto Layout的锚点提供了更好的替代方案。
- 语义化。Align API集中关注您的目标,而不是Auto Layout约束背后的数学。
- 强大的。通过一行代码创建多个约束。
- 类型安全。在编译时确保无法创建无效的约束。
- 流畅的。遵循Swift API设计指南的简洁明了的API。
- 简单。无需担心
translatesAutoresizingMaskIntoConstraints和约束激活。
为了展示语义API的样子,以下是一个示例
view.anchors.edges.pin(insets: 20, alignment: .center)
入门
整个库仅包含一个文件,约300行代码。如果您想用,可以直接将它拖到您的应用中。如果您需要更多安装选项,请参阅安装指南。
简介
锚点(Anchor<Type, Axis)代表了视图的布局属性,包括边缘、尺寸、轴和基准线。您可以使用锚点来创建约束。Align API位于以下象限

核心API允许您通过设置一个或多个锚点之间的关系来创建约束,这些API与NSLayoutAnchor提供的类似。语义API是一个高级API,专注于您的目标,例如将边缘固定到容器、对齐视图、设置视图之间的间距等。
这两类API都旨在使用Xcode代码补全轻松发现。同时,还有一个速查表,以及位于此README中的图文指南。
锚点
核心API
// Align two views along one of the edges
a.anchors.leading.equal(b.anchors.leading)

// Other options are available:
// a.anchors.leading.greaterThanOrEqual(b.anchors.leading)
// a.anchors.leading.greaterThanOrEqual(b.anchors.leading, constant: 10)

// Set height to the given value (CGFloat)
a.anchors.height.equal(30)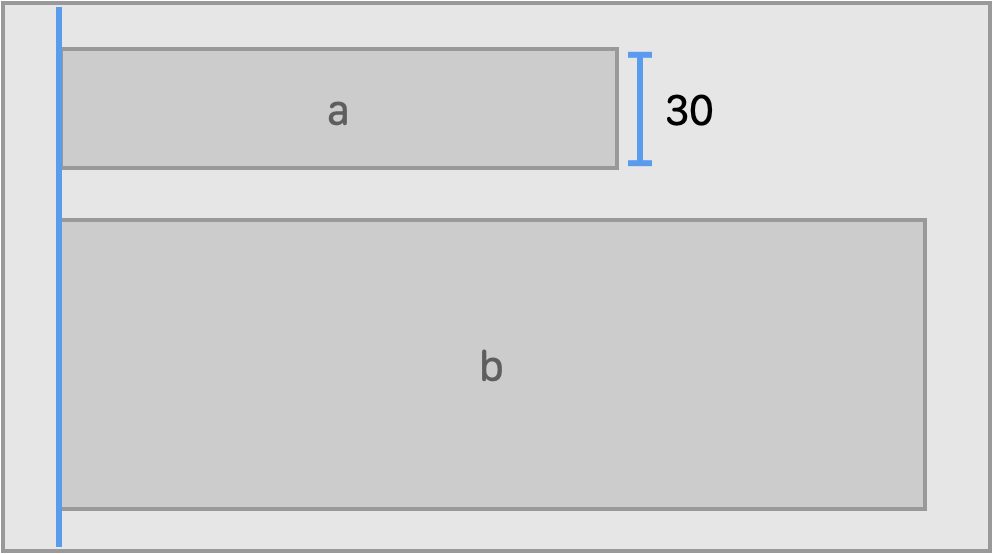
自动对齐会自动将 translatesAutoresizingMaskIntoConstraints 设置为 false,用于每个您通过它操作的视图,因此您不必再担心它。
自动对齐还会自动激活创建的约束。使用 (NSLayoutConstraint.active(_:) 通常比单独激活每个约束要有效一些。要利用此方法,请将您的代码包裹在 Constraint 初始化器中。
Constraints {
    // Create constraints in this closure
}
自动对齐具有完整的测试覆盖。如果您想了解每次调用其方法时 Align 创建了哪些约束(
NSLayoutConstraint),测试用例是一个很好的开始。
自动对齐还允许您偏移和乘以锚点。这是一个无需分配的轻量级操作。
// Offset one of the anchors, creating a "virtual" anchor
b.anchors.leading.equal(a.anchors.trailing + 20)

// Set aspect ratio for a view
b.anchors.height.equal(a.anchors.width * 2)
语义API
// Set spacing between two views
a.anchors.bottom.spacing(20, to: b.anchors.top)

// Pin an edge to the superview
a.anchors.trailing.pin(inset: 20)
Clamps the dimension of a view to the given limiting range.
a.anchors.width.clamp(to: 40...100)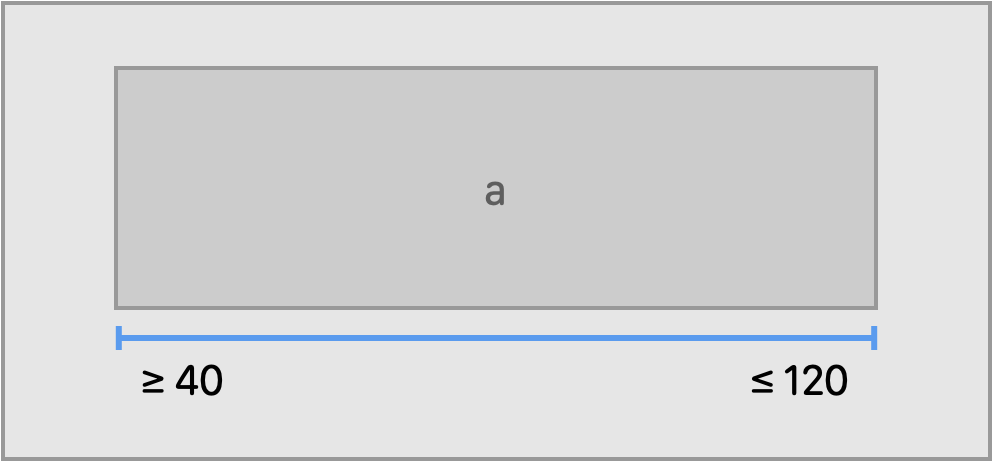
锚点集合
使用 Align,您可以在同时操纵多个边缘,一次创建多个约束。
边界
pin() 可能是 Align 中最强大和灵活的 API。
view.anchors.edges.pin(insets: 20)

// Same as the following:
view.anchors.edges.pin(
    to: view.superview!
    insets: EdgeInsets(top: 20, left: 20, bottom: 20, trailing: 20),
    alignment: .fill
)
默认情况下,pin() 方法会使边缘紧贴当前视图的父视图。但是,您可以选择任何目标视图或布局指南。
// Pin to superview
view.anchors.edges.pin()

// Pin to layout margins guide
view.anchors.edges.pin(to: container.layoutMarginsGuide)

// Pin to safe area
view.anchors.edges.pin(to: container.safeAreaLayoutGuide)
Align 还提供了一个方便的途径来访问布局指南的锚点:
view.anchors.safeArea.top。
默认情况下,pin() 用户使用 .fill 对齐。还有许多其他对齐方式可供选择(如果您结合所有可能的选项,共有 81 种)。
view.anchors.edges.pin(insets: 20, alignment: .center)
您可以在给定的轴上创建约束。
view.anchors.edges.pin(insets: 20, axis: .horizontal, alignment: .center)
或者将视图固定到角落。
view.anchors.edges.pin(insets: 20, alignment: .topLeading)
您可以通过提供垂直和水平组件来创建自定义对齐方式(请参阅 Alignment 类型)。
anchors.edges.pin(insets: 20, alignment: Alignment(vertical: .center, horizontal: .leading))
中心
a.anchors.center.align()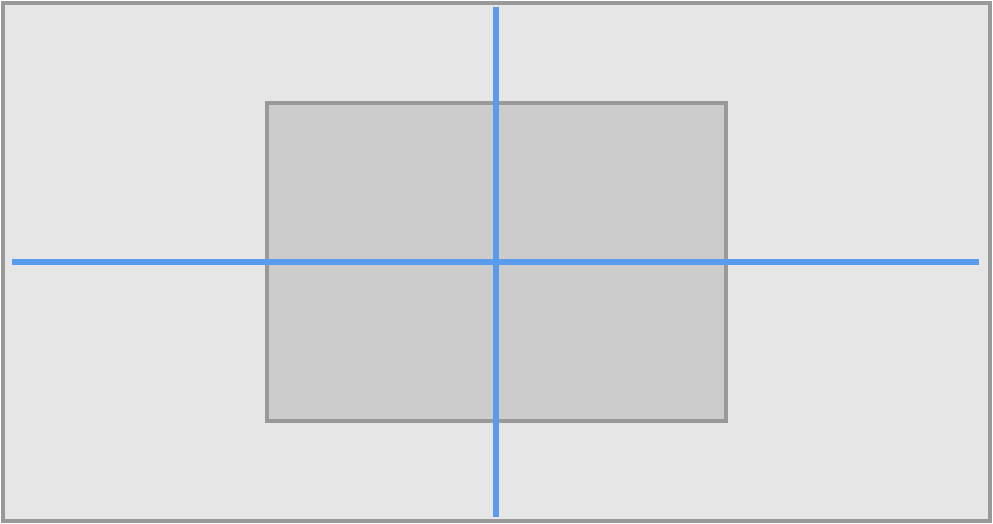
大小
a.anchors.size.equal(CGSize(width: 120, height: 40))大于等于和小于等于选项也可用

a.anchors.size.equal(b)
高级
默认情况下,Align 会自动激活创建的约束。使用 Constraints API,当您退出闭包时,会同时激活所有约束。这为您提供了一个修改约束 priority 的机会。
Constraints(for: title, subtitle) { title, subtitle in
    // Align one anchor with another
    subtitle.top.spacing(10, to: title.bottom + 10)

    // Manipulate dimensions
    title.width.equal(100)

    // Change a priority of constraints inside a group:
    subtitle.bottom.pin().priority = UILayoutPriority(999)
}
Constraints 还可以轻松访问 Align 锚点(注意,示例中没有 .anchors 调用)。而且,如果您不想激活约束,也有相应的选项。
Constraints(activate: false) {
    // Create your constraints here
}
快捷技巧

需求
| Align | Swift | Xcode | 平台 |
|---|---|---|---|
| Align 2.0 | Swift 5.1 | Xcode 11.0 | iOS 11.0 / tvOS 11.0 / macOS 10.13 |
| Align 1.1-1.2 | Swift 4.2 – 5.0 | Xcode 10.1 – 10.2 | iOS 10.0 / tvOS 10.0 |
| Align 1.0 | Swift 4.0 – 4.2 | Xcode 9.2 – 10.1 | iOS 9.0 / tvOS 9.0 |
为什么对齐
Align致力于清晰和简洁,遵循Swift API 设计指南。尽管大多数API都很简洁,但不是一个目标使语法尽可能简洁。
Align适合以下人群
- 偏好遵循Swift API 设计指南的流畅API
- 不想依赖于大型、复杂的库
- 不过度使用操作符重载,偏好快速编译时间
- 喜欢NSLayoutAnchor,但希望有更简单、更流畅的API,而且不需要手动激活约束