带有爱通知的AlertView 1.4
| 测试测试通过 | ✗ |
| 语言语言 | SwiftSwift |
| 许可 | MIT |
| 发布最新版本 | 2017年10月 |
| SwiftSwift 版本 | 4.0 |
| SPM支持 SPM | ✗ |
由 BoisneyPhilippe 维护。
带有爱通知的AlertView 1.4
- 作者:
- PhilippeBoisney
一个简单而吸引人的AlertView,用于**向用户请求推送通知权限**。
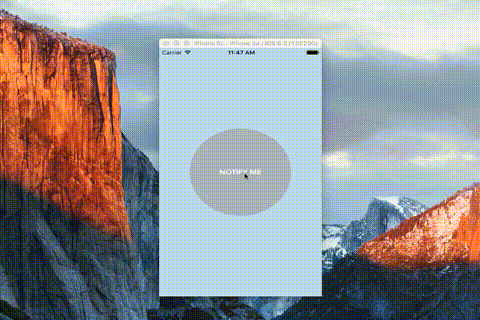
演示
请求推送通知权限非常重要。但是,原生的alertview太丑,常常意味着对用户来说是垃圾信息...
使用AlertViewLoveNotification,请求推送通知权限变得 既简单又美观。
所以试试看吧!
演示
安装
####CocoaPods
pod 'AlertViewLoveNotification'
手动安装
- 下载并将
AlertViewLoveNotification.swift文件拖放到您的项目中。 - 恭喜!
使用方法
//Simply call AlertViewLoveNotification...
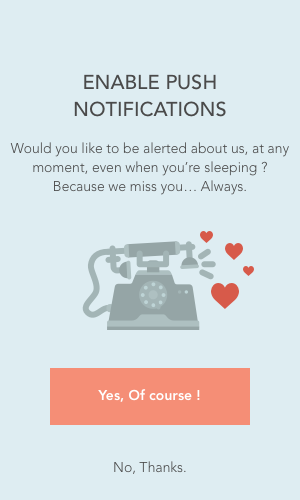
var alertView = AlertViewLoveNotification(imageName: "iconNotification", labelTitle: "ENABLE PUSH NOTIFICATIONS", labelDescription: "Would you like to be alerted about us, at any moment, even when you're sleeping ? Because we miss you... Always.", buttonYESTitle: "Yes, Of course !", buttonNOTitle: "No, sorry.")
//... and show it !
alertView.show()
//And maybe, if you want, you can hide it.
alertView.hide()
自定义
您必须在调用 show() 函数之前设置选项。
///Height of each view (Total of this height MUST be equal to 1)
self.alertView.heightOfButtonYes = 0.1
self.alertView.heightOfButtonNo = 0.1
self.alertView.heightSpaceBetweenViews = 0.05 ///There is 4 spaces
self.alertView.heightOfContenerForImage = 0.35
self.alertView.heightOfTitle = 0.1
self.alertView.heightOfDescription = 0.15

///Width of each view
self.alertView.widthOfImage = 0.9
self.alertView.widthOfTitle = 0.7
self.alertView.widthOfDescription = 0.9
self.alertView.widthForButtons = 0.8

self.alertView.heightOfImage = 0.7

///Colors of views
self.alertView.colorLabelTitle = UIColor(red:0.29, green:0.29, blue:0.29, alpha:1.0)
self.alertView.colorLabelDescription = UIColor(red:0.29, green:0.29, blue:0.29, alpha:1.0)

self.alertView.colorBackgroundAlertView = UIColor.redColor()

self.alertView.colorBacgroundButtonYes = UIColor(red:0.96, green:0.56, blue:0.46, alpha:1.0)
self.alertView.colorTextColorButtonYes = UIColor.whiteColor()

self.alertView.colorBacgroundButtonNO = UIColor.clearColor()
self.alertView.colorTextColorButtonNO = UIColor(red:0.29, green:0.29, blue:0.29, alpha:1.0)
功能
- 多设备全面支持
- 旋转支持
- 完全可定制
版本
1.4
作者
Philippe BOISNEY (phil.boisney(@)gmail.com)